Atomizer Cleaned ! Simple Cheap Effective Method.

Status
Not open for further replies.

crazyhorse

Super Member
ECF Veteran
Apr 17, 2009
575
6
Baja Alabama
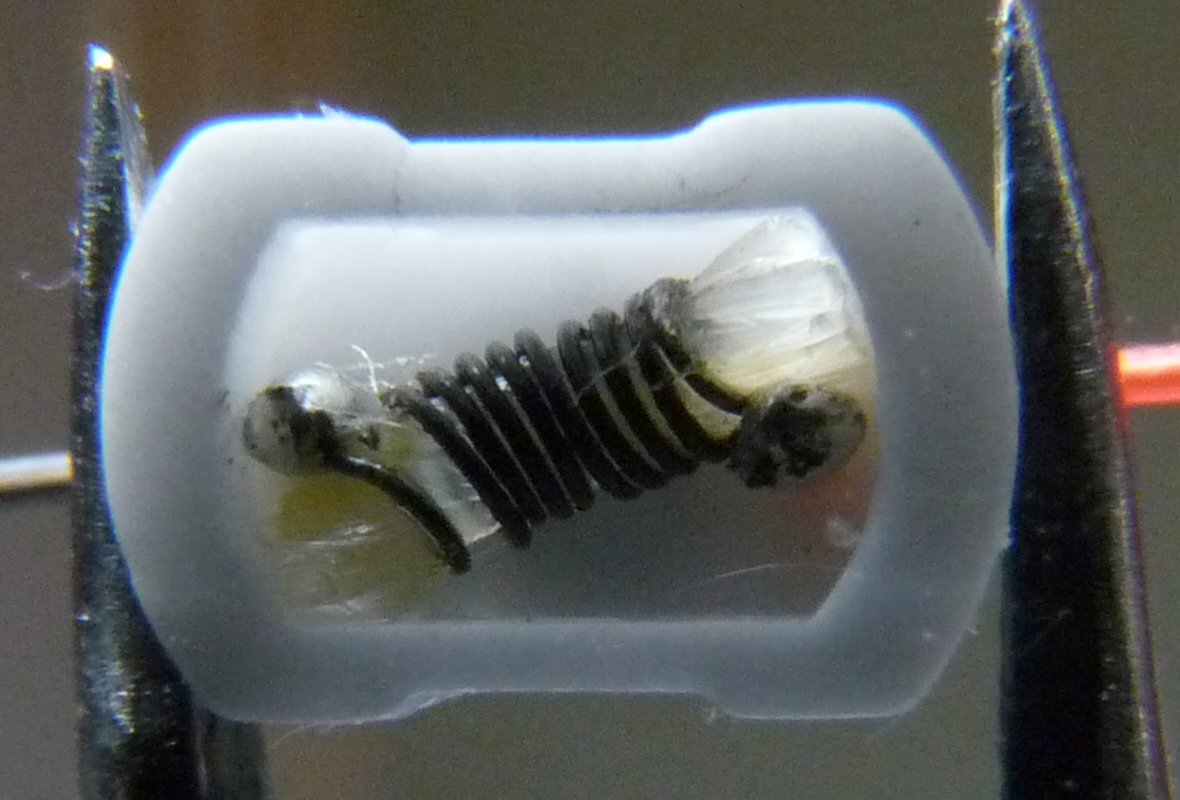
After using one 4-hole 801 atomizer continuously for a week, I find no evidence of any gunk whatsoever. When using various types of lighting and magnification for inspection purposes, I find this atomizer is as bright and shiny as brand new. The only maintenance it's had is draining a few times. It's been flooded once and initially I had to give it a shot of prime because it started out too dry for making good vapor.

I've using three flavors of 24 mg PG e-liquid stock (all from the same supplier) and vaping between 1 and 2 ml/day. I cut one ml to 6 mg strength, vaped one ml full strength and the rest was cut to 12 mg. All cutting was done with USP PG.

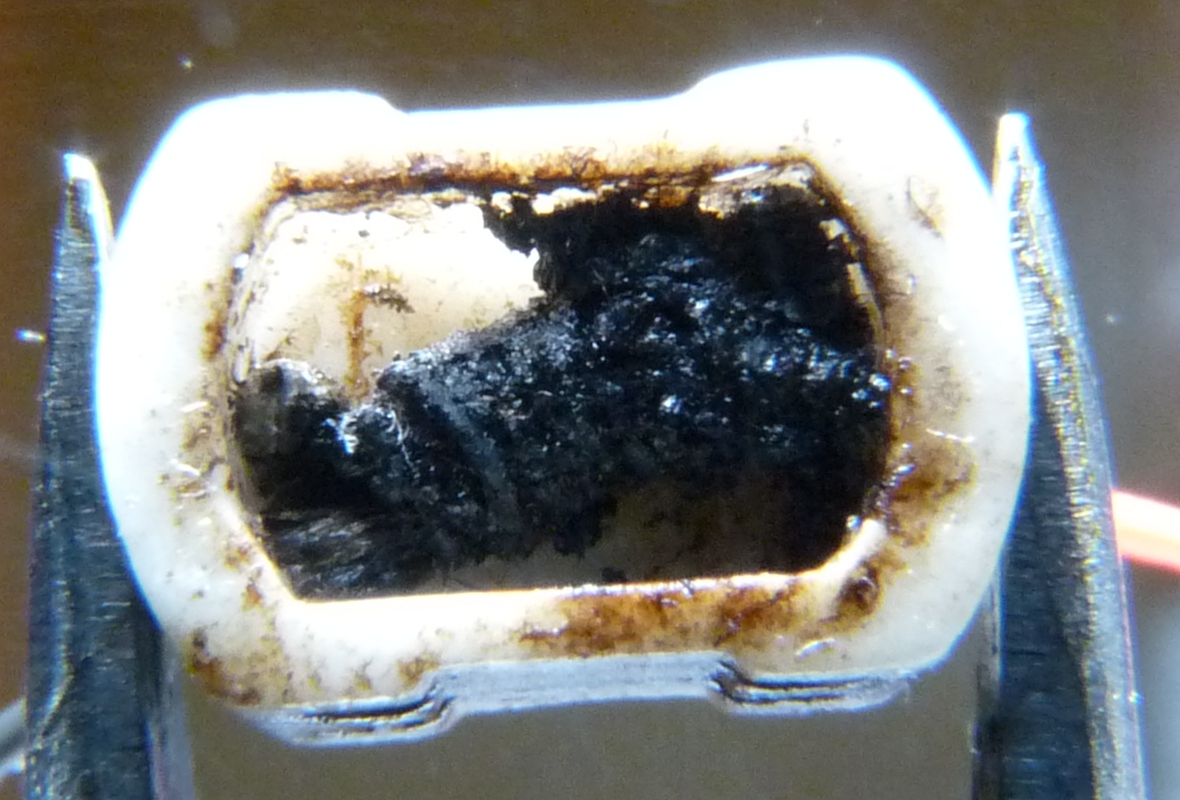
What's up with this? I thought these things were supposed get foul and be in need of a serious cleaning after a week.
 

crazyhorse

Super Member
ECF Veteran
Apr 17, 2009
575
6
Baja Alabama
Aha, complications.

Well, I've yet to find pics of 801 guts but I've seen pics of 901 innards, courtesy of Jaaxx who posted some in another thread. Still, I'm not too sure what the "coil" actually is. I see a steel mesh arch which I believe is called a bridge or wick. This is a part of a larger piece of the same material which encircles the inside of the cylinder and surrounds what appears to be a smaller white plastic cylinder. Inside of this inner cylinder I can see a solder dot where I assume a power lead connects to something. It looks like there's more steel below that.

Even with bright light and magnification, I still have old eyes but everything I can see, (and attempt to describe above) is bright and shiny, unstained in any way and looks identical to a brand new atomizer.

I do have a pretty fair macro camera that sees things I can never see so I'll play around with getting a downhole picture that may allow me to see a little deeper.
 

exogenesis

Super Member
ECF Veteran
Mar 1, 2009
877
16
UK
Any pictures yet crazyhorse?


Nash076 said:
Was very interested in you method of cleaning gunk from atomizers.
I wanted to ask you a few quick questions about how it's done,
so I've got it down when I go to try it with a "dead" atomizer:
 
1) I use a DSE 901.
I noticed you mentioned the power adapter you used was a 4.5v 1200ma unit.
I've found one cheaply that is strictly 4.5v, 1600ma;
would that be all right to use without harming the atomizer?
 
2) How long do you do the initial burn?
I saw the process of burning off the HO2O itself,
but before you drip that onto the atomizer,
how long do you burn the atomizer by itself?
 
3) My understanding of it so far is this:
Burn, Drip H2N0/NH3 solution onto atomizer, burn it off, repeat 3-4 times,
rinse with cold water, allow to dry.
Am I missing any steps?
 
Nash
 
 
1) The switchable voltage 3/4.5/5/6/9/12 V,
1200 mA current-limited unit I use may well
be quite close to the limit, without burning out the coil.
 
Just measured it on a new 901 atomiser that I had dissembled the other day:
 
 
At '3V' : 690 mA and 2.9 V actual : dullish orange glow
at '4.5V' : 1100 mA and 4.2 V actual, bright glow.
 
 
Repeated :
 
Cold

 
'3V' : 560 mA duller glow than before at 3V

 
'4.5V' : 910 mA, brightish glow.

 
'5.0V' : 1060 mA bright glow

 
'6.0V' : 1280 mA beginning to look like a light bulb filament, survived though.


Personally I wouldn't want to go any further.
i.e. my guess is your 1600 mA might well be too much if left on for more than
a fraction of a second.
- there's one way to find out I guess...
 
 
Also the trouble is every atomizer coil is probably slightly different,
due to manufacturing variances.
 
And the above figures seems to show that is might change somewhat,
after being over-heated anyway (at least after the first time).
 
 
2) The initial burn at '4.5V' is just until all the gunk is burnt off, usually
only takes a few seconds, but doesn't hurt to leave it glowing for more time,
at least at around 900 mA anyway.
 
3) The way I did my last cleaning batch was:
 
Heavy burn at 4.5V for a few to several seconds,
Then switch to 3V - not sure why, just seems a good idea,
maybe it'd be better to stick to 4.5V ?
 
Drip H2O2, fizz, till dry
(on the coil at least, the metal mesh is probably still wet & hot
- hence having to use a clamp to hold the atomiser)
repeat the last step a few times.
 
Rinse under tap thoroughly, soak in a large cup of water overnight,
rinse under tap again, blow out water, leave to drain, prime, use.


Happy Jack

Unregistered Supplier
ECF Veteran
Any pictures yet crazyhorse?


1) The switchable voltage 3/4.5/5/6/9/12 V,
1200 mA current-limited unit I use may well
be quite close to the limit, without burning out the coil.
 
Just measured it on a new 901 atomiser that I had dissembled the other day:
 
 
At '3V' : 690 mA and 2.9 V actual : dullish orange glow
at '4.5V' : 1100 mA and 4.2 V actual, bright glow.
 
 
Repeated :
 
Cold

 
'3V' : 560 mA duller glow than before at 3V

 
'4.5V' : 910 mA, brightish glow.

 
'5.0V' : 1060 mA bright glow

 
'6.0V' : 1280 mA beginning to look like a light bulb filament, survived though.


Personally I wouldn't want to go any further.
i.e. my guess is your 1600 mA might well be too much if left on for more than
a fraction of a second.
- there's one way to find out I guess...
 
 
Also the trouble is every atomizer coil is probably slightly different,
due to manufacturing variances.
 
And the above figures seems to show that is might change somewhat,
after being over-heated anyway (at least after the first time).
 
 
2) The initial burn at '4.5V' is just until all the gunk is burnt off, usually
only takes a few seconds, but doesn't hurt to leave it glowing for more time,
at least at around 900 mA anyway.
 
3) The way I did my last cleaning batch was:
 
Heavy burn at 4.5V for a few to several seconds,
Then switch to 3V - not sure why, just seems a good idea,
maybe it'd be better to stick to 4.5V ?
 
Drip H2O2, fizz, till dry
(on the coil at least, the metal mesh is probably still wet & hot
- hence having to use a clamp to hold the atomiser)
repeat the last step a few times.
 
Rinse under tap thoroughly, soak in a large cup of water overnight,
rinse under tap again, blow out water, leave to drain, prime, use.
 

Is that finally IT? THE IT? Like safe, repeatable, seems to work everytime? Wow!!!

There was a post with pics (or video) showing how to build a little device for this purpose from an old charger or something. Based on these numbers, any recommendations on good, inexpensive parts?

Nice work, Exo!!!
 

nash076

Senior Member
ECF Veteran
Apr 28, 2009
107
4
Thanks for the response.

I found a multi-volt 800ma charger while cleaning out some old electronics today. It's one of Radio Shack's modular units with multiple tips available. I'm thinking I could combine that, a momentary switch and a N Coaxial DC Jack with a component enclosure to make a "burn box."

Appreciate the research!

Nash
 

Happy Jack

Unregistered Supplier
ECF Veteran
Thanks for the response.

I found a multi-volt 800ma charger while cleaning out some old electronics today. It's one of Radio Shack's modular units with multiple tips available. I'm thinking I could combine that, a momentary switch and a N Coaxial DC Jack with a component enclosure to make a "burn box."

Appreciate the research!

Nash

That's the info I am anxiously awaiting. What would be the consensus for the optimum supplies to give optimum power for great price? I know nothing about electronics but I have a friend that could help me out once this solidifies...

SO excited!
 

nash076

Senior Member
ECF Veteran
Apr 28, 2009
107
4
That's the info I am anxiously awaiting. What would be the consensus for the optimum supplies to give optimum power for great price? I know nothing about electronics but I have a friend that could help me out once this solidifies...

SO excited!


Depends on what you consider the cheapest way, or the more durable way.

Cheaply done: Find an old 4.5v 800 to 1200ma AC adapter. Hack the tip off of it, wire in a momentary switch that'll handle the amps, solder on a connector from an old DSE 901 battery at the end, wrap the whole thing in shrink tubing and electrical tape.

Durable: Get a $3.00 component box, a $3.00 N Coaxial DC Jack (fits the atomizer threads perfectly and has solder leads on it), a $3.00 3 amp momentary switch, and (here's the part that's going to hurt) a $20 multivolt AC adapter from Radio Shack. The reason I say the $20 one is that it's the only one they have with 4.5v at 1200ma; the only other one they sell that's 4.5 volts is 1600ma. Also, get their "adaptaplug" component project tip . . . it's essentially one of their multiple AC adapter with nothing but contact leads on the end. You'll also need a drill, a phillips screwdriver, and some electrical tape or hot glue to make a quick easy wire grommet.

Drill three holes in the box: one to mount the N Coaxial jack, one to mount the switch, and one to run the lead back to your AC adapter. Mount the components, solder the positive lead of the AC adapter component project tip to one side of your switch, and a lead of wire to the solder point on the N Coaxial jack that feeds out to the center pin. The other lead from the project tip, the ground, should be soldered to one of the outside leads on the N coax jack; from there you'll also need to run either a small wire or a solder bridge to the sleeve of the jack. This'll secure your ground.

Once you've done that, you're golden. Screw on an atomizer; if it doesn't fire up (and you'll hear it if it does), check your wiring. If it works, go back into the box and wrap any exposed wiring with electrical tape, or maybe a dap of hot glue, and then screw the box closed. It's probably one of the simplest circuits there is to build, honestly.

Hope that helps,

Nash
 

crazyhorse

Super Member
ECF Veteran
Apr 17, 2009
575
6
Baja Alabama
Any pictures yet crazyhorse?

No, I couldn't get any pictures that were worthwhile.

I did soak/agitate the atomizer in a test tube of a denatured alcohol to see what would come out of invisible places. There was some goop. Now I'm trying to dry it so I can get a weight on the solids. Actually, I don't think it will dry. The alcohol is long gone and acetone won't dry it. The liquid that's remaining appears to be oils of smoking juice that ain't evaporating after a couple of days. Regardless, it appears the solids will be only a tiny fraction of a milligram.
 

exogenesis

Super Member
ECF Veteran
Mar 1, 2009
877
16
UK
Round Three : Testing the e-liquids ingredients seperately:part 2. Propylene Glycol

(Images are thumbnails, with bigger pictures if clicked)

Same test as for Glycerol:

http://www.e-cigarette-forum.com/fo...ple-cheap-effective-method-11.html#post215731

But using EuPh (same as USP) i.e. pure, Propylene Glycol
(and a 901 atomizer rather than a 510 atomizer)

New coil/wick versus after 28 ml PG vaped (over 3 days):


The one on the left is very dry, the right one is slightly damp with PG,
there's a slight 'browning' of the wick, and a tiny amount of gunk on the coil wire,


But nothing like the (relatively) huge deposit given with the same amount of glycerol:


What's the implication ?

Maybe have a look at :
http://www.e-cigarette-forum.com/forum/experiments-equipment/14359-decomposition-vg-acrolein.html
for a good scare story (with possibly true implications).

Or is it just that glycerol (VG) based e-liquids might gunk up your atomizer
quicker than propylene glycol (PG) ones.

Then again don't most PG e-lquids have say 5 to 20% glycerol content anyway ?

Also I think (know) that glycerol-only 'gunk' is a lot softer than that produced with a full e-liquid,
that has flavours and other stuff in it.

But still, does anyone make a VG-free PG based e-liquid ?
 
Last edited:
Exo -

No scare story, just science fact. There's still no alternative mechanism for the gunk from VG and we don't know how much noxious gases might be in the vapor as the gunk forms and degrades.

The very slight discoloration with PG might be mostly airborne dust (and perhaps a slight amount of burnt PG).

A test like these two, with a mix something like a typical mostly PG with some VG and no flavoring juice would be most informative.

As for flavourings, I suspect that resins in the dry residue are responsible for the harder deposit.

ps: what the PG atty easy to clean? How good did it look after?
 
Last edited:

exogenesis

Super Member
ECF Veteran
Mar 1, 2009
877
16
UK
Why be you intimidated Tallgirl1974 ?
nothing scary here (mostly).

If you mean you're worried about trying this 9%-content peroxide skin-disinfectant,
I can assure you it's pretty mild if dropped on the skin,
in fact I just poured a couple of palm-fulls and rubbed in into my hands,
great clean feeling :)

(However - abiding by the sensible forum everyone 'play-safe' rules,
be careful not to get it in your eyes)


Yes Kin. I know, just playing it with a lighter note.

That test is definately on the cards
(if I knew what a typical mix was exactly).

Resins? what resins ?
Do you mean ingredients turns to 'resin' as they gunk-up ?
 

crazyhorse

Super Member
ECF Veteran
Apr 17, 2009
575
6
Baja Alabama
Goop? like jelly or hard bits ?

What was the liquid you were vaping ?

Like tiny flecks of black carbon when it was in the alcohol. After the alcohol was gone and I tried to dry the leftovers with acetone, it turned brown with some green residue. I'm hoping it will eventually dry so I can get a weight and a good look at it with a scope. The amount and oiliness of this fluid mystifies me, especially since the atomizer was thoroughly drained before going into the alcohol.

The liquids were Virginia, Mocha and Cream Brulee from MVS and French Roast from Juicy. All 24 & 36 mg base and generally cut by half with PG from Paddock Labs.
 
Status
Not open for further replies.

Users who are viewing this thread