What the heck is the Puck SD? Well I had to travel out of town this week to San Diego so I wanted to create a small box (smaller than the original Puck.. which is here ) to carry with me and vape at the airports as I was traveling.
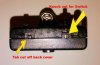
The night before I left, I threw this together in about an hour. It is still based on the exact parts used to create the Puck except for the push button switch which is a Radio shack 275-1571 and is still based on the 910 atomizer and using 4 AAA NiMH rechargable batteries you can buy at the grocery store. All parts are still all Radio shack parts.
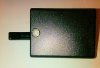
So I call it the Puck SD (San Diego) because that is what I built it for... the trip to SD. It's not the prettiest thing because I threw it together really fast and it uses JB Weld Putty to form a mount for the atomizer connector but it is functional, very small and kicks like a mule!
Anyway... I didn't have time to do a complete tutorial on it yet and it does take fitting some small parts into very small places but it is small. Really small.
You may get an idea on how to build it just by the pictures. Sorry, i used my camera phone at the hotel I'm staying at to take the photos but they're not too bad.
I might do a tutorial when I get back home next week. It's not that hard to build... just a bit tedious because parts have to be placed in exact positions to get them to fit correctly.
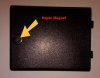
Also, a new feature created here can be also added to the original Puck. It's a magnetic back cover instead of having to slide off the old one.
I love this little thing and haven't put it down yet.
And now... the Puck SD...


Build yourself one and enjoy")
The night before I left, I threw this together in about an hour. It is still based on the exact parts used to create the Puck except for the push button switch which is a Radio shack 275-1571 and is still based on the 910 atomizer and using 4 AAA NiMH rechargable batteries you can buy at the grocery store. All parts are still all Radio shack parts.
So I call it the Puck SD (San Diego) because that is what I built it for... the trip to SD. It's not the prettiest thing because I threw it together really fast and it uses JB Weld Putty to form a mount for the atomizer connector but it is functional, very small and kicks like a mule!
Anyway... I didn't have time to do a complete tutorial on it yet and it does take fitting some small parts into very small places but it is small. Really small.
You may get an idea on how to build it just by the pictures. Sorry, i used my camera phone at the hotel I'm staying at to take the photos but they're not too bad.
I might do a tutorial when I get back home next week. It's not that hard to build... just a bit tedious because parts have to be placed in exact positions to get them to fit correctly.
Also, a new feature created here can be also added to the original Puck. It's a magnetic back cover instead of having to slide off the old one.
I love this little thing and haven't put it down yet.
And now... the Puck SD...
Build yourself one and enjoy