
You are using an out of date browser. It may not display this or other websites correctly.
You should upgrade or use an alternative browser.
You should upgrade or use an alternative browser.
KangerTech SUBTANK Mini
- Thread starter Vap0rnomics
- Start date
- th_trl_thread_readers 0
- Status
- Not open for further replies.
Couple months ago I traded an Aspire Quadflex kit for my first STM. Also got 2 rba PLUS and these 4 V1 RBAs. Hacked at with a Dremel. What do y'all think, useable? They look like leak city to me?

Couple months ago I traded an Aspire Quadflex kit for my first STM. Also got 2 rba PLUS and these 4 V1 RBAs. Hacked at with a Dremel. What do y'all think, useable? They look like leak city to me?
View attachment 673761
I'd be surprised if they didn't leak. Hopefully, I'm wrong![emoji4]
Yeah, luckily I don't really need 'em. Guess I'll throw 'em in the stash and hope I never get that desperate that I need to find out.I'd be surprised if they didn't leak. Hopefully, I'm wrong![emoji4]
Yeah, luckily I don't really need 'em. Guess I'll throw 'em in the stash and hope I never get that desperate that I need to find out.
Niice…you could drive a semi through those barn door j-holes. Whatya use, a chizzle? Looks more like the formula for the flash fry rather than the fast foggy boil. Just might need the four-banger cooktop and quad 20700's to stoke 'em tho. Seriously? Take a dremel to the base pin and bore 'em out to a 16th and horizontally (wiggle back and forth 'till almost 2x). That might just get you there. Then just hammer in whatever fused tangled shredded-wheat mess you have handy. Sorry for the mixed metaphors but there just ain't any one way to describe that.
Hey, good luck!


Last edited:
Wow! You psychic? Those were the exact thoughts that came to mind when I first saw them!Niice…you could drive a semi through those barn door j-holes. Whatya use, a chizzle? Looks more like the formula for the flash fry rather than the fast foggy boil. Just might need the four-banger cooktop and quad 20700's to stoke 'em tho. Seriously? Take a dremel to the base pin and bore 'em out to a 16th and horizontally (wiggle back and forth 'till almost 2x). That might just get you there. Then just hammer in whatever fused tangled shredded-wheat mess you have handy. Sorry for the mixed metaphors but there just ain't any one way to describe that.
Hey, good luck!

Wasn't me, my Dremel vanished into the nether regions of my garage years ago.
But thanx for confirming what I was only 97.2576% certain of already.
Well even a broken clock…Yep, Dremels are dangerous. Back of the woodshed's a good place for 'em.
Good luck.
Good luck.
My brother gave me one a while back and stupidly broke the glass and not thinking about it I tossed it. I just got a new one this week after learning my lesson. I almost had forgotten how the big the clouds are.
I've been building with the STM RBA for 2 years, and suddenly I'm getting the "No atomizer" warning. I switched out the STM base and the mod, but it only started working when I put in a factory-made atomizer. I checked the coil and it's not touching the base, and I don't see how it could be a short. I have back up RBAs, but I'm wondering - do the RBAs have a limited lifetime?
I've been building with the STM RBA for 2 years, and suddenly I'm getting the "No atomizer" warning. I switched out the STM base and the mod, but it only started working when I put in a factory-made atomizer. I checked the coil and it's not touching the base, and I don't see how it could be a short. I have back up RBAs, but I'm wondering - do the RBAs have a limited lifetime?
DC make sure the base pin is firmly pushed up once you screw in the fact coil. The coil assy pin may be off-spec and a bit short. HOWEVER…make sure the base's pin is not flush or flat to the neg threading (that could be a problem too). I've seen this with so called factory coils. Internally the coil assy pin must be long enough or screw in enough to contact the base at the bottom.
Good luck.
Thanks for the quick response. The factory coil works - it's my RBA that's giving me the error. Not sure what's going on as I'm not doing anything differently than I have for the last 2 years!DC make sure the base pin is firmly pushed up once you screw in the fact coil. The coil assy pin may be off-spec and a bit short. HOWEVER…make sure the base's pin is not flush or flat to the neg threading (that could be a problem too). I've seen this with so called factory coils. Internally the coil assy pin must be long enough or screw in enough to contact the base at the bottom.
Good luck.
Thanks for the quick response. The factory coil works - it's my RBA that's giving me the error. Not sure what's going on as I'm not doing anything differently than I have for the last 2 years!
Sorry misread. Check the insulator on that. It's the only thing that does go wonky (small cracks, gets brittle). I've had to replace a few in time that looked fine.
Kanger US still has them…Kanger Subtank Mini PEEK Insulator (Upgraded material) - Kanger World
Good luck.
p.s. I still rebuild these routinely.
Thank you! I've never really inspected the RBA that closely - how do you replace the insulator?
If you are looking for big hole case RBA. These clones have the large holes or at least the FT picture and the ones they sent me do. The base on them is crap but if you have the base from the small hole tank, the case fits fine on them.
$2.04 Replacement Rebuildable RBA Plus Coil Head for SUBTANK Mini Clearomizer - 0.5ohm at FastTech - Worldwide Free Shipping
Also if you want to boost the toptank on the amount of ejuice it holds this bubble glass fits. I ordered it for the coppervape skyline which it works well with but it also fits the toptank just fine too.
$1.73 Iwodevape Replacement Glass Tank for Aspire Cleito Clearomizer - authentic / 5ml at FastTech - Worldwide Free Shipping
Thank you! I've never really inspected the RBA that closely - how do you replace the insulator?
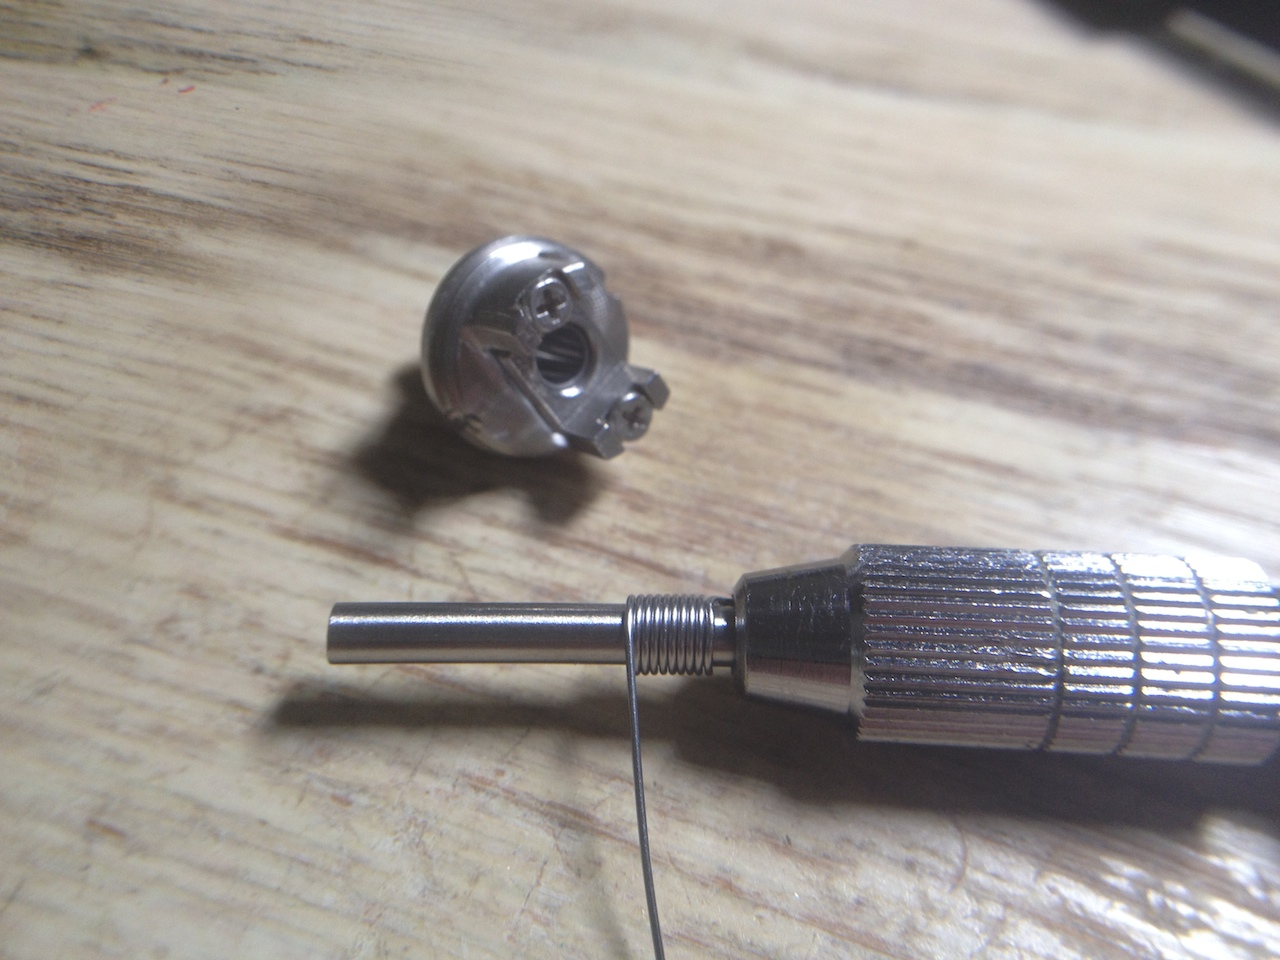
See the Hole on the End of the RBA Section...

If you put a Small Allen Wrench thru it, or a Drill Bit, you can turn it to Disassemble the RBA Section.
The hard part sometimes is Holding the RBA Section while you try to turn it. It can Help to grab the Deck Section across the Flat section with an Adjustable Wrench.

Stick your magic blue screwdriver in all the way thru the bottom pin and rotate it out counter-clockwise carefully. Threads are delicate. Then all the components on the deck float (free). Easy to relocate the replacement insulator as its end tab isolates the pos and neg posts. You can see it in the above pic at the base of the deck.
Good luck.
p.s. If what you got resembles the above, the insulator is incorrectly installed with the tab opposite of its correct location skewing the pos post at right. "Factory coils" are great aren't they?
Good luck.
p.s. If what you got resembles the above, the insulator is incorrectly installed with the tab opposite of its correct location skewing the pos post at right. "Factory coils" are great aren't they?
Last edited:
Merry Christmas [emoji319][emoji320] Everyone [emoji322]
Sent from my iPhone using Tapatalk
Sent from my iPhone using Tapatalk
Stick your magic blue screwdriver in all the way thru the bottom pin and rotate it out counter-clockwise carefully. Threads are delicate. Then all the components on the deck float (free). Easy to relocate the replacement insulator as its end tab isolates the pos and neg posts. You can see it in the above pic at the base of the deck.
Good luck.
p.s. If what you got resembles the above, the insulator is incorrectly installed with the tab opposite of its correct location skewing the pos post at right. "Factory coils" are great aren't they?
I began to take my RBA's apart and clean with every rewicking. I was getting burnt taste through the new build, that was from dryburn bits going down into the airflow tube that water doesn't wash out. I do agree the threads are weak and only a couple threads holding it all together. I remove the old build, take the RBA to bits, clean with alcohol and put the coil back into place and no taste. I have broken(not striped) one RBA so far in the almost couple years I've been taking them apart. I also find under the peek insulator reminisce of old juice that doesn't clean out either cleaning the RBA as a whole.
Its the base rubber insulator that begins to decompose and they are very hard to find if at all and expensive. I did find a redneck solution using taifun insulators. I put a couple rounds of copper foil tape around the pin to hold it tight enough not to fall out and also they are a bit short on the bottom but they so far work great as a replacement insulator. The taifun insulators aren't exactly but close enough to do the job.
Sad, those insulators should be cheap and plentiful. The stuff we buy is only as useful or cheap as it's weakest link. We're flooded with gear that's too often considered a bargain until you consider how quickly we just throw it out.
The insulators do crack and gaps to the base present with time as it gets brittle. Yeah, crud builds up under them and within the airflow inlet and pin. Somewhat tedious but I try to micro brush it, the pin itself with its small air holes and clean the outside of the insulator which is also a trap.
Alcohol and/or ultrasonic are my mainstays. But to get it vapable for me means removing the slightest trace of residue and that includes cleaners. Found early on that baking soda toothpaste works great as both a cleaner and freshener. But for the deep and dirty you've gotta start with the first two.
Good luck and Happy New Year.
For general info here, from the thread …Vaping is too complicated. | Page 4 | Post #79 | E-Cigarette Forum…
The foremost cause of hot leads or hot segments in open or closed coils is geometric asymmetry. This may as well contribute to ineffective termination. The mangling brought by the irregularity of hand winding or common forming (bending) can corrupt a wind and unbalance dual or parallel elements. A common hazard is inconsistent wick contact which results in hot zones or segments regardless of coil type, i.e. variations in turn-to-turn diameters, spacing. There is a methodology to best promote temp stability across coils using strain in wind and installation to promote symmetry, uniform rigidity, oxidation and so durability. It makes best use of the properties of Kanthal, a wire developed to serve as a thermal element. Such coils are notably less susceptible to hot leads. Best of all, it's so simple anyone can do it…and consistently reproduce it!
It may not be the way we always vape…but it sure is a nice warm and reliable hearth to return to from the cold.
Good luck all and Happy New Year.
- Status
- Not open for further replies.
Similar threads
- Replies
- 39
- Views
- 9K
- Replies
- 105
- Views
- 27K
- Replies
- 0
- Views
- 2K
- Locked
- Replies
- 4
- Views
- 2K
- Replies
- 0
- Views
- 840
Users who are viewing this thread
Total: 2 (members: 0, guests: 2)