Nextel xc-116 'U' Wick on AGA-T2

Status
Not open for further replies.

curt9733

Full Member
Verified Member
Jul 2, 2011
46
24
55
Charleston, SC
This is going to be a long post. It will be about the use of an AGA-T2 with the silica post removed.
Things you will need:
1. 3.5" Nextel xc-116 (I know, I know, "That stuff is expensive", but think of all the money you have already put into this e-cig thing. buy 10 ft. and be done with it.)
2. 2 pieces of 3.5-4" 34 awg wire. (I use the kanthal that I used to build vivi nova heads with. I don't need that anymore.)
3. Drill with 1/8" bit preferably titanium or cobalt.
4. Any small drill bit (You may need it but possibly not.)
5. AGA-T2.

I. Preparing the AGA-T2 top section.
a) Disassemble the Aga completely. Remove all o-rings, screws and the insulator from the top piece so that they don't get damaged by the heat that the drilling creates. Use vice grips to remove the silica post. hold the top with another set of pliers--wrap the top in a small towel while doing this to keep from scratching the outer part. (I had one of the silica posts break off at the base while trying to do this, but I just drilled it out.)
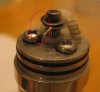
b) Drill out the post hole and the wick hole to 1/8". Be careful, because you don't want to breach or bend the inner wall of the top cap where the center post screws in. I did this once but ended up tapping the indentation out so that the inner cylinder was even again.
Here is the completed top section (Sorry for the focus).
Top cap drilled-top view.jpg
Here is what the underside looks like (this is after I put the o-rings back on). Circled are the areas to be concerned about.
Top cap drilled-underside.jpg

c) Put rings and insulator back in.

II. Preparing The Nextel
a) While it is still on the spool or a longer section, heat 3.5" of the Nextel. You will need to heat the entire length in small section until it glows white for a while (4 minutes). I use a chef's torch, so I have to let it rest after it gets too hot. This process removes the organic sizing material from the Nextel and MUST be done. It also keeps the Nextel from unbraiding.
Here is another blurry picture, but you get the idea.
Nextel Heating.jpg
b) Now you can cut the sleeving without it unraveling. I use toenail clippers. Fluff up the ends a bit so that they unravel a small amount. Here also are the 2 pieces of thin wire.
Nextel cut and fluffed.jpg
c) Begin wrapping the nextel beginning right before the unraveling point. wrap in a spiral towards the end. It doesn't have to be perfect in any way, It just needs to get smaller and smaller so that it can get through the top section of the AGA.
Nextel wire wrapping.jpg


Section 2 of this follows in the next post.
 
Last edited:

curt9733

Full Member
Verified Member
Jul 2, 2011
46
24
55
Charleston, SC
This is what the Nextel looks like with both sides wrapped.
Nextel wrapped.jpg
d) Thread the nextel through the cap until it pokes out of the underside just enough to grab with tweezers or fingernails. If you have trouble, you can use a small drill bit to push it through enough.
Nextel threading through cap.jpg
Do the same with the other side. You can now remove the wire wrappings.
Nextel threaded cap.jpg
e) Now you are ready to reassemble. Make sure the legs are not too long (to the bottom of the glass is usually the best). Cut it shorter if necessary. The 'U' section above the cap should align with the top pf the center post or lower depending on what gauge wire you use and how many wraps you use. Here is my setup:
Aga reassembled.jpg
And here is a dry burn using 0.5x0.1mm kanthal ribbon wire 1.6 ohms @ 15 watts (although I don't vape at that much power.)
AGA dry burn.jpg

I hope I didn't forget anything, and I hope someone finds it useful. FYI, The whole purpose of doing this is to have juice flowing from both holes to the coil. It can also be used to set up a dual coil using higher resistance on each leg to equal out to your preferred resistance (for example, 2 2ohm legs would equal 1 ohm) but the resistance has to be the same on each leg. In addition, you would need an extra vent hole in the top cap to run air along the second coil.
 
Last edited:

curt9733

Full Member
Verified Member
Jul 2, 2011
46
24
55
Charleston, SC
The wicking is great. I have been using this setup for the past 2 months, ever since i grew tired of hotspots and fiddling. It is easy to clean as well. Just wait until your tank is almost empty, then cook it at high wattage until it is dried out (this may take a few minutes and you will stink up the room with burnt juice smell, but that will go away soon). The coils will begin to glow red again and the wick will turn whitish (or silver to be more accurate) after you cook it for a minute or so. You can also remove your coil and rebuild a coil using the other side (the fill hole screw). You would then use the original negative screw hole as the fill hole.
Aga alternate coil.jpg
This means you only need to clean the wick after you have used both sides of it.
 

Attachments

  • Aga reassembled wigh circle.jpg
    Aga reassembled wigh circle.jpg
    21.6 KB · Views: 336

curt9733

Full Member
Verified Member
Jul 2, 2011
46
24
55
Charleston, SC
To clean the wick thoroughly and bring it back to its original white appearance, you can remove the coil, remove the center post bolts, and push the center post down so that it sits flush with the insulator. then you pull the wick up about 1/2 inch. At this point I cover the cap area excluding the wick with tin foil. The reason for this is that when I torch the wick, the residual juice will flame until it is gone, and I don't want my o-rings or insulator to melt. After torching for about 30 sec, the wick will be restored and you are ready to push it back into the tank. As I said in the original post, if It will not go back in easily, you can use the back end of a small drill bit to push it in. I would rather do this than completely disassemble the AGA to pull the wick back through, although pushing it through does create some stress on the fibers. Here is what I mean (although I didn't disassemble mine because I just built it):
Pushing Nextel in.jpg
 

curt9733

Full Member
Verified Member
Jul 2, 2011
46
24
55
Charleston, SC
Thanks, now I've read that. Do you know which standard SNG treats to? (4hr @ 900c/4min @ 500c)

I saw, on their site, it was just under 900c, but not the time.


No clue. I order from Omega.com--10ft for $22.50. That's $2.25/ft. untreated compared to $7.00/ft. at SnG treated. That means $4.75 for heat treating? I'll stick to my torch.
"Cleaning" it of hazardous sizing materials (absolutely necessary) is 4-5 minutes @ 700C
"Treating" it to "make it more rigid and less likely to break down under mechanical stresses" is 4 hours @ 900C. (There is not much mechanical stress in an RBA, so I skip this step. I haven't had any problems so far.)
 
Last edited:

curt9733

Full Member
Verified Member
Jul 2, 2011
46
24
55
Charleston, SC
As stated in the MSDS
""Due to their large size (7-13 microns in diameter), fibers of this product are considered
non-respirable and would be expected to cause only minor nose and throat irritation if inhaled."

I have had no irritation.

Perhaps it would help with durability, but to reach 900C for 4 hours, I would need a kiln. Perhaps I should buy a small kiln and a bunch of Nextel and go into business selling it at $5.99/ft.
 
Last edited:

pdib

ECF Guru
ECF Veteran
Nov 23, 2012
17,151
127,511
www.e-cigarette-forum.com
As stated in the MSDS
""Due to their large size (7-13 microns in diameter), fibers of this product are considered
non-respirable and would be expected to cause only minor nose and throat irritation if inhaled."

I have had no irritation.

Perhaps it would help with durability, but to reach 900C for 4 hours, I would need a kiln. Perhaps I should buy a small kiln and a bunch of Nextel and go into business selling it at $5.99/ft.

Maybe once you figure in the cost of running a kiln for 4 hours, it could be $6.07/ft. Your right, I was just looking for a wider buffer. Look, I've ordered the stuff and I'm gonna vape it, so.
 

pdib

ECF Guru
ECF Veteran
Nov 23, 2012
17,151
127,511
www.e-cigarette-forum.com
So, I got my foot of XC-116 today. I didn't want to go with a u-wick; cause I've tried that with other materials and haven't found much benefit. I went with a doubled head; but single length beneath the coil. I'm liking this stuff a whole lot. (This is totally first impression. With other materials I've found that 2-3 days are needed to find most short-comings.) thanks for the suggestion, curt9733!

IMAG1340.jpgIMAG1347.jpgIMAG1354.jpg

26g Kanthal, 0.8Ω
 

curt9733

Full Member
Verified Member
Jul 2, 2011
46
24
55
Charleston, SC
Glad to see it works for you. The u-wick is not a necessity. I just like the option of bring able to switch sides when one side gets gunked. However, removing the silica post is a pain, and drilling it out is worse. But when my 0.4x0.1mm ribbon gets here,I'm going to try a dual coil on each side. I see from your pictures that you opened up the strands on the inside of the tank. I did that too and it absorbs much better, but if you want to pull the wick up to torch it, it's hard to get it back in. I guess it will be better to torch it when your juice is almost empty so you can disassemble and pull the wick down after torching. If you hit it with 15 watts for a minute or so, though, it's almost as good as torching it.
 

madstabber

Vaping Master
ECF Veteran
Verified Member
Jan 20, 2013
3,961
7,061
Concoction Creating Cave
Has anybody tried heat treating this stuff in an oven on self clean for a few hours(after torching it to remove hazardous materials of course)? I believe an oven on self clean will get about 1000 degrees F so I don't know if that is enough to make a difference. Anybody have any thoughts about this?
 
Status
Not open for further replies.

Users who are viewing this thread