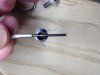
A couple of pics of my KA1, 8/7, .070 tmc ready to install.


Something that would help me tremendously is some pics of the coil before installation.
Maybe we can ask our coils to take a selfy to show off her legs!
After counting endless numbers of leads I can attest that the nominal wire length of Protank leads is 7mm/n, 9.25mm/p. The latter varies quite a bit as typically I measured the lead to the end of cut. However, the resistance value is merely to the first point of termination which is in reality the first good contact with the hosing or pin respectively. This is problematical as the exact wire length cannot be directly measured but merely calculated for the travel length from the end of wire to first point of contact for each lead.
Further complicating this is the fact that the grommet set is grossly imprecise so that wire length back to termination may vary quite a bit for each set and only approximated in general terms.
For these reasons I chose to post charts of validated actual raw coil resistance reads as a guideline on this thread. It's just not that simple to measure and compute Protank wire length in each case.
Please also consider that typical carto-meter results may commonly vary +/-.02Ω (specs vary) against known fixed loads. I've recorded greater if somewhat infrequently.
Accordingly maz as you may have picked up my 16mm as 1.6mm and regardless your wire length calculation may be significantly understated for the above reasons. Haven't followed your recent posts but worth a look.
In my own builds using prior res results as a guide, I become suspicious of builds that fall below .05Ω of the published target. As noted per cigatron I believe recently, first be sure of the published resistance of your wire. Measure some of your own completed legs on disassembly. Derive a best observed calculation for the termination point. Set your res target accordingly.
I'm far more concerned on the low side (both deviation and variation) as I often transfer tanks to unregulated mech's. If I'm shooting for 2.0Ω and I end up with a beautiful center fire at 2.1Ω with the effect the first or second pop, hey I'm happy as a pig in But hey smell your rig after pulsing. I'm using LV's hard rubber grommets for tight lead stability. If you smell the slightest bit of rubber then ditch the build. I'tll take you a few minutes to make another. Ain't worth a tank of juice. Likewise if your res falls significantly below a reasonable expectation. For me that's >.5Ω and I'm scratchin' my head if I can't find the hanger. LOL
Good luck all.
That was a typo Mac, I did put in 16 mm for leg length in Steam Engine, not 1.6 ... either way I am not too cocnerned ! I will post my results when I attempt to duplicate the build
A couple of pics of my KA1, 8/7, .070 tmc ready to install.
View attachment 340033
View attachment 340034
That's really a perfect wind result. I like that 5 O'clock 7 orientation 'cause it's about the maximum amount of contact you can maintain even if you send the lead to the opposite side of the grommet. In other words, you create the coil in the state it's going to be installed. No disruption. So as I dewind the last turn, I tweeze it out to end up about where you did. If you miss and end up 9-9, no biggie. It will end up there when you tension the leads.
If you pinch together the resulting wire ends with your fingertips you can send them easily via the bottom of the slot (shortest distance to the cup base) and there will likely not be any end turn change in adhesion. The legs will just spring back.
The leads here end up pointing to their respective best termination location. Kinda what I've been talking about that the build will point the way, euphemistically and in reality.
Thanks for that graphic demonstration cig.
Good luck.

Thanks Mac, I've been trying hard all along to follow the logic but the pic you posted really brought it home.
In order to refrain from adulterating the coil as much as possible I have been inserting it through the bottom of the 510 connector then reinserting the mandrel for assembly. Might not work for coils with alot more winds though.
My intent is , as you said and as your pics show, to terminate at the grommet opposite and perpendicular to the exit side of the end turns.
I'll post some pics when it stops look like sh--.
Deep breath......okaaaay....try number three.
..............My intent is , as you said and as your pics show, to terminate at the grommet opposite and perpendicular to the exit side of the end turns.
I'll post some pics when it stops look like sh--.
Deep breath......okaaaay....try number three.
:Many deep breathes later.......tried number 4,5,6
These squishy silicone grommets are SLIPPERY as......
Why do tonight what can be put off till tomorrow.
Night folks, cig
Ok, got it. Understanding where the legs need to enter the grommet helped rectify a few issues I was having.
Due to my affiliation with an organization called "lisDexics Untie" I am finding it easier to terminate straight off the coil to the grommet instead of crossing over to it.
I realize that this could cause the end turn to expand in diameter due to grommet compression when the battery is installed but so far it hasn't caused too much trouble.
Thanks, cig
 LMAO
LMAO"lisDexics Untie"
Really was a great pic of how best to orient the coil on the bit for install. Sometimes simple is better.
I try not to take the coil off the bit to protect these little creatures as much as possible. But even a 28g coil is fragile. Even going down the side slot if you jarr a leg by poking it into the side of the assembly it can be enough to disrupt the adhesion you got to in your wind. It's a small scale cig. And most of the changes too small to see.
I've given a lot of thought to your bottom insertion idea. It has a lot of merit. If you hold the coil at the "Y" where the legs cross and push both gently inwards (towards the center of the coil) you may put a bit of pressure on the top side of the end turns. If the "Y" is far enough removed perhaps not enough to accordion (separate) the end turn tops or coil overall. A light squeeze.
It's definitely worth a try if you feel confident enough to reinsert the bit with care so as to not disturb the wind.
Good luck cig, and let us know how that vape's goin.
All sounds good.
Even easier for me now that I'm not crossing the leads any longer. Had a lot of trouble getting things lined up with those crossed leads.
My new method is too terminate directly from the end turns to the near side of the grommet. The coil is underwound at 6:30 o'clock for the pos and 4:30 o'clock for the neg without crossing. (My coils are wound left-hand thread)
When the coil is inserted from the bottom the leads are not compressed much and seems to make it easier for me to line things up.
Once the mandrel is reinstalled and the grommet is set, I then rotate the gromment and the neg lead simultaneously to position the neg lead at the point that perfectly centers the coil. Then very slightly tension it.
After re-verifying proper location of the neg and pos leads I set the pos pin. I then tension both leads alternating between the two until tight.
Using this method I have been able to withdraw the mandrel without any coil movement. Not even a twitch. No more pushing and prodding.....yeah that!
Maybe I'm just lucky so far but have not had any visual negative side effects....yet
Still play'n round
Hey folks, anyone tried the "wick tuck" method (elliminates need for flavor wick) for cotton wicked kanger clearos yet?
Not intending on a hijack here, just would be great to hear positive or negative feedback. :d
Cig
... Might be blasphemy to some, but I think I enjoy it more than a dripper or kay/tai . Not harsh on my throat with the 12 mg juices I use.Excellent! An approach, after the fact, I described in more detail to the OP earlier in this thread in a roundup of termination. If you encounter horizontal rotation of the coil after you withdraw the bit you can adjust for it (return it to alignment with the slot) by rotating both leads, grasping the pin and grommet and firmly and very slightly turning both together. The risk here comes with slippery grommets that you might lose the balance of tension in one or both leads if either or both slip. End turns may change and even adhesion can be lost. Then you've lost the coil. But worth a try because you won't get a good vape if the skewed wick is crimped at the slot. A harder grommet though a bit more difficult to install initially saves you then.
So I'm likin' your insertion method. Here's why
You want to end up with a coil that's as undisturbed as it was on the bit when you wound it. Any deviation from that, skew of any kind indicates some kind of stress (strain) was added by something you did subsequently. It may not prevent the coil from going micro but perhaps distort it enough that it doesn't reach the efficiency potential that it might have had when wound to a point of adhesion (if the strain added isn't relieved). When a coil skews [horizontally, by rotation of its axis] at withdrawal of the bit it is ideal if it doesn't move or change its geometry or symmetry. When it does, a change has been induced.
[Once realigned with the slot] it's almost always better if a quick tweak like a nudge or raking doesn't restore it to consider a reset (pulling the pin and grommet). Or really for as little time as it takes, rewinding it.
Whole lot less heartache.
Just love it when ya'll think you're a coil. LOL
Good luck.
Hey folks, anyone tried the "wick tuck" method (elliminates need for flavor wick) for cotton wicked kanger clearos yet?
Not intending on a hijack here, just would be great to hear positive or negative feedback. :d
Cig
Hey folks, anyone tried the "wick tuck" method (elliminates need for flavor wick) for cotton wicked kanger clearos yet?
Not intending on a hijack here, just would be great to hear positive or negative feedback. :d
Cig
Btw, there is no need for the method, or a flavor wick on regular kanger coils, only on the duals rebuilt as singles !
Sent from my SGH-T999 using Tapatalk