Could you explain in detail how to do a tension wrap?
I don't quite understand lol.
I actually understand it but can't get it.
Sorry fella's, I wish I could make it clearer but I'm not as photogenic as my avatar. I am funnier than
yippie kai though at times. But sadly, no movie contracts. And I stopped tap dancin' when I was a kid. I'm a MacTech, true but I helped 'em fix the gear that made the media, not produce it. I didn't tell 'em my job, they didn't tell me theirs. That's the breaks.
Short answer: Already was one.
...you don't even need a forceps, or a jig. It really is so simple. Sacrifice a tad of precision of control and pressure. If you bought your wire on a spool…feed it directly to your 1/16 screwdriver (hard to use a bit you need a good handhold). The hand pressure on one side holding the spool and guiding it's exit with the pressure of your fingers, the index finger on the tip of the screwdriver to provide stability. On the other hand the screwdriver turning slowly. Without very much tension at all the wire slides right in line. Very little chance of overlap, or lift off if you apply just a modicum of pull.
Unfortunately, I don't have time to play with the gear as much as I'd like. The coils just have to work. To save time I bypassed detail winding as I described a few posts early. Down and dirty. Your first wrap won't matter. You're turning 14 to get 9. The more the merrier and the tighter the remaining become. Hold the spool in one hand, hold the screwdriver bit with the other as you wind, tension by pressing lightly against the screwdriver shank with thumb and or index finger. Can't get any simpler really. And very natural to release the rotation of the spool with the lower three fingers of the hand. A very natural motion. Not requiring a lot of dexterity. Just a steady modicum of tension. And above is how they come out. One after the other. Ready for installation and compression burn in, wicking and vape.
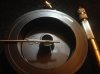
And here's the demo…
You'll note a common screwdriver can be used. The largest that will fit will be the most effective and easiest for the Protank at .07" or ~1.778mm (sometimes called 3/43" in some kits). A pin vise can be used and an ordinary common drill blank at .07". These are available on eBay for a couple'a bucks. In the above pic you'll see the long leg leading up which was affixed with ordinary Scotch tape to the handle of the screwdriver. This can easily be removed after winding with the miniature cutter shown in one slice. Real time and fuss saver.
To begin, you're going to need to feed off about 4" of wire off the supplied spool and attach the end of the wire to the screwdriver handle as above. But be careful to not have several feet wind off the spool as you do this. Keep a slight tension on the wire at all times. Or you can use something like a school eraser fit into the spool to hold the coils in place. I don't. It's cumbersome to wind with later. And so I prefer to just keep the wire tensioned at all times. Keep an eye on it or you'll have a real mess. Leave the spool laying down on the workspace you're using and maneuver the screwdriver bit above it until you're ready to pick up both spool and screwdriver.
Once you affix about 1-1.25" of wire to the handle (try to tape over the end of the wire so it doesn't stick you) draw back some of the extra wire back to the spool. Before picking up the spool…proceed to start the first turn winding hand over hand guiding into position with the thumb of your left hand as you rotate with your right. I wind clockwise looking towards the tip of the screwdriver. Once you've laid down the first turn, press that turn in tightly buttressed against the base of the shaft. The spool should still be laying on your workspace with your hands above, right hand holding the screwdriver and base of palm on the spool to stabilize it.
Pick up the spool in your left hand now that you've affixed the end of the wire to the screwdriver. Separate the spool and the screwdriver holding the spool in your left hand and the screwdriver in your right. You may have as much as several inches separating the two. So you want to take up the slack and bring them as close together as possible and find a hand-hold that is comfortable for you. This is one example…
In this case photo I'm using the edge of the spool as a fulcrum, like a see-saw pivot, but also to add to the pressure I can apply in the stretch. Resting the screwdriver shank on that edge
adds resistance. It acts as a multiplier of the press with your thumb and wrist on the screwdriver to the right and away from the spool and the combined pull or resistance of the left hand retaining the spool.
The end of the screwdriver tip is resting on the side of the left index finger. This serves to stabilize the orientation of the shaft so that the wind doesn't go sideways or up-and-down which could skew the wind or make it loose.
Lately, I move the right hand slightly to the right and around the spool away from the left and and use the tip of the left index to stabilize the end of the screwdriver. The important point is to find a way to balance the shaft of the screwdriver. This also serves to balance the pressure being applied with both ends of the screwdriver being firmly held against the tension or pull of the left hand and the spool. The screwdriver resting on the edge of the spool is the balance center.
Now slowly apply gentle pressure of the left hand and right. You
will see the first turn tighten on the shaft. And it's time to begin the wind by rotating your wrist slowly and firmly to the right, clockwise.
These first two turns are critical. If you are applying enough tension, and just enough is all that's required, no need to over exert, you will see both the 2nd and 3rd turns line up neatly and tight. So much so at times that if you try to overlap them they will snap into place with a "ping" like a guitar string being pulled. Continue consistent turning but with no more pressure than necessary. This will unnecessarily fatigue you. Even though this can be completed in 30 seconds or less (the typical dozen or so turns) if you press too hard, tense your hands and body too much, you run the risk of interrupting your turns. You will lose muscle control and the wind will go erratic. The flow should be consistent until you complete and you will have an alignment identical to the amazing photo of ribbon above which to my surprise lines up just as neatly with the right level of tension.
If you immediately see separation, you are skewed.
")
You definitely are not applying enough tension. It's likely that the spool and the screwdriver are not perpendicular (being held at 90 degrees relative to each other). This will force the wind kind of sideways (skewing) and we don't want that. Check alignment, counter-rotate off the last turn, retention spool and screwdriver and line up another 1st to 2nd turn start from that point. You may need to do this a few times to achieve a consistent adhesion. Keep slowly adding a bit of tension until you see persistent alignment.
Take a break! If you're not getting it, stop. Give your muscles (and vision) time and energy to learn. Set the work aside. Come back to it. Or try another time. It will happen for you. No rule says it has to happen in one session. And some days it doesn't happen at all for some of us. The universe isn't perfect. Some news, huh?
But if you got through that first one, you should be looking at this…
Leave the wind on the bit. Remove the tape with the cutter. Pull the coil slightly away from the shank of the screwdriver. With your left thumb hold the top or back of the coil and with the left lead of the coil pointing down delicately pull the extended right lead down. Tweeze it several times as you go coaxing this lead
in the direction of its rotation, in this example
towards you.
You now have a completed coil ready to be installed directly in your atomizer coil assembly or other.
(Well that's after you
de-wind a few turns to arrive at your desired tight
and perfect count. But that's another lesson.)
Congratulations. Glad you stayed tuned.
Good luck.