Hi, today let's take a look at Ursa Nano S & Ursa Nano Art sent to me by Lost Vape. I will examine in this Test each of the characteristics that distinguish these devices. I hope that by the end of this reading you will have understood these products, and therefore decided whether to invest in them or not. As always, my opinions are free and based on my personal experience.
• Enjoy the reading.
► Lost Vape Ursa Nano S Details:
• 1. The new continuation of Ursa Dwarf
• 2. Maximum output 16W
• 3. Bring pure MTL vaping
• 4. Updated Ursa Pod
• 5. Smart pod detection
• 6. Compatible with UB Mini Coil (empty pod only)
► Lost Vape Ursa Nano Art Details:
• 1. New generation of the Ursa Nano
• 2. Powered by Lost Vape Quest Chip
• 3. Built-in 800mAh battery with 18W max
• 4. Adopts 5V/2A Type-C charging
• 5. Designed with responsive auto-shooting
• 6. Suitable for empty Ursa/Ursa Nano cartridge
• 7. Suitable for mini UB Coils
• 8. Able to give you MTL flavor
• 9. 2.5ml capacity, leak proof design
• 10. Designed with comfortable drip tip
• 11. Colorful and elegant look
► Lost Vape Ursa Nano S & Ursa Nano Art; Packaging:
Ursa Nano S & Ursa Nano Art have colored packs based on the device they contain. The front side reports; the image of the device, the writings regarding the product name, the brand name (Lost Vape), the chipset used (Quest). On the back there is a lot of information; the packing list, the warnings, some social icons, a serial number, the color of the sample, the scratch&check and various international approvals. On the edges of the package we find; the main features in the form of icons, and the motto "The Modern Demarcation".
► Lost Vape Ursa Nano S; Packing List:
• 1 Ursa Nano S Pod device
• 1 2.5ml 0.8Ω Ursa cartridge
• 1 Type-C charging cable
• 1 Warranty card
• 1 User Manual
► Lost Vape Ursa Nano Art; Packing List:
1 Ursa Nano Art Pod Device
1 Empty Lost Vape Ursa Cartridge
1 Lost Vape UB Mini S2 Coil (1.0Ω)
1 Lost Vape UB Mini S1 Coil (0.8Ω)
1 Type-C charging cable
• 1 Warranty card
• 1 User Manual
► Lost Vape Ursa Nano S; Specifications:
• Dimensions: 101*24.1*14mm
• Body material: Plastic and silicone
• Battery: Integrated 800mAh
• Power range: 5-16W
• Battery voltage: 3.2V-4.2V
• Shot: Automatic
• Recharge: Fast Type-C
• E-liquid capacity: 2.5ml
• Type of filling: Lateral
► Lost Vape Ursa Nano Art; Specifications:
• Dimensions: 108.9*25*15mm
• Body material: Transparent polycarbonate
• Battery: Integrated 800mAh
• Power range: 5-18W
• Battery voltage: 3.2V-4.2V
• Charging: Type C 5V/2A
• E-liquid capacity: 2.5ml
• Type of filling: Lateral
• Compatible with: Ursa Empty Cartridge, Ursa Nano Cartridge, UB Mini Coils
► Lost Vape Ursa Nano S; Available colours:
• Lemon yellow
• Stone Grey
• Baby Blue
• Coral Pink
• Violet Purple
• Full Black
• Mint Green
• Berry Blue
• Rose Red
• Cyan Orange
► Lost Vape Ursa Nano Art; Available colours:
• Deep Space for Kaleido Art
• Yellow Sands for Kaleido Art
• Blue Stella x Kaleido Art
• Lime Green x Pachinko Art
• Babe Pink x Pachinko Art
• Aqua Blue x Pachinko Art
► Lost Vape Ursa Nano S & Ursa Nano Art; First Impressions:
The "Nano" devices of the Ursa line grow in number, therefore Ursa Nano S & Ursa Nano Art go alongside the previous Ursa Nano Original and Ursa Baby. The last two Nanos that have arrived in chronological order are inspired by the form factor of the original Ursa Nano, sharing together with Ursa Baby both the disposable cartridges of Ursa Nano S and the cartridges with replaceable coils UB Mini of Ursa Nano Art. The two devices share a built-in 800mAh battery, Ursa nano S can deliver a maximum power of 16W, while Ursa Nano Art can deliver up to 18W Max.
► Lost Vape Ursa Nano S; How it is made:
Touching Ursa Nano S with your hand, you immediately realize that the rubberized surface with which her body is covered offers pleasant tactile sensations. There are quite a few eye-catching colors with cute color gradients, the one I got is a solid color "Coral Pink". The only decorations are the writings on the main panels, on one side you can read "URSA NANO S" and on the other side "LOST VAPE". On the side profile there are two Airflow holes that are opposite each other (one on each side) undoubtedly these small diameter holes are designed for restricted MTL use. On one side there is the notification LED while on the opposite side there is the Type-C charging port. With Ursa Nano S, to vape simply draw through the spout to activate the automatic draw.
* The Led light lights up as follows:
• During extraction, the LED lights up
• During the recharging phase, the LED stays on, when recharging is complete, the LED goes off. It takes about 60 minutes to recharge the built-in 800mAh battery.
• The LED flashes 10 times when the battery needs to be recharged.
• The led flashes 10 times when it is necessary to recharge the battery.
• In the event of a short circuit, the led light flashes for 2 seconds
• Delivery stops (Over Time Protection) if the puff has an uninterrupted duration of 10 seconds, the LED flashes twice and the device switches off.
• If the device exceeds the temperature limit, the LED flashes for 2 seconds, then you need to wait for the chipset to cool down.
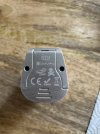
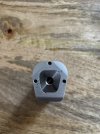
On the bottom are the logos and trademarks along with the inscription "Designed And Manufactured By Lostvape LTD". The pod compartment houses two rather strong magnets, they are also present; the sensor for automatic extraction and the contact pins which are spring loaded and gold plated.
► Lost Vape Ursa Nano Art; How it is made:
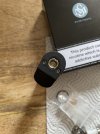
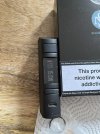
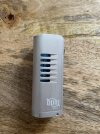
Nano Art is slightly taller and slimmer than Nano S. Nano Art is available in six different colors with 2 different types of artistic decorations; Pachinko adopts the typical cartoon style, while Kaleido with its contrasting geometric designs wants to recreate a futuristic look. For this test I received the Blue Stella x Kaleido Art specimen. These captivating effects were obtained with the IML technique of plastic processing, in practice the drawing is enclosed within the transparent shell, therefore the decorations cannot be damaged. Contrary to Nano S which has a rubbery and rather grippy coating, Nano Art is really smooth, almost slippery, but always remains quite pleasant to handle. The writing on the main panels; on one side you can read "URSA NANO ART" and on the other side "LOST VAPE". On the side profile there are four Airflow holes, two on each side. These are also small diameter holes and are designed for restricted MTL use.


On the bottom there is the Type-C charging port, moreover the bottom is transparent so the notification LED emits a powerful and clearly visible glow.
The Led light lights up as follows:
• During extraction, the LED lights up
• During the recharging phase, the LED stays on, when recharging is complete, the LED goes off. It takes about 60 minutes to recharge the built-in 800mAh battery.
• The LED flashes 10 times when the battery needs to be recharged.
• The led flashes 10 times when it is necessary to recharge the battery.
• In the event of a short circuit, the led light flashes for 2 seconds
• Delivery stops (Over Time Protection) if the puff has an uninterrupted duration of 10 seconds, the LED flashes twice and the device switches off.
• If the device exceeds the temperature limit, the LED flashes for 2 seconds, then you need to wait for the chipset to cool down.
The pod compartment of Ursa Nano Art is transparent and offers greater visibility on the level of e-liquid contained. The Compartment/Pod houses two rather strong magnets, they are also present; the sensor for automatic extraction and two contact pins which are spring loaded and gold plated.
► Lost Vape Ursa Nano S & Ursa Nano Art; Disposable Pod & Replaceable Coils;
For all Ursa Nano devices there are really interesting options for MTL vaping, in fact there are disposable cartridges with integrated 0.8 and 1.0Ω coils but also empty cartridges that can accommodate 0.8 and 1.0Ω UB Mini replaceable coils. According to Lost Vape, all Ursa Nano cartridges use an internal system that limits losses and has successfully passed countless tests. All these 2.5ml cartridges include a comfortable and ergonomic spout, on the bottom of the cartridges there are two magnets mirroring those on the Mod. The capsules are made of PCTG and despite the dark color they offer a discreet visual control . The refill takes place laterally by lifting a silicone rubber. The filling hole is large enough, however the lateral position for filling does not allow for total filling. I have estimated that introducing more than 2ml of liquid is quite difficult. Disposable cartridges clearly show the resistance value inside them. In the "empty" cartridges you have to insert the UB Mini coils with a slight pressure.


► Lost Vape Ursa Nano S & Ursa Nano Art; Final conclusions:
With a view to proposing economic devices, Lost Vape has deemed it appropriate to create Nano S and Nano Art using light plastic materials without giving up a
dazzling range of colors with a slim and elegant form factor. Both of these new pods forego any control buttons to prevent accidents when the device is placed in a pocket. In the Ursa Nano S kit there is only one 0.8Ω disposable cartridge, so if you are interested in purchasing, I recommend you take a couple of spare cartridges. If desired, a disposable 1.0Ω cartridge is also available as a spare which you can also use with Ursa Nano Art. In the Ursa Nano Art Kit there is an empty cartridge and two replaceable UB Mini Coils of 1.0 and 0.8Ω which you can use without problems also on Ursa Nano S. I tested disposable cartridges and UB Mini Coils with one of my favorite flavors for Pod Mod (Colonel Custard) diluted 10% with Boost concentration of 6mg/ml. Ursa Nano S and Ursa Nano Art have a practically equivalent air flow rate, therefore both provide the same performance. The 0.8Ω disposable cartridge offers a rather restricted puff and the flavor is higher than the average of the "disposable pods" on the market. Using the "empty cartridge" instead, my favorite UB mini coil was the 0.8Ω one because it offers consistent clouds and hot vapor. The Puff is sufficiently smooth, with a good hit in the throat. I estimated that the average duration of the disposable Pods is equal to a consumption of about 25/30ml of e-liquid, while I think that the duration of the replaceable UB Mini Coils is higher and that these coils can easily reach a consumption of 40/50ml before being replaced. For me both of these entry-level devices are pleasant to use and are also quite reliable thanks to Lost Vape's anti-leaking system which works perfectly even after many hours of use. In fact, I have not detected any trace of condensation and the functioning of these two kits has turned out to be excellent.
• Thanks to Lost Vape for sending me Lost Vape Ursa Nano S & Ursa Nano Art for the review:

www.lostvape.com
• Thank you for reading.


 Reminds me of St. Patrick's day drinks.. I certainly don't mean green beer either, think more along limes and limericks. It's a misty, minty thing you know..


