Building Custom Pipes

Status
Not open for further replies.

Mstr Mashnst

Unregistered Supplier
ECF Veteran
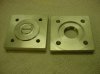
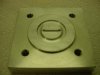
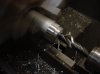
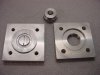
Hello there. Here is the story. I've been asked by a number of people to make them an e-pipe. I had a thread over in the mod section but got a hand slap for pre-saleing. I was in the wrong, so now I'm here, where I should be. I'm going to proto-type a few pipes, come up with a model I like and can build. The first four pipes will be for myself. This may turn into a full time business or just a hobby, time will tell. Whatever happens you will see it to the end.

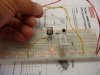
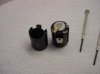
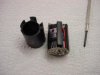
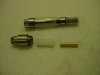
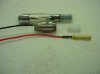
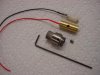
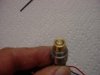
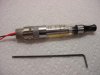
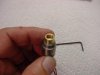
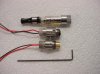
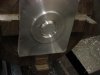
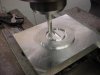
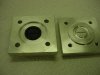
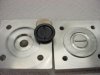
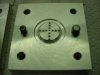
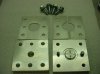
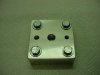
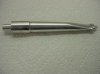
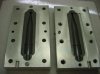
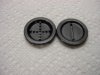
I started by designing a touch circuit and a battery holder. The battery holder is 1" in dia so it will fit into the bowl. Tomorrow I'll show the PCB and the casted battery holder. I already have the mold made for the battery holder. Enjoy:D
 

Attachments

  • New Pipe 2 002.jpg
    New Pipe 2 002.jpg
    23.2 KB · Views: 244
  • New Pipe 10 002.jpg
    New Pipe 10 002.jpg
    21.7 KB · Views: 243

Mstr Mashnst

Unregistered Supplier
ECF Veteran
There was one thing that I think should be a must with the battery holder and elec circuit. You should be able to take it out of the pipe for repairs if needed. This is a three wire system that comes up the sides of the battery holder and connects to three screws on top. There are two grooves up the side of the battery holder for the wires. My touch circuit is good for 18 amps. More then what is needed but, it will help keep it cool. The pipe will be a push/pull so the draw air will go by the heat sink on the transistor and help keep it cool aswell. The PCB are not hard to make. When I make the next six I'll take a pic of just the PCB and post it. Makes for a nice compact package I think. This part is not going to change so I'm building ahead on them before I have a final pipe design.:D
 

Attachments

  • New Pipe 11 001.jpg
    New Pipe 11 001.jpg
    21.5 KB · Views: 207
  • New Pipe 11 002.jpg
    New Pipe 11 002.jpg
    21.7 KB · Views: 217
  • New Pipe 11 008.jpg
    New Pipe 11 008.jpg
    21.1 KB · Views: 208
  • New Pipe 11 010.jpg
    New Pipe 11 010.jpg
    22 KB · Views: 219

Cavediver

Super Member
ECF Veteran
Verified Member
Apr 9, 2013
688
513
Buford, Ga
Nice work!

Drawing air across the heat sink is an interesting idea. I like warmer vapes, and absolutely do not get it out of the pipe / stem combo I'm using now, even with a 1.8 ohm head. I doubt there's enough heat to make a difference (unless chain vaping), but it certainly wouldn't hurt my feelings.

Also, now that this is in the suppliers' forum, are you allowed to / going to discuss plans for the machined connector? :) I've completed my first pipe, and am sure I'll do a couple more. The available eGo connectors are all short and have the button hole; no one appears to make one with a longer shank. I've thought about buying a cheap eGo battery and gutting it, but that still leaves me with a button hole to fill. That's something I don't really want.
As a semi-custom piece, I'm sure it'll fall outside of the price range I need for my low-end creations. Once I get my feet under me, however, it'd probably be something I'd spring for if I had a special pipe or two in the works.
 

Mstr Mashnst

Unregistered Supplier
ECF Veteran
Nice work!

Drawing air across the heat sink is an interesting idea. I like warmer vapes, and absolutely do not get it out of the pipe / stem combo I'm using now, even with a 1.8 ohm head. I doubt there's enough heat to make a difference (unless chain vaping), but it certainly wouldn't hurt my feelings.

Also, now that this is in the suppliers' forum, are you allowed to / going to discuss plans for the machined connector? :) I've completed my first pipe, and am sure I'll do a couple more. The available eGo connectors are all short and have the button hole; no one appears to make one with a longer shank. I've thought about buying a cheap eGo battery and gutting it, but that still leaves me with a button hole to fill. That's something I don't really want.
As a semi-custom piece, I'm sure it'll fall outside of the price range I need for my low-end creations. Once I get my feet under me, however, it'd probably be something I'd spring for if I had a special pipe or two in the works.

Here is some pics of that adaptor. After talking to a few people on the subject, I'm going to change it. It needs to have the 510 connector aswell and the center post needs to be adjustable. Going to make that change right away. PM me your address and I will send you the one I'm not going to use for free. Can't get any better deal then that. If you can't use it, just toss it.:)
 

Attachments

  • New Pipe 4 002.jpg
    New Pipe 4 002.jpg
    22.5 KB · Views: 155
  • New Pipe 4 008.jpg
    New Pipe 4 008.jpg
    22.6 KB · Views: 164
  • New Pipe 4 009.jpg
    New Pipe 4 009.jpg
    21.1 KB · Views: 178
  • New Pipe 4 011.jpg
    New Pipe 4 011.jpg
    21.2 KB · Views: 173

State O' Flux

Vaping Master
ECF Veteran
Verified Member
Jul 17, 2013
4,844
4,989
Seattle
The degree of workmanship and obvious creativity and talent going into this project is impressive MM... single-handedly, you've caused me to rethink the idea of using a pipe. I'll be following along as you progress... and looking forward to the finished product. I hope the rest is as creative and high quality as what you have so far. ;-)
 

Mstr Mashnst

Unregistered Supplier
ECF Veteran
The degree of workmanship and obvious creativity and talent going into this project is impressive MM... single-handedly, you've caused me to rethink the idea of using a pipe. I'll be following along as you progress... and looking forward to the finished product. I hope the rest is as creative and high quality as what you have so far. ;-)

Thank you. My goal is to build high end pipes that will last for years and years.
 

Mstr Mashnst

Unregistered Supplier
ECF Veteran
So today I worked out the new adaptor with the adjustable contact. It is spring loaded but, the contact is still hard wired. I added the 510 connector. What you do is loosen the set screw so the contact pops out. Screw the cart all the way down, then back off a half turn. Tighten the set screw back up and it is set. Now you won't over tighten the cart. There is a hole in the 510 adaptor that the set screw goes through. This will stop it from turning when you loosen the set screw. The main houseing is made out of stainless steel and the 510 adaptor is brass. The final product will be all stainless and the contact will be gold plated. I made this change because of feed back from people that want to buy a pipe from me and that is one of the things they want to have. How cool is that. :D
 

Attachments

  • New Pipe 12 014.jpg
    New Pipe 12 014.jpg
    22.2 KB · Views: 113
  • New Pipe 12 015.jpg
    New Pipe 12 015.jpg
    21.4 KB · Views: 115
  • New Pipe 12 017.jpg
    New Pipe 12 017.jpg
    22.2 KB · Views: 104
  • New Pipe 12 018.jpg
    New Pipe 12 018.jpg
    21.1 KB · Views: 109
  • New Pipe 12 019.jpg
    New Pipe 12 019.jpg
    21.9 KB · Views: 124

Cavediver

Super Member
ECF Veteran
Verified Member
Apr 9, 2013
688
513
Buford, Ga
More nice work! You're really making me wish I had a metal lathe! Not that I could do any of this, but it would be fun to have!

268197d1383264553t-building-custom-pipes-new-pipe-12-014.jpg
Isn't the center pin normally the positive pole?

I accidentally wired my DIY pipe with the center pin as the negative pole. It's a potential problem due to the unlikely possibility of a short. I would have to transport it with the battery in place, and then have something (keys?) bridge the button (negative pole of the battery) and the outside of the connector / atomizer. Like I said, highly unlikely, but possible. I meant to do it the other way, but forgot while I was working on it and didn't remember 'till the end. Oops... It's got a resettable fuse, so it's really not a big deal, but it's not the way I wanted it.
 

Mstr Mashnst

Unregistered Supplier
ECF Veteran
More nice work! You're really making me wish I had a metal lathe! Not that I could do any of this, but it would be fun to have!

View attachment 268247
Isn't the center pin normally the positive pole?

I accidentally wired my DIY pipe with the center pin as the negative pole. It's a potential problem due to the unlikely possibility of a short. I would have to transport it with the battery in place, and then have something (keys?) bridge the button (negative pole of the battery) and the outside of the connector / atomizer. Like I said, highly unlikely, but possible. I meant to do it the other way, but forgot while I was working on it and didn't remember 'till the end. Oops... It's got a resettable fuse, so it's really not a big deal, but it's not the way I wanted it.

Buy a small hobby lathe and have fun. Learn as you go. Post picture of your projects. The ones that don't turn out so well hold the camera father back until they look good. LOL

The neg side on this pipe does come out of the center connection of the adaptor. It runs straight to the neg side of the battery. There is no way you can short it out. I had to do it that way for the pos wire that will run up the pipe stem. More on that later.
 

Mstr Mashnst

Unregistered Supplier
ECF Veteran
I got up this morning planning on making a pipe bowl. When I got out to the shop I got to thinking about the cap that will go over the battery holder. Might be important to get that done first. Thought I would throw out a few TXT to some friends and see what they think it should look like. Flat on the top, dished in, look like there was tobacco in it, slot for a coin to turn it out and so on. Ended up with a shop full of people and pizza. The pizza dude had some input on it aswell. What we came up with was, dished in with a coin slot. The company name will be ingraved above the slot. The cap should sit down inside the bowl so you see the wood ring around it and no metal. I spent the last few hours of the day making a casting mold for the cap. I'll finish it tomorrow and cast a part.
 

Attachments

  • New Pipe 13 001.jpg
    New Pipe 13 001.jpg
    20.7 KB · Views: 81
  • New Pipe 13 002.jpg
    New Pipe 13 002.jpg
    21.7 KB · Views: 79
  • New Pipe 13 003.jpg
    New Pipe 13 003.jpg
    21.1 KB · Views: 79
  • New Pipe 13 004.jpg
    New Pipe 13 004.jpg
    20.6 KB · Views: 86

Mstr Mashnst

Unregistered Supplier
ECF Veteran
Finished up the back plug for the battery cap mold. Not real happy with with how the mold turned out. I like the design but, it has to fine of threads on it. It will take to long to turn it out of the pipe I think. I'm going to redo the thread plate and try it again. I did a quick cast to pull a part and see what it looked like. The face part of the mold needs to be polished and cleaned. I'll make the thread ring that goes into the top of the bowl after I finish this part. Then I can start on the bowl.
 

Attachments

  • New Pipe 14 001.jpg
    New Pipe 14 001.jpg
    21.3 KB · Views: 76
  • New Pipe 14 005.jpg
    New Pipe 14 005.jpg
    21.3 KB · Views: 76
  • New Pipe 14 006.jpg
    New Pipe 14 006.jpg
    21.3 KB · Views: 78
  • New Pipe 14 007.jpg
    New Pipe 14 007.jpg
    21.8 KB · Views: 85

Mstr Mashnst

Unregistered Supplier
ECF Veteran
Well, I didn't like the cap and I made it. I thought the threads would cause problems somewhere down the line. All you need is a little piece of dirt or lint to get in there and you have problems. Made a new mold with a different design altogether. Going for the tab and slot look. Took the coin slot out and put in some finger grips. I'll pull a sample piece after dinner tonight. If it looks good I'll do the sloted ring mold tomorrow. Enjoy:)
 

Attachments

  • New Pipe 15 011.jpg
    New Pipe 15 011.jpg
    21.4 KB · Views: 88
  • New Pipe 15 010.jpg
    New Pipe 15 010.jpg
    21.3 KB · Views: 72
  • New Pipe 15 008.jpg
    New Pipe 15 008.jpg
    21.1 KB · Views: 70

Mstr Mashnst

Unregistered Supplier
ECF Veteran
I also got some time in on the stem. I need to put it to the buffer wheel to make it shine. Then make a mold of it. The insert will be the hard part. It has to be tappered so I can pull it out and hold the locking ring with the wire soldered to it. That all gets molded into the stem and has to stay.:blink:
 

Attachments

  • New Pipe 11 007.jpg
    New Pipe 11 007.jpg
    21.3 KB · Views: 98

Mstr Mashnst

Unregistered Supplier
ECF Veteran
Talk about not being able to stay on track. Headed out to the shop, bright and early this morning to finish the battery cap. Got started on the stem mold and couldn't stop. Set the stem plug in 90 minute alum-epoxy. Let it set, flipped it over and did the other side. I set the plug .010 deep on the first plug casting. Then faced it off before I bolted the two together and poured the second half. I want to finish the battery cap and then I'll come back to the stem. I'm thinking about doing a double lip contact molded into the stem. That way there wouldn't be any touch pad on the pipe bowl. Just put it into your mouth and it would come on. Any thoughts on this would help:)
 

Attachments

  • New Pipe 11 003.jpg
    New Pipe 11 003.jpg
    21.7 KB · Views: 78

Mstr Mashnst

Unregistered Supplier
ECF Veteran
I forgot to post the pictures of the battery cap. You can see the slot between the tabs and the top in one pic. The top of the battery cap in an other ( old and new). The last would be the bottom, with the tabs showing, with the alum back ground. I think this is going to work much better. Drop it in, a little turn with the finger and done.:)
 

Attachments

  • New Pipe 15 002.jpg
    New Pipe 15 002.jpg
    21.9 KB · Views: 74
  • New Pipe 15 001.jpg
    New Pipe 15 001.jpg
    21.7 KB · Views: 76
  • New Pipe 15 003.jpg
    New Pipe 15 003.jpg
    21.3 KB · Views: 69

Cavediver

Super Member
ECF Veteran
Verified Member
Apr 9, 2013
688
513
Buford, Ga
Those molds are really neat! Are you using an injection molding machine, or is this some other process?

I can see the appeal of the auto-on feature, but I prefer manual activation; there are a lot of times when I've got the pipe in my mouth, but am not actively vaping (this seems to happen a lot when I'm reading).
 
Status
Not open for further replies.

Users who are viewing this thread