Building Custom Pipes

Status
Not open for further replies.

Mstr Mashnst

Unregistered Supplier
ECF Veteran
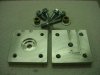
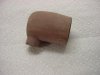
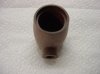
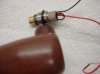
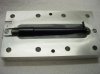
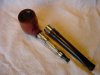
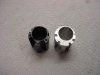
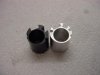
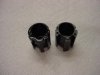
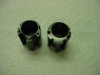
Those molds are really neat! Are you using an injection molding machine, or is this some other process?

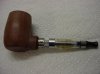
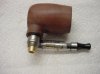
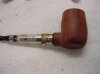
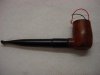
I can see the appeal of the auto-on feature, but I prefer manual activation; there are a lot of times when I've got the pipe in my mouth, but am not actively vaping (this seems to happen a lot when I'm reading).

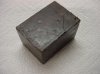
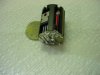
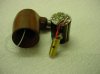
For the first run of 50 I'm going to pour the molds with urethane, pressure cast at 60 PSI and then heat to 250 for 2 hours. If all works out I will then make the injection molds for the next run.

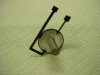
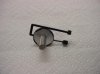
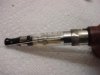
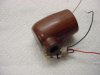
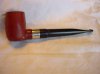
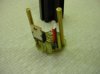
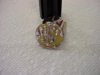
Not being one that likes to hold the stem in his mouth, I didn't think about other people doing it. May be best to have a contact point on the bowl that you can lift your finger off of. I'm still going to set the stem up for double contact. May be such a thing that you could order the pipe one way or the other. I don't know.
 

Mstr Mashnst

Unregistered Supplier
ECF Veteran
Today I finished the battery cap ring mold. It was a task to make this little mold. Had to do an insert in order to make it work. I'll cast a part tomorrow and see where I need to do some hand work on it. Made some changes to the cap mold too. So I'll cast a new part out of that one aswell. Should be able to start on the bowl soon. This is just to much fun.:)
 

Attachments

  • New Pipe 17 001.jpg
    New Pipe 17 001.jpg
    21.7 KB · Views: 69
  • New Pipe 17 003.jpg
    New Pipe 17 003.jpg
    21.7 KB · Views: 66

Mstr Mashnst

Unregistered Supplier
ECF Veteran
Got around to pulling the part out of the mold this afternoon. It turned out great. Built a little test jig to fit it and try it. I found that you would have to turn the pipe upside down and let the battery cap fall out into your hand. If you didn't hold it just right the cap would jam and not come out. This just won't do. Went back and built a new insert for the ring mold. Now I will be able to turn it in and turn it out. This will be much better. Going to redo the tab plate on the battery cap mold so they are more square. This will give it a more positive fell when you put the cap into the pipe. I like it when you can feel a part drop in, then turn to a fixed stop. That's all for this weekend. Monday I'll finish it up and cast two new parts.:)
 

Attachments

  • New Pipe 18 002.jpg
    New Pipe 18 002.jpg
    21.8 KB · Views: 72
  • New Pipe 18 004.jpg
    New Pipe 18 004.jpg
    21.7 KB · Views: 68
  • New Pipe 18 010.jpg
    New Pipe 18 010.jpg
    21.7 KB · Views: 65

Mstr Mashnst

Unregistered Supplier
ECF Veteran
Pulled out the new battery cap and cap ring. Have some hand work to do on the molds still but, I'll do that later. I think for now it's time to move on to making the bowl. Going to do the first ones by hand until I come up with a design I like. Then I will write the G-code and do them on my CNC router. I kind of like doing the hand shaping. It's fun to see things take shape in your hands by how you move them against a sanding wheel and belt. First thing to do is start with a block of wood. In the end I'll tell you what the block of wood is. For now:unsure:
 

Attachments

  • New Pipe 19 001.jpg
    New Pipe 19 001.jpg
    21.3 KB · Views: 62
  • New Pipe 19 002.jpg
    New Pipe 19 002.jpg
    21.9 KB · Views: 60
  • New Pipe 19 005.jpg
    New Pipe 19 005.jpg
    21.7 KB · Views: 64

Mstr Mashnst

Unregistered Supplier
ECF Veteran
One of the things I want is for my pipe to sit upright when I put it down. To do this it has to have a flat bottom. I would like this to be a trade mark of my pipes. Cut and sanded the bowl into a little apple shape with a flat bottom. Bored the inside for the battery holder and cap. The cap will set down inside so it is harder to see from the side and there is a wood ring around it. I need to finish sand it, seal the inside, then hand wax it until the grain pops. You can see how the adaptor goes on and how the cart will install. It's starting to look like a pipe. You can bet I will be out in the shop all day tomorrow casting the stem and waxing. Later:D
 

Attachments

  • New Pipe 19 009.jpg
    New Pipe 19 009.jpg
    21.2 KB · Views: 80
  • New Pipe 19 010.jpg
    New Pipe 19 010.jpg
    21.4 KB · Views: 77
  • New Pipe 19 013.jpg
    New Pipe 19 013.jpg
    21.3 KB · Views: 91
  • New Pipe 19 014.jpg
    New Pipe 19 014.jpg
    20.9 KB · Views: 98
  • New Pipe 19 015.jpg
    New Pipe 19 015.jpg
    21.5 KB · Views: 87

Mstr Mashnst

Unregistered Supplier
ECF Veteran
The pipe is looking awesome!

Thank you, there's more to come.

Gorgeous. Very interested to see what a finished pipe looks like. Since this is the supplier's forum I think it's appropriate to ask about target price...?

I don't have a target price yet. After I finish the proto-type I'll put the numbers together and see what it looks like. Then comes the question, will more then 50 people buy them. You can make the best product in the world and price yourself right out of the market.


Today I finished sanding the bowl and rubbed it out. Made the lock ring that will be molded into the mouth piece and soldered the wire to it. Drilled the bowl for the touch contact. You can kind of see it in the photo. It is very small and sticks out about .015. Just so you can fell it. Poured the mouth piece and will pull the part in the morning. Tomorrow we should all see what this thing is going to look like. Later:)
 

Attachments

  • New Pipe 20 001.jpg
    New Pipe 20 001.jpg
    21.3 KB · Views: 70
  • New Pipe 20 002.jpg
    New Pipe 20 002.jpg
    22 KB · Views: 77
  • New Pipe 20 006.jpg
    New Pipe 20 006.jpg
    21.7 KB · Views: 78
  • New Pipe 20 007.jpg
    New Pipe 20 007.jpg
    21.4 KB · Views: 72

Mstr Mashnst

Unregistered Supplier
ECF Veteran
Pulled the mouth piece out of the mold this morning. Cleaned off all the flashing and gave it a sanding. In the second pic you can see the wire molded into the mouth piece down by the bite. It has a square slot on the mouth side and the lock ring on the other. There will be an o-ring between the bowl and the lock ring. The o-ring is to make a seal and hold the mouth piece. The mouth piece will make a click when you turn it, to put it on. I'm going to make a cover ring that goes over the o-ring so you can't see it. More on that tonight.:)
 

Attachments

  • New Pipe 21 002.jpg
    New Pipe 21 002.jpg
    21.5 KB · Views: 69
  • New Pipe 21 006.jpg
    New Pipe 21 006.jpg
    21.2 KB · Views: 62
  • New Pipe 21 007.jpg
    New Pipe 21 007.jpg
    20.2 KB · Views: 62
  • New Pipe 21 008.jpg
    New Pipe 21 008.jpg
    20.4 KB · Views: 67

SimianSteam

Super Member
ECF Veteran
Verified Member
Feb 2, 2013
941
1,322
44
The Jungle
Thank you, there's more to come.


I don't have a target price yet. After I finish the proto-type I'll put the numbers together and see what it looks like. Then comes the question, will more then 50 people buy them. You can make the best product in the world and price yourself right out of the market.


Today I finished sanding the bowl and rubbed it out. Made the lock ring that will be molded into the mouth piece and soldered the wire to it. Drilled the bowl for the touch contact. You can kind of see it in the photo. It is very small and sticks out about .015. Just so you can fell it. Poured the mouth piece and will pull the part in the morning. Tomorrow we should all see what this thing is going to look like. Later:)

Well, if the price is right I'd definitely be in for one. I love my current pipe and wouldn't mind another one.
 

Mstr Mashnst

Unregistered Supplier
ECF Veteran
Very nice work! That looks to be a pretty clean / well blended joint between the stem and the bowl, and I really like the bowl finish. I can't wait to see pics of the assembled pipe!

And here it is.

Well, if the price is right I'd definitely be in for one. I love my current pipe and wouldn't mind another one.

I will let you know on price. Can I ask what pipe you have now?
 

Attachments

  • New Pipe 21 010.jpg
    New Pipe 21 010.jpg
    20.2 KB · Views: 65
  • New Pipe 21 017.jpg
    New Pipe 21 017.jpg
    20.8 KB · Views: 76
  • New Pipe 21 012.jpg
    New Pipe 21 012.jpg
    20.2 KB · Views: 62
  • New Pipe 21 013.jpg
    New Pipe 21 013.jpg
    19.6 KB · Views: 67

Mstr Mashnst

Unregistered Supplier
ECF Veteran
Went to put the battery holder and electronics into the pipe today. As hard as I tried, I could not get it to look like a clean install. One wire run over the top of a screw and then ran over the top of LED, blocking it some what. It looked good in my head when I built it and at three in the morning while I laid in bed looking up at the ceiling. But once in the pipe it looked like crap. Now that the adaptor center can be removed, I'm going to hard wire it to the PCB. Spent the day redesigning the PCB and then made a new battery holder pattern. I'll do a rubber cast tonight and then cast a part tomorrow. I hope this will be a much cleaner look.
 

Attachments

  • New Pipe 22 001.jpg
    New Pipe 22 001.jpg
    20.7 KB · Views: 47
  • New Pipe 22 002.jpg
    New Pipe 22 002.jpg
    21.6 KB · Views: 47
  • New Pipe 22 003.jpg
    New Pipe 22 003.jpg
    21.2 KB · Views: 45
  • New Pipe 22 004.jpg
    New Pipe 22 004.jpg
    21.2 KB · Views: 57

Mstr Mashnst

Unregistered Supplier
ECF Veteran
Casted the new plastic battery holder. It still needs to be faced off and sized. Made a quick printed circuit board for testing. There is a company here in town that will laser cut them for me when I get the final design down. Until then I'll just do them by hand. Tomorrow it should be done and in the pipe. A little set back remaking everthing but, not bad.:)
 

Attachments

  • New Pipe 23 001.jpg
    New Pipe 23 001.jpg
    22.4 KB · Views: 51
  • New Pipe 23 002.jpg
    New Pipe 23 002.jpg
    22 KB · Views: 58
  • New Pipe 23 004.jpg
    New Pipe 23 004.jpg
    21 KB · Views: 49
  • New Pipe 23 005.jpg
    New Pipe 23 005.jpg
    21.2 KB · Views: 49

Mstr Mashnst

Unregistered Supplier
ECF Veteran
Was able to finish the battery holder and new electronics today. Hard wired the adaptor to the circuit board. There are two upright post that hold the PCB to the battery case and supplies B+ along with the sensor pad to the PCB. This board is not water proof but, the production ones will be.:)
 

Attachments

  • New Pipe 24 001.jpg
    New Pipe 24 001.jpg
    21.8 KB · Views: 49
  • New Pipe 24 002.jpg
    New Pipe 24 002.jpg
    21 KB · Views: 68
  • New Pipe 24 003.jpg
    New Pipe 24 003.jpg
    21.1 KB · Views: 53
  • New Pipe 24 004.jpg
    New Pipe 24 004.jpg
    22.1 KB · Views: 55
  • New Pipe 24 006.jpg
    New Pipe 24 006.jpg
    21.6 KB · Views: 66
Status
Not open for further replies.

Users who are viewing this thread