

You are using an out of date browser. It may not display this or other websites correctly.
You should upgrade or use an alternative browser.
You should upgrade or use an alternative browser.
Mike n Tibs DNA Mods!
- Thread starter Proetus
- Start date
- th_trl_thread_readers 0
- Status
- Not open for further replies.
Good News!
I "will" be able to get the Evolv 510s for the Enclosures! Not sure about extras, but he committed to selling me enough to complete the project. He couldnt give me a price yet though.
I "will" be able to get the Evolv 510s for the Enclosures! Not sure about extras, but he committed to selling me enough to complete the project. He couldnt give me a price yet though.
OK Folks, here is how I am going to work this. I dont want to open the discussion thread until I actually have something more than a rendering to show. Once I get the drawings I will get a single sample of each size made. That will take 2-3 weeks. I will then assemble it and assuming it is as good to go as we think, I will then open a Discussion thread.
Right now I am targeting a complete kit including a DNA200 board (optional), 850Mah or 1350mAh enclosure, Evolv 510, SS buttons, and all screws needed. Folks would need to supply their own wire and Lipo.
Oh, and BTW, I am going on vacation next week so dont be surprised if I go off the grid.
Right now I am targeting a complete kit including a DNA200 board (optional), 850Mah or 1350mAh enclosure, Evolv 510, SS buttons, and all screws needed. Folks would need to supply their own wire and Lipo.
Oh, and BTW, I am going on vacation next week so dont be surprised if I go off the grid.
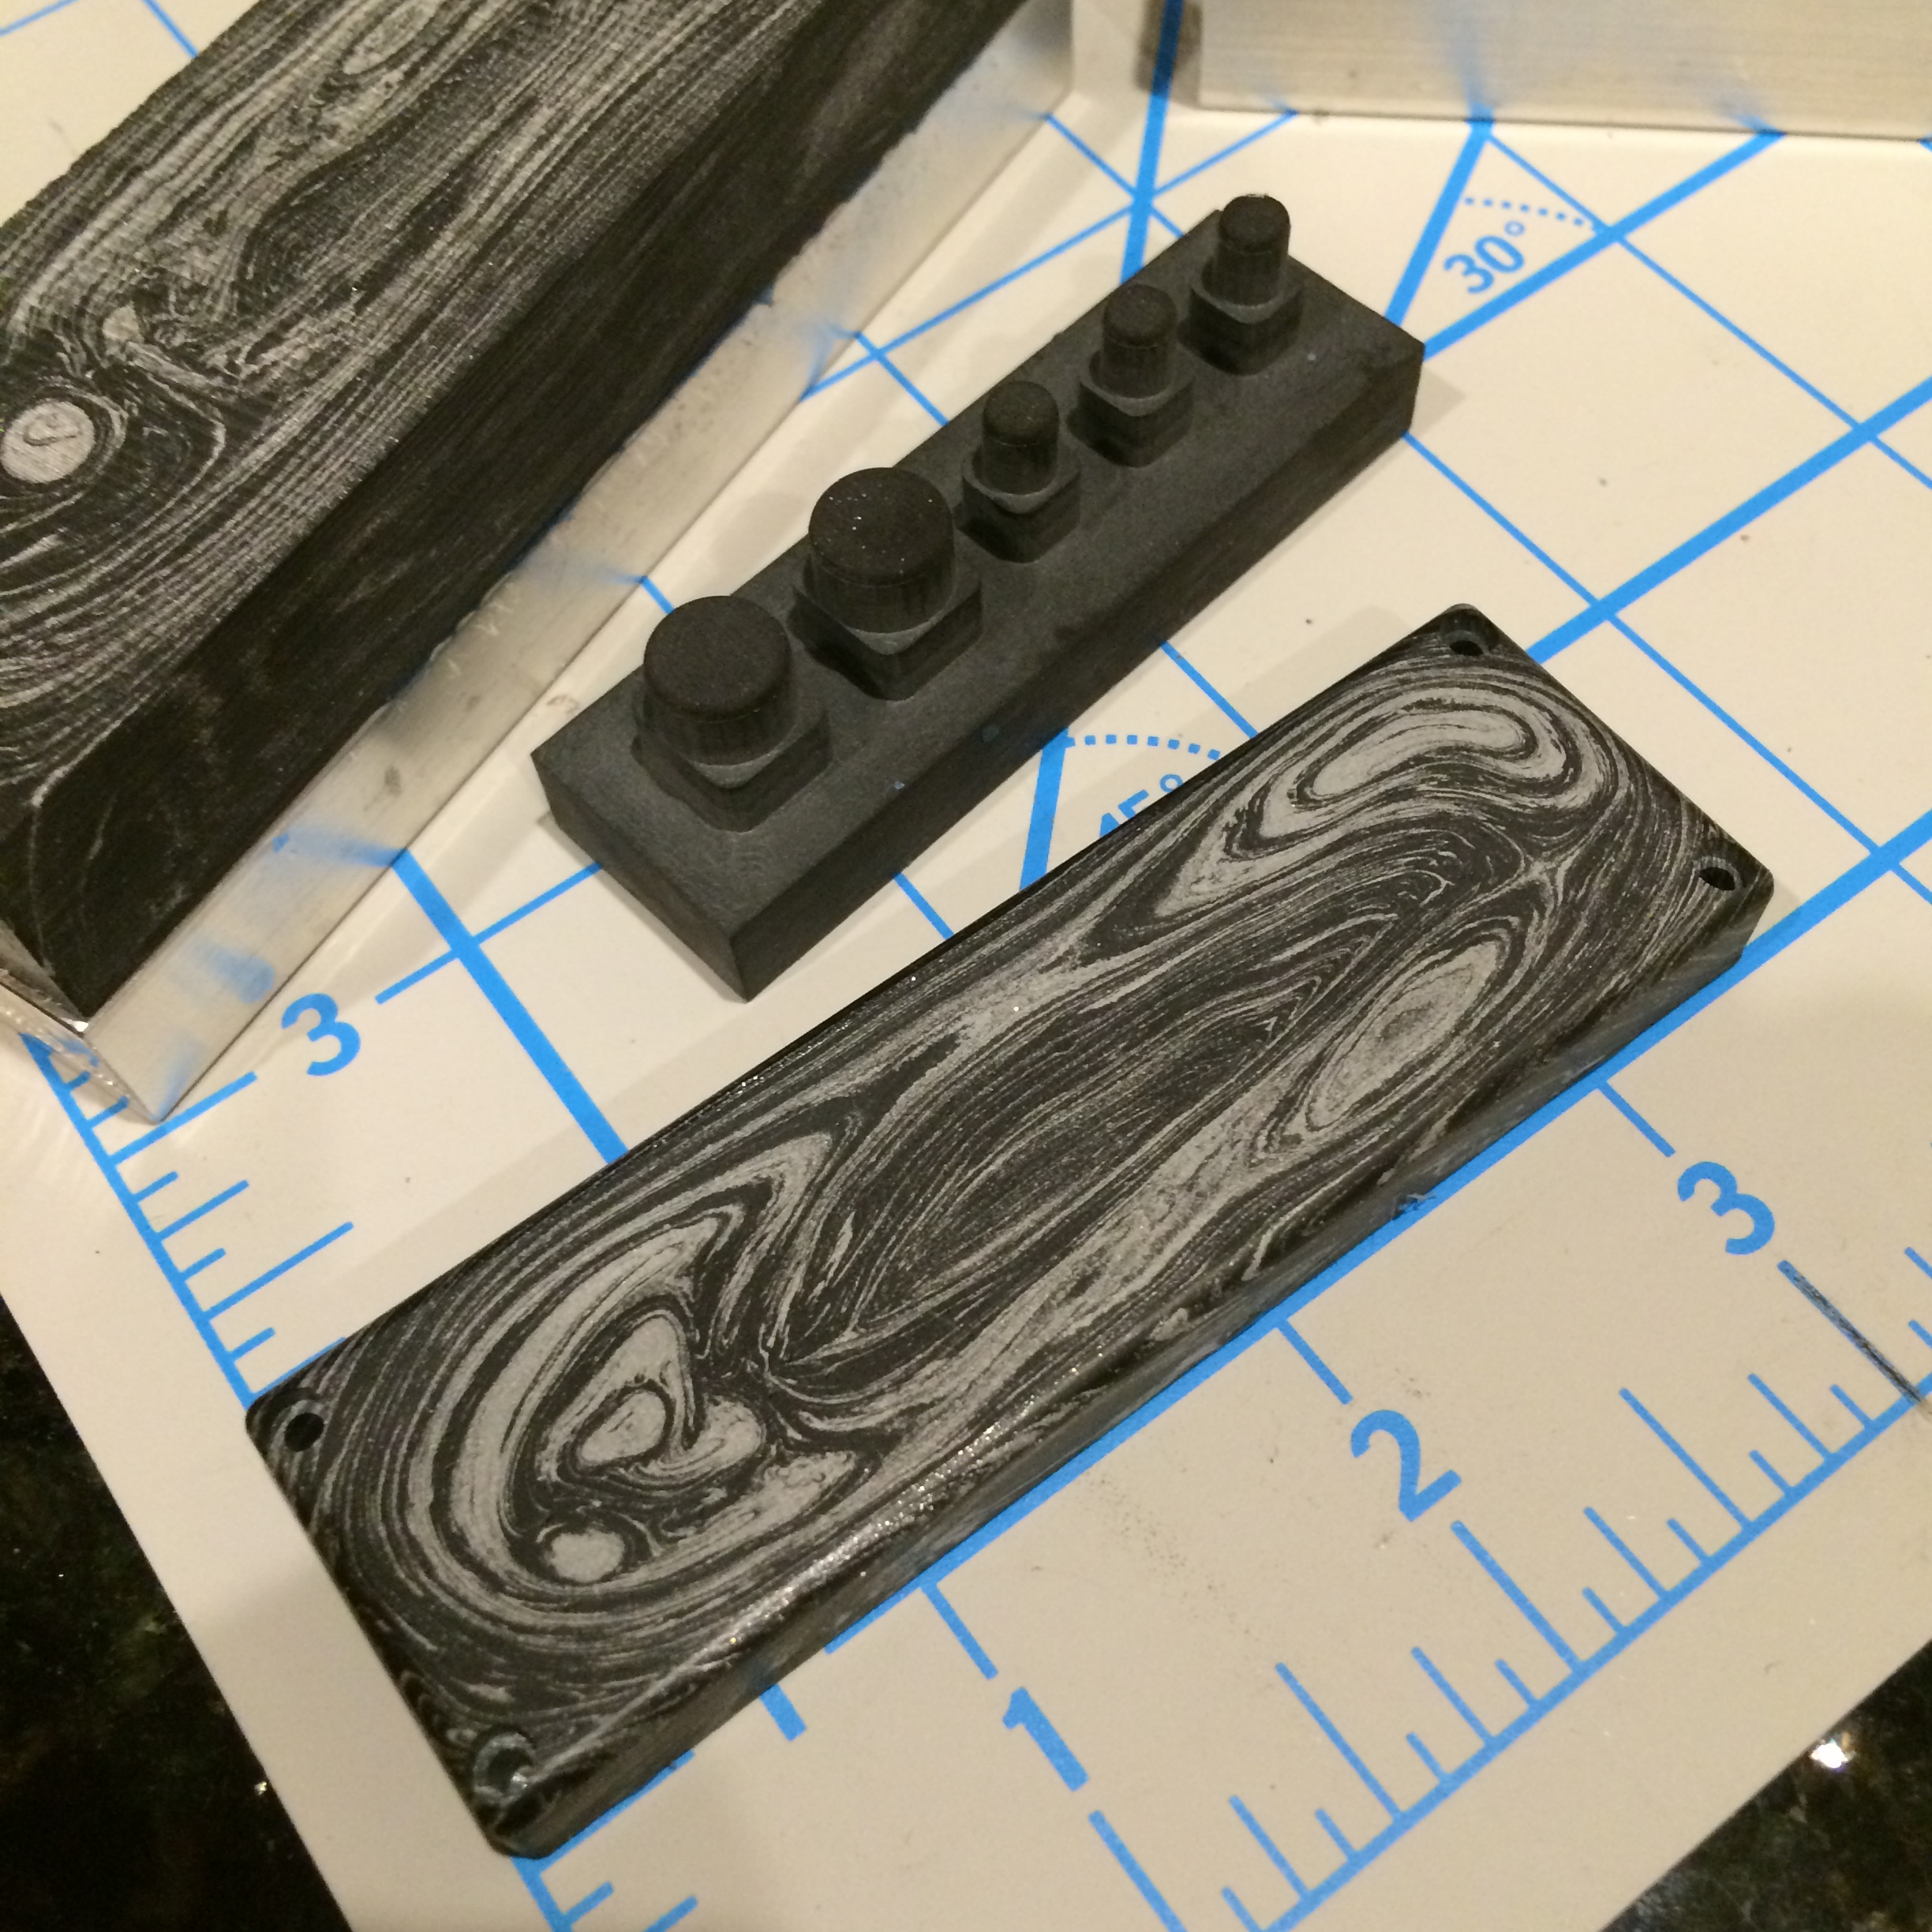
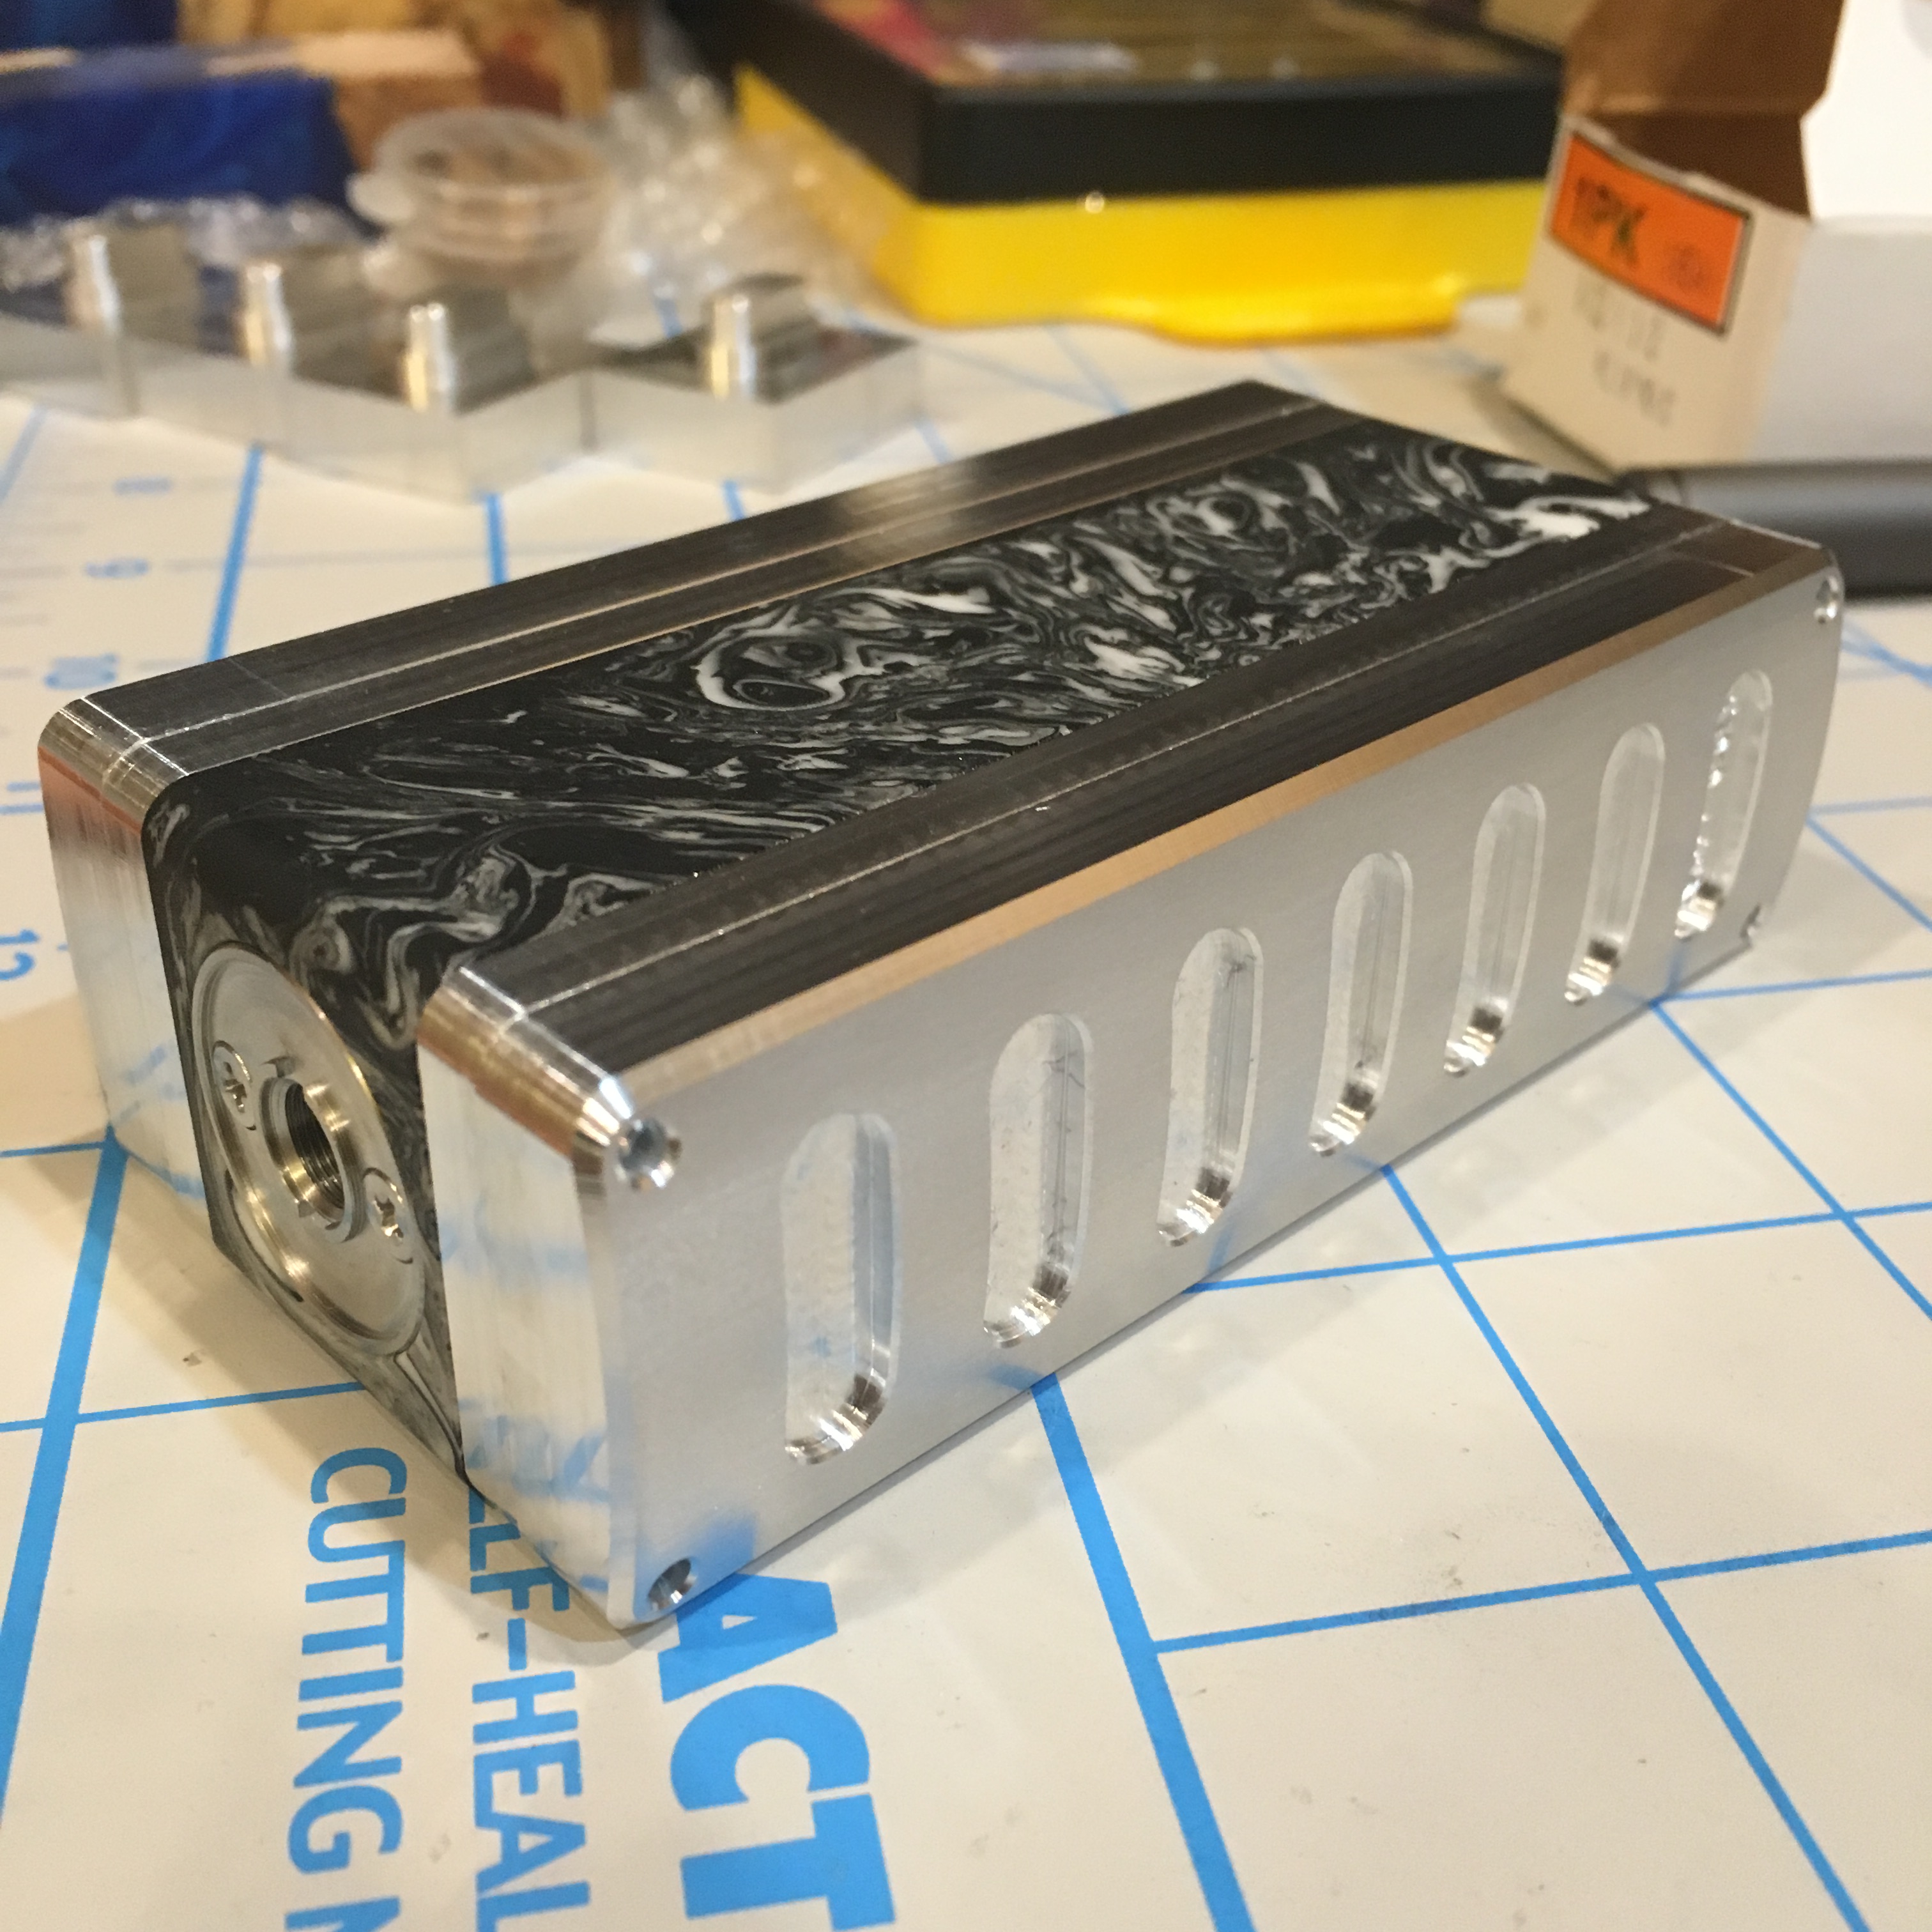
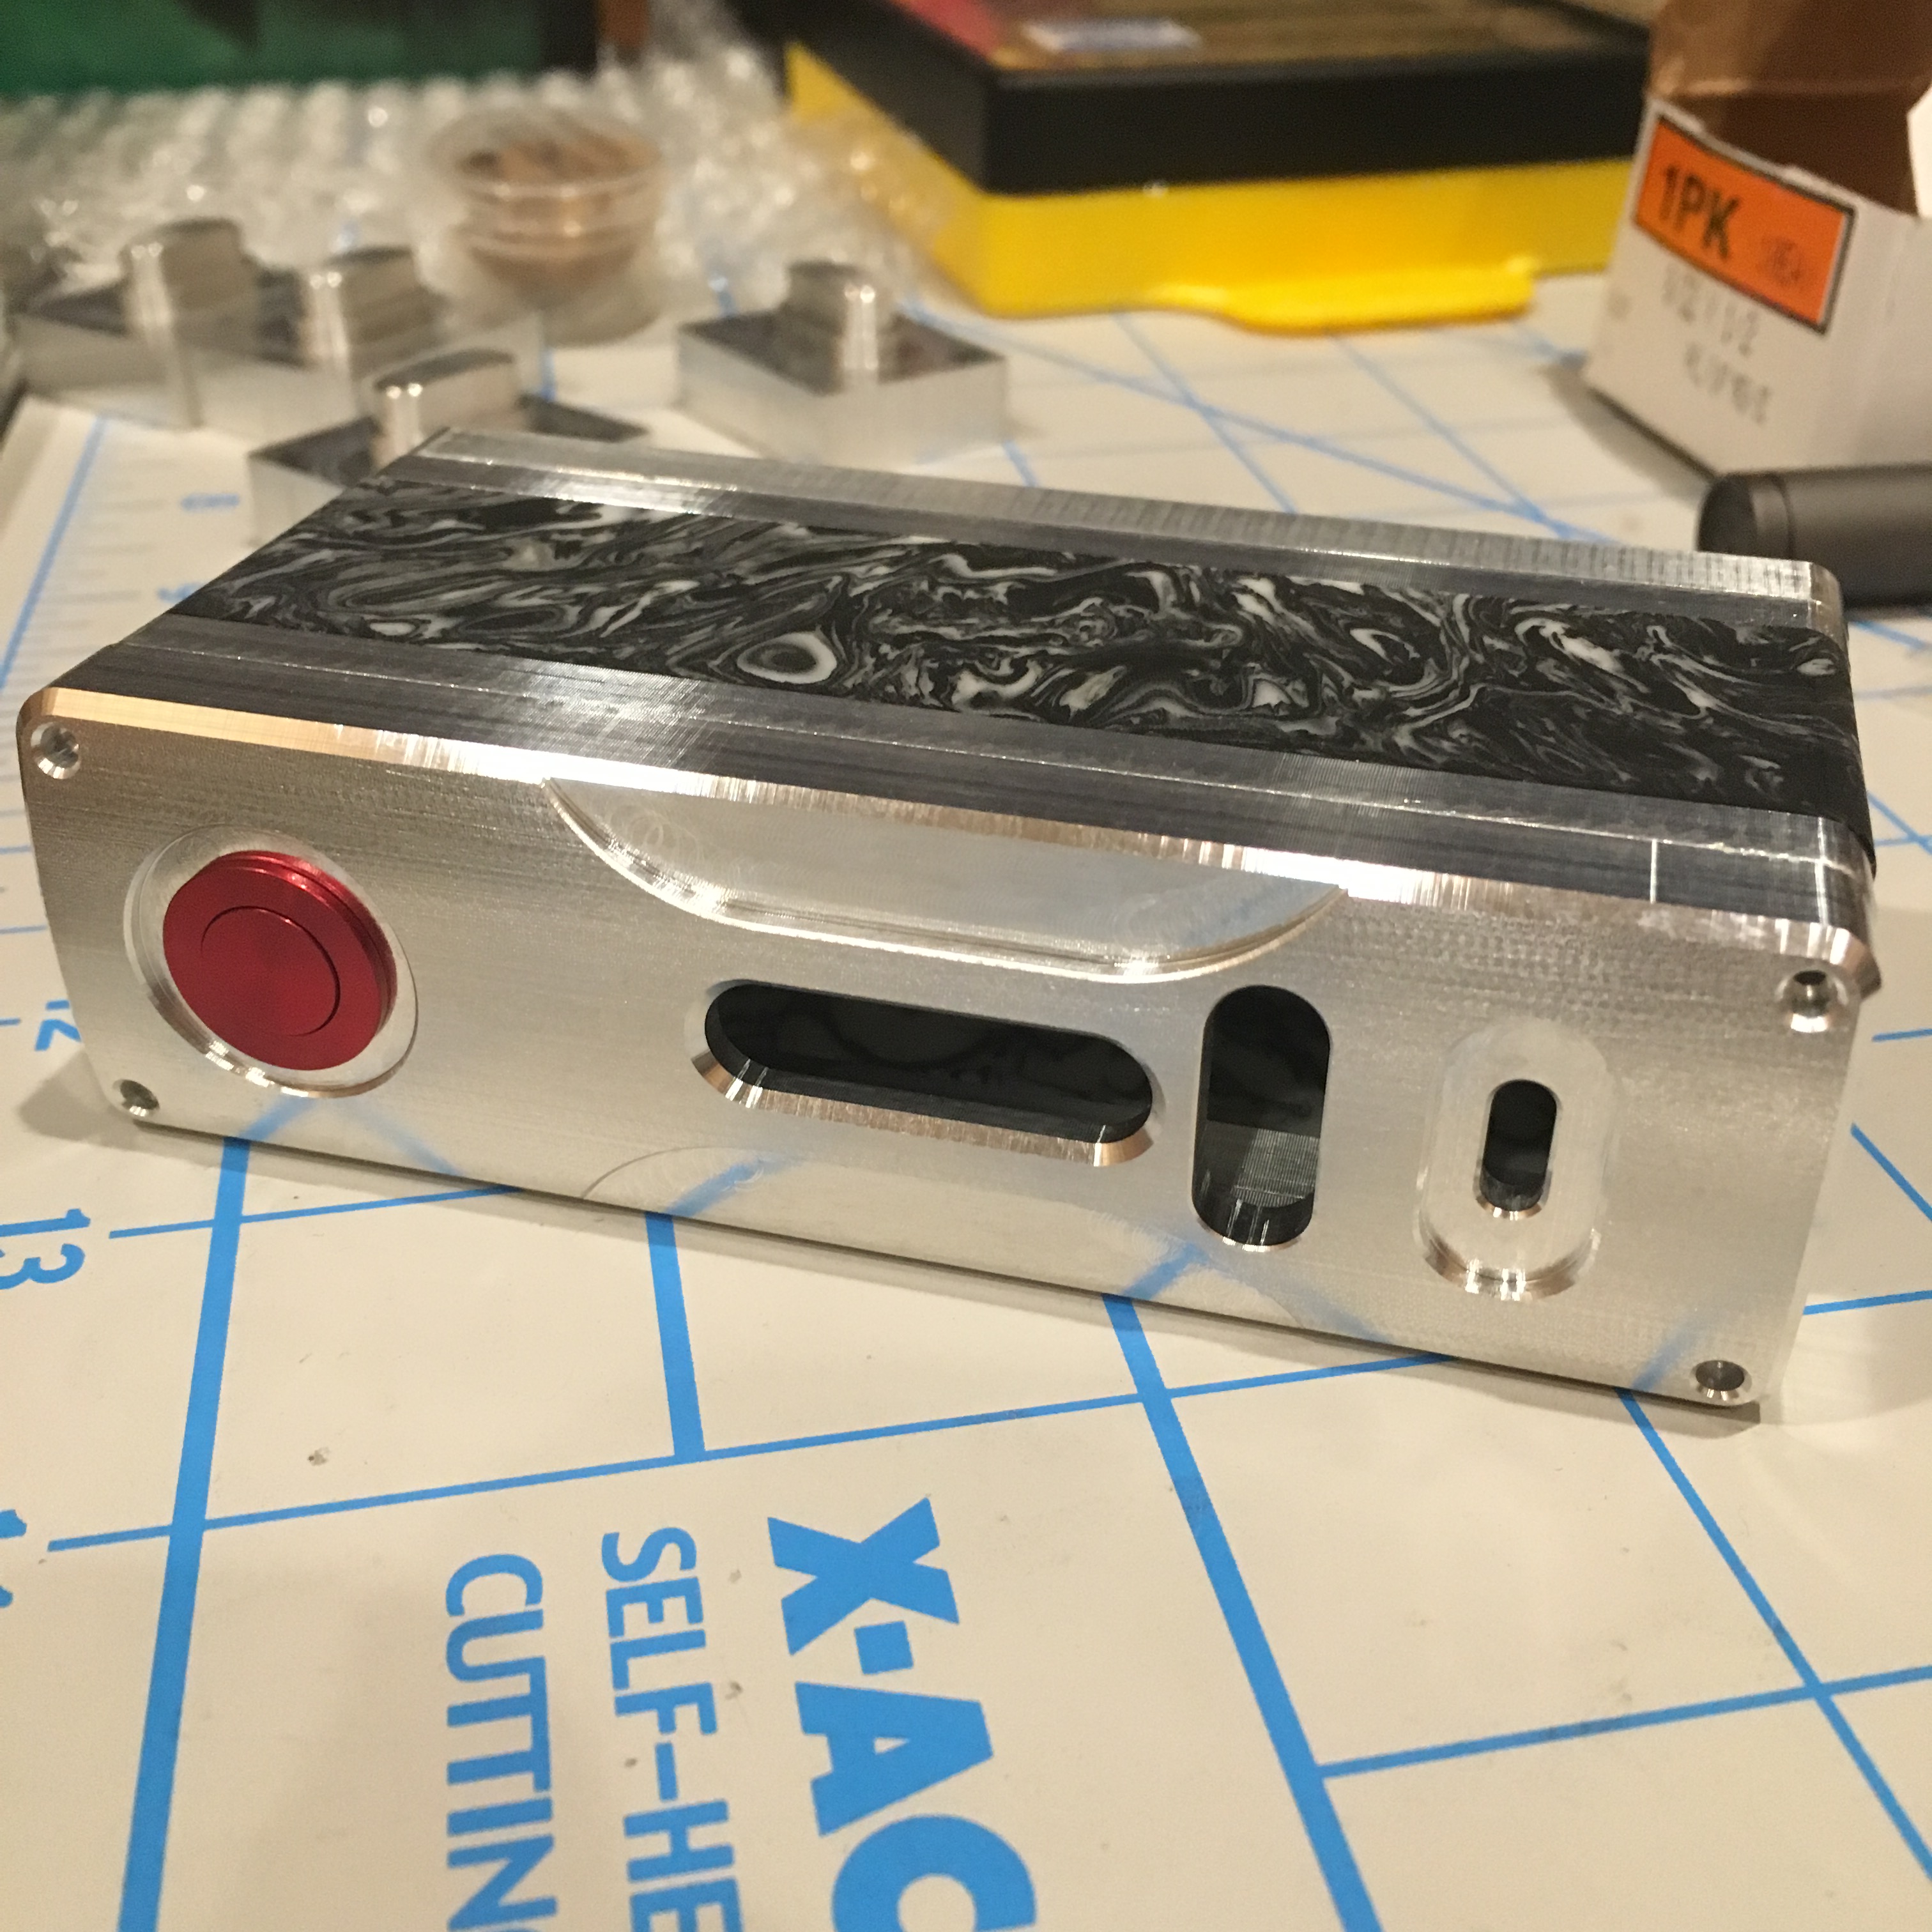
Been making a little bit of progress on my first DNA200 mod. Here is a picture of the milled buttons and rear cover. Still lot's to do but thought some of you might like to check it out. The buttons are black titanium and the front and rear covers are black and white M3 Mokume.
Concept:
Milled Parts
Concept:
Milled Parts
It's alive, It's ALIVE!!!
Finally! It's like Christmas and I got just what I wanted! Here's a couple quick pics, I'll post more of the inside tomorrow, I'm really tired.
The 3M double sided tape worked great for the screen and I was able to disconnect it and clamp the screen while I worked on the board, wasn't too bad hooking it back up once the battery and all the wires were soldered.

And here it is ALIVE!


A complete set of prints got sent to the Machinist last Friday for 2 samples of the ERM1300 v b1 (Evolv Reference Mod 1300mAh)

NOTE: This is only the front half of the clamshell......
NOTE: This is only the front half of the clamshell......


Well, I know that Li -Ion may not the best as a power supply but I have made a 3 x 18650 mod anyway")

It features

including:


All in all, it is working and fits nicely in the colourful fleet


And this is how it started; a broken battery pack that I was playing with:


It features
- 3 x LG HG2 3000mAh batteries with a whopping 33.3Wh nominal and hopefully some 25-30Wh actual capacity which is still not too bad especially for the size.
- Max planned dimensions of 38 x 50 x 85mm (1.496 x 1.9685 x 3.3465 inches) with an annoying +/-0.5mm Shapeways tolerancy
- Thousands of parts
including:
- Slightly concave battery cover that even more ergonomic (at least for me) than expected
- Spring loaded solid copper battery contacts
- Additional 25A quick blow glass fuse
- Pressfit concave fire button that almost works as good as intended and almost always as flush as designed
- Super simple double action +/- bar that works/looks exactly as intended
- A 3D print with acceptable overall accuracy and unacceptable accuracy on detail level (e.g. the body is some 0.5mm higher than designed which is ok but this 0.5 mm is plenty when it is added to a wall that should have been 2.5 mm thick not 3mm) and a broken(?)/missing part that happen to be an extremely important load bearing screw socket. Let alone the useless oval pilot holes just to name a few.
- A couple stupid design flaws including a missing pilot hole where I couldn't drill any
- Some brutal filing/hot knifing etc. actions and yes, even some hot glues thanks to the last two points above.
All in all, it is working and fits nicely in the colourful fleet
And this is how it started; a broken battery pack that I was playing with:
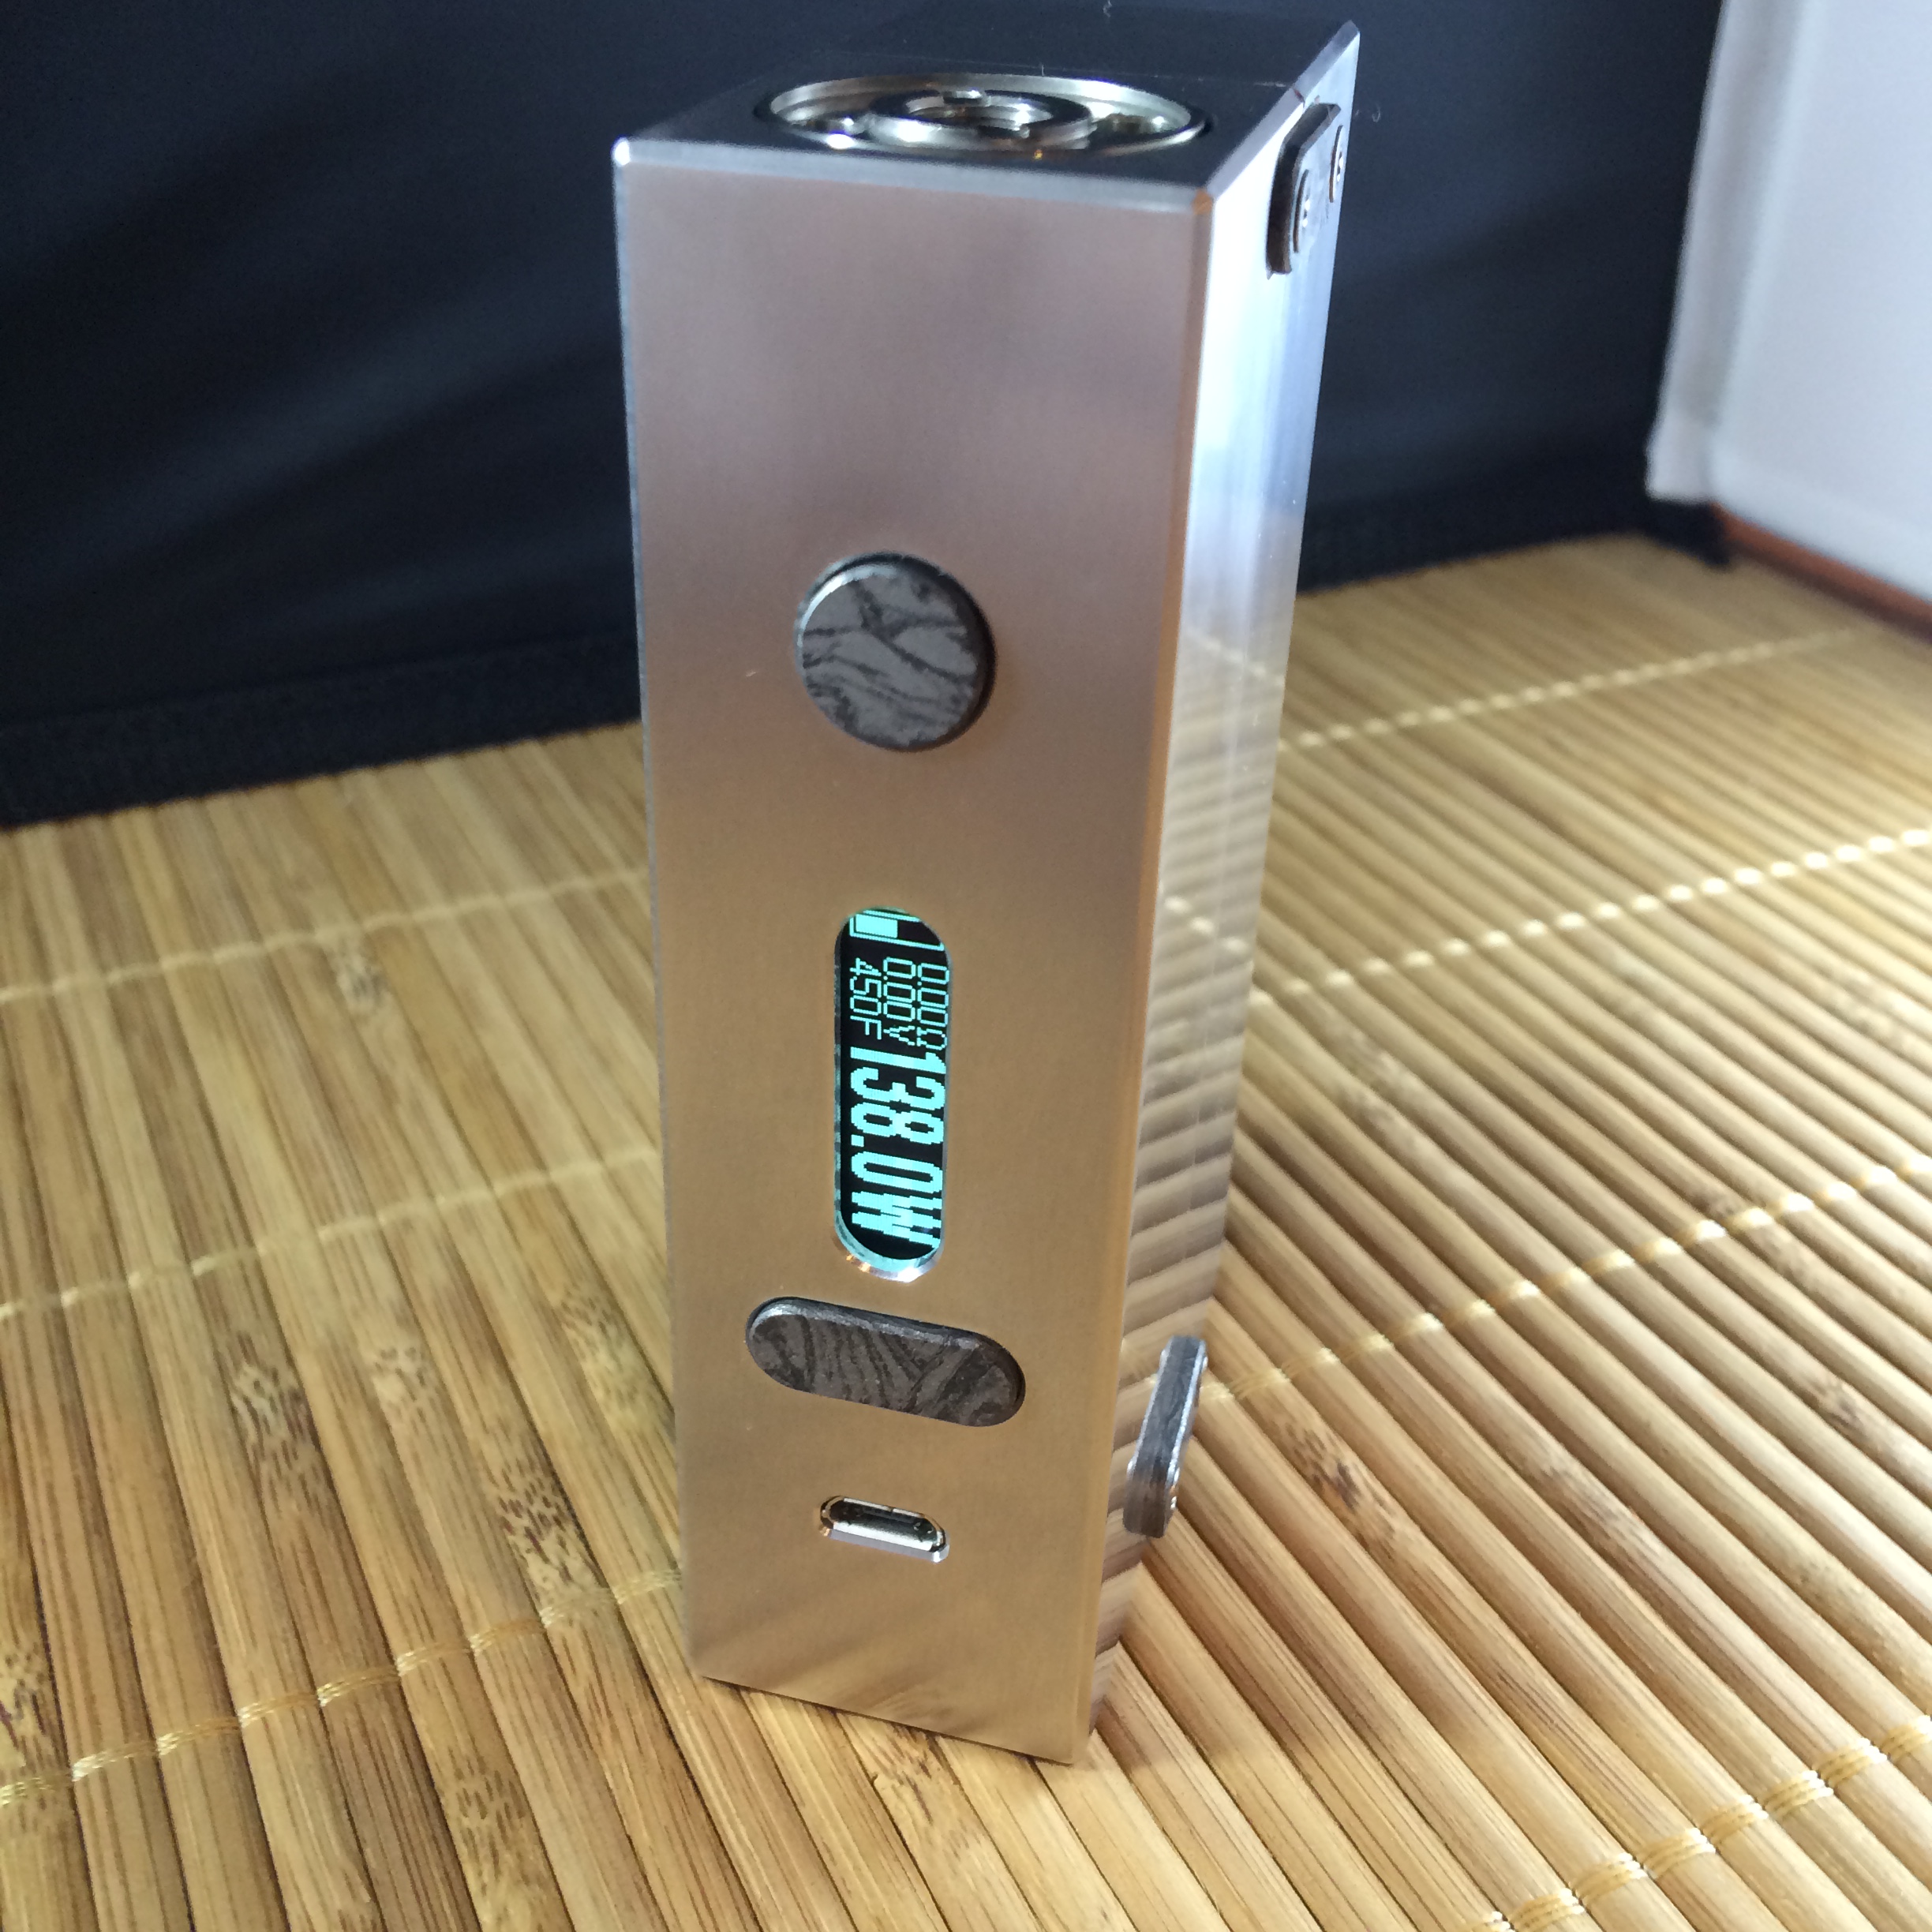
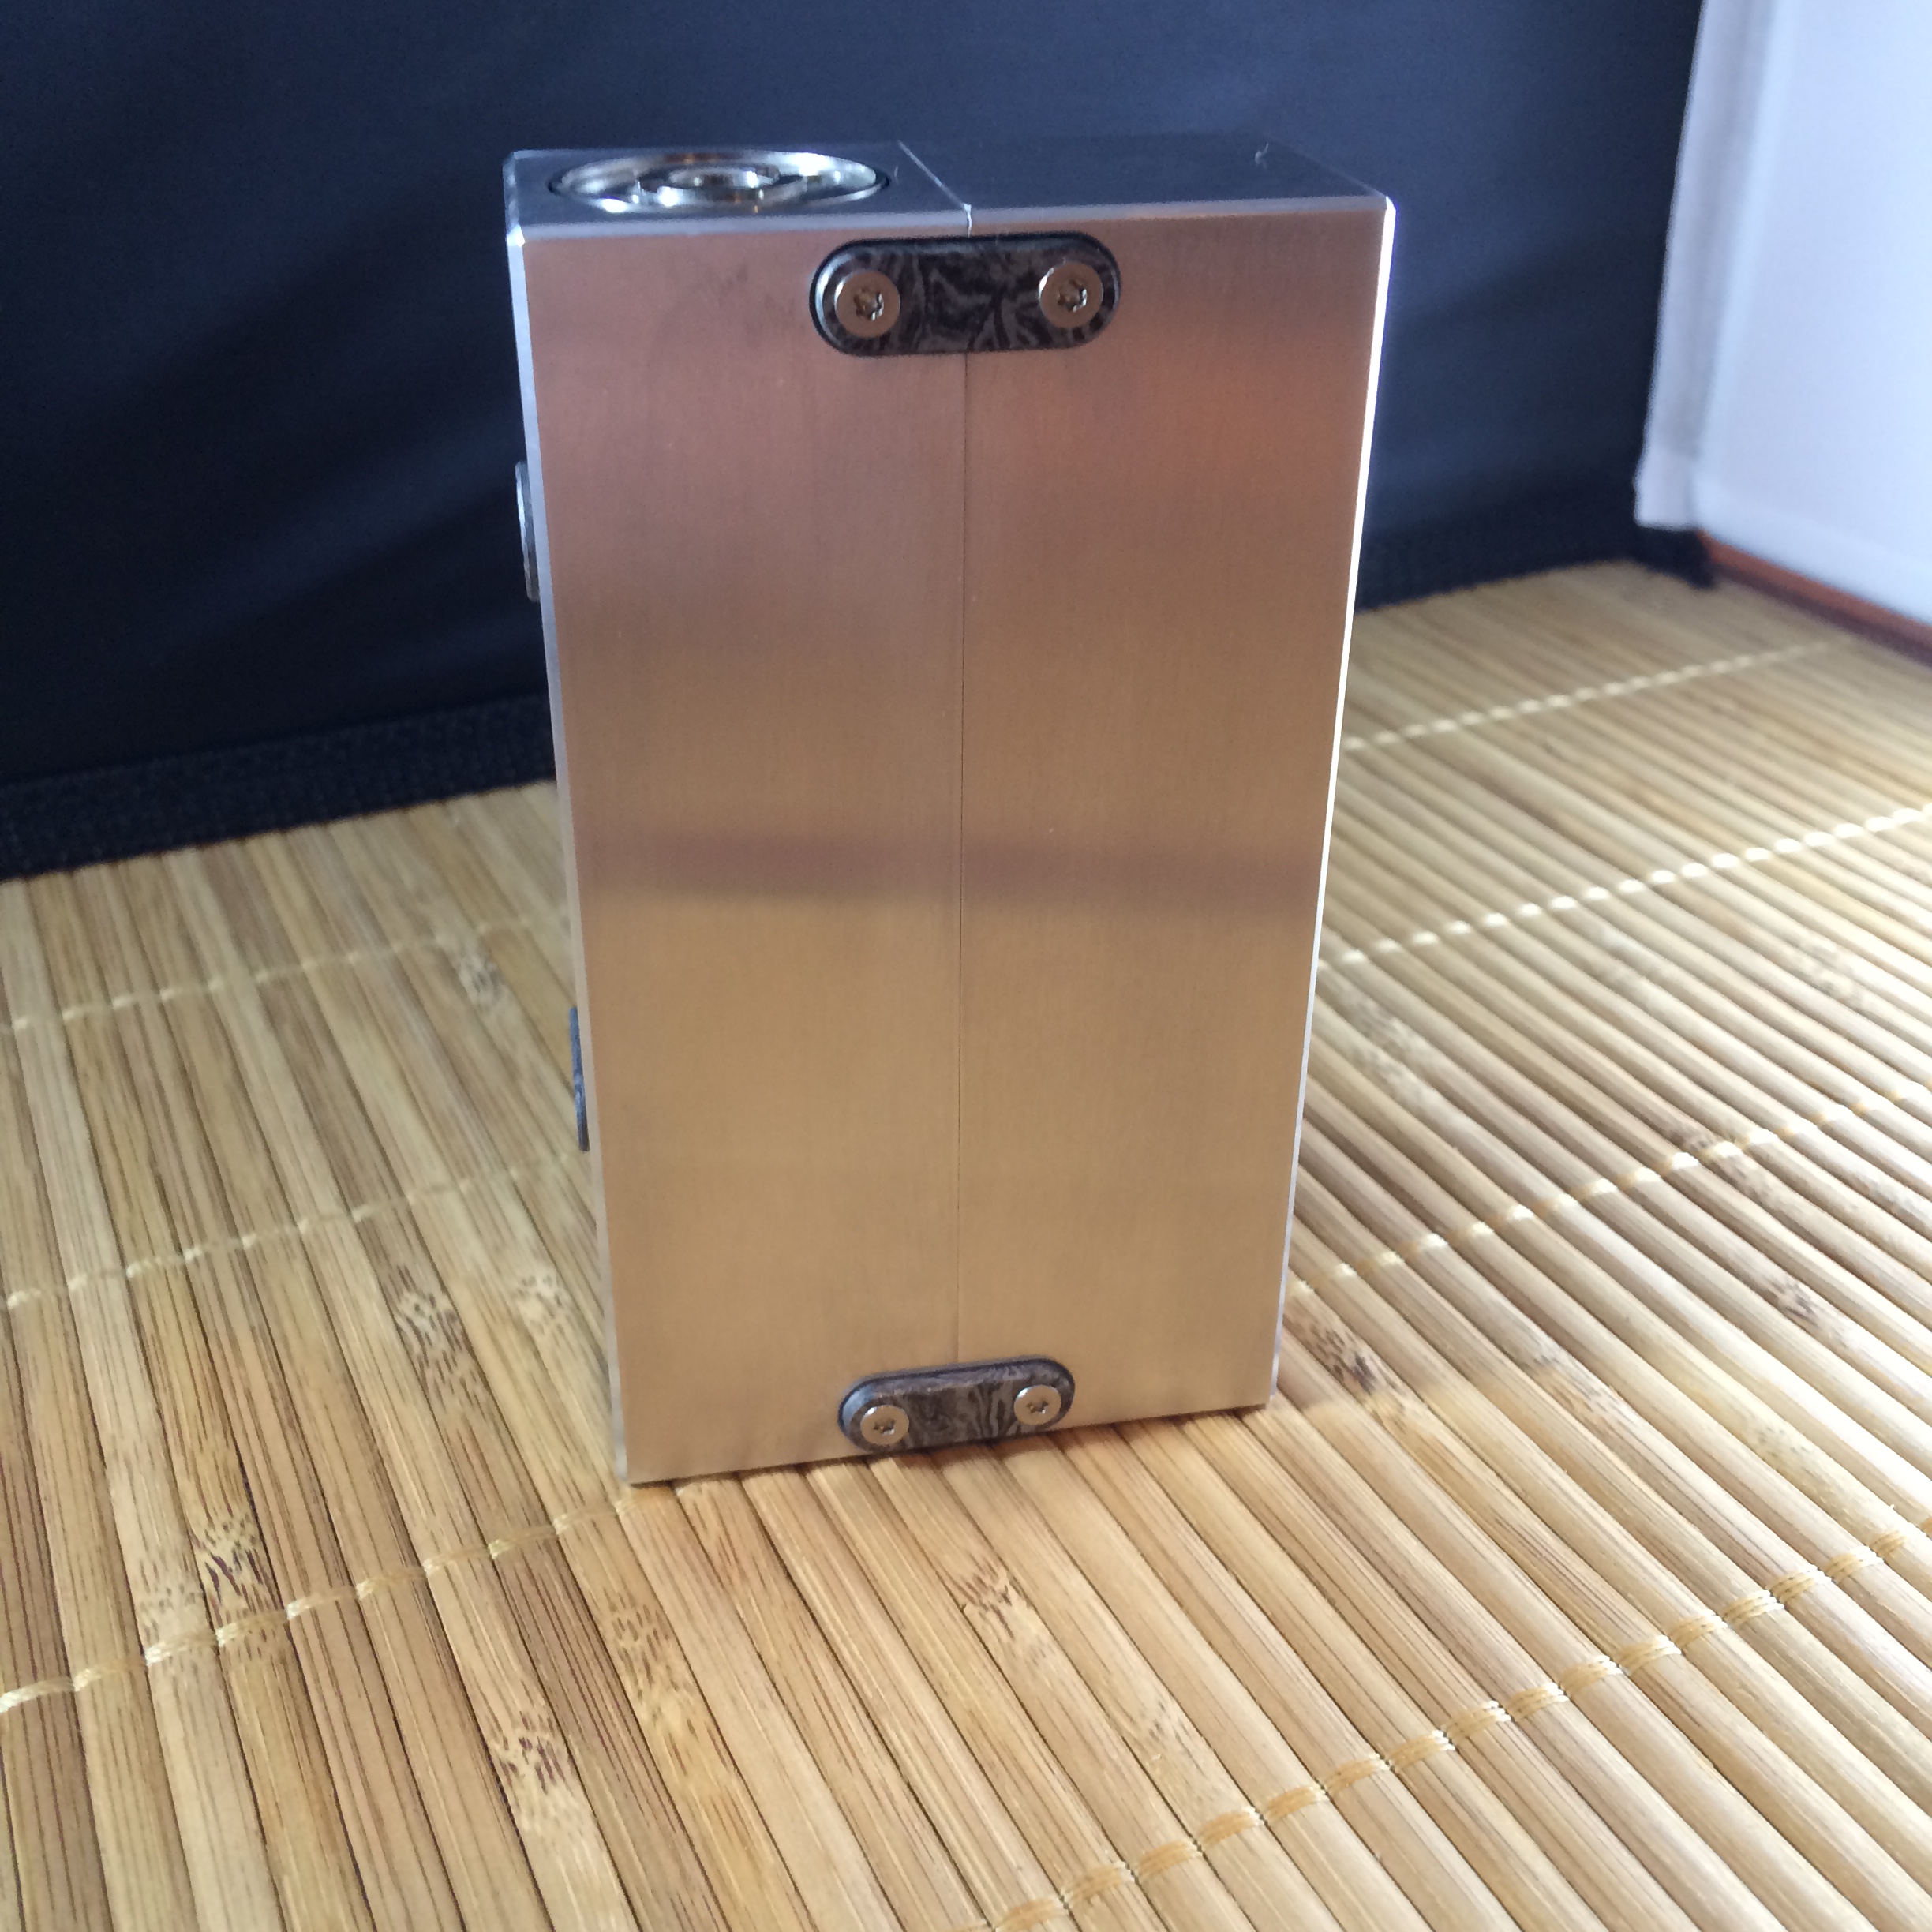
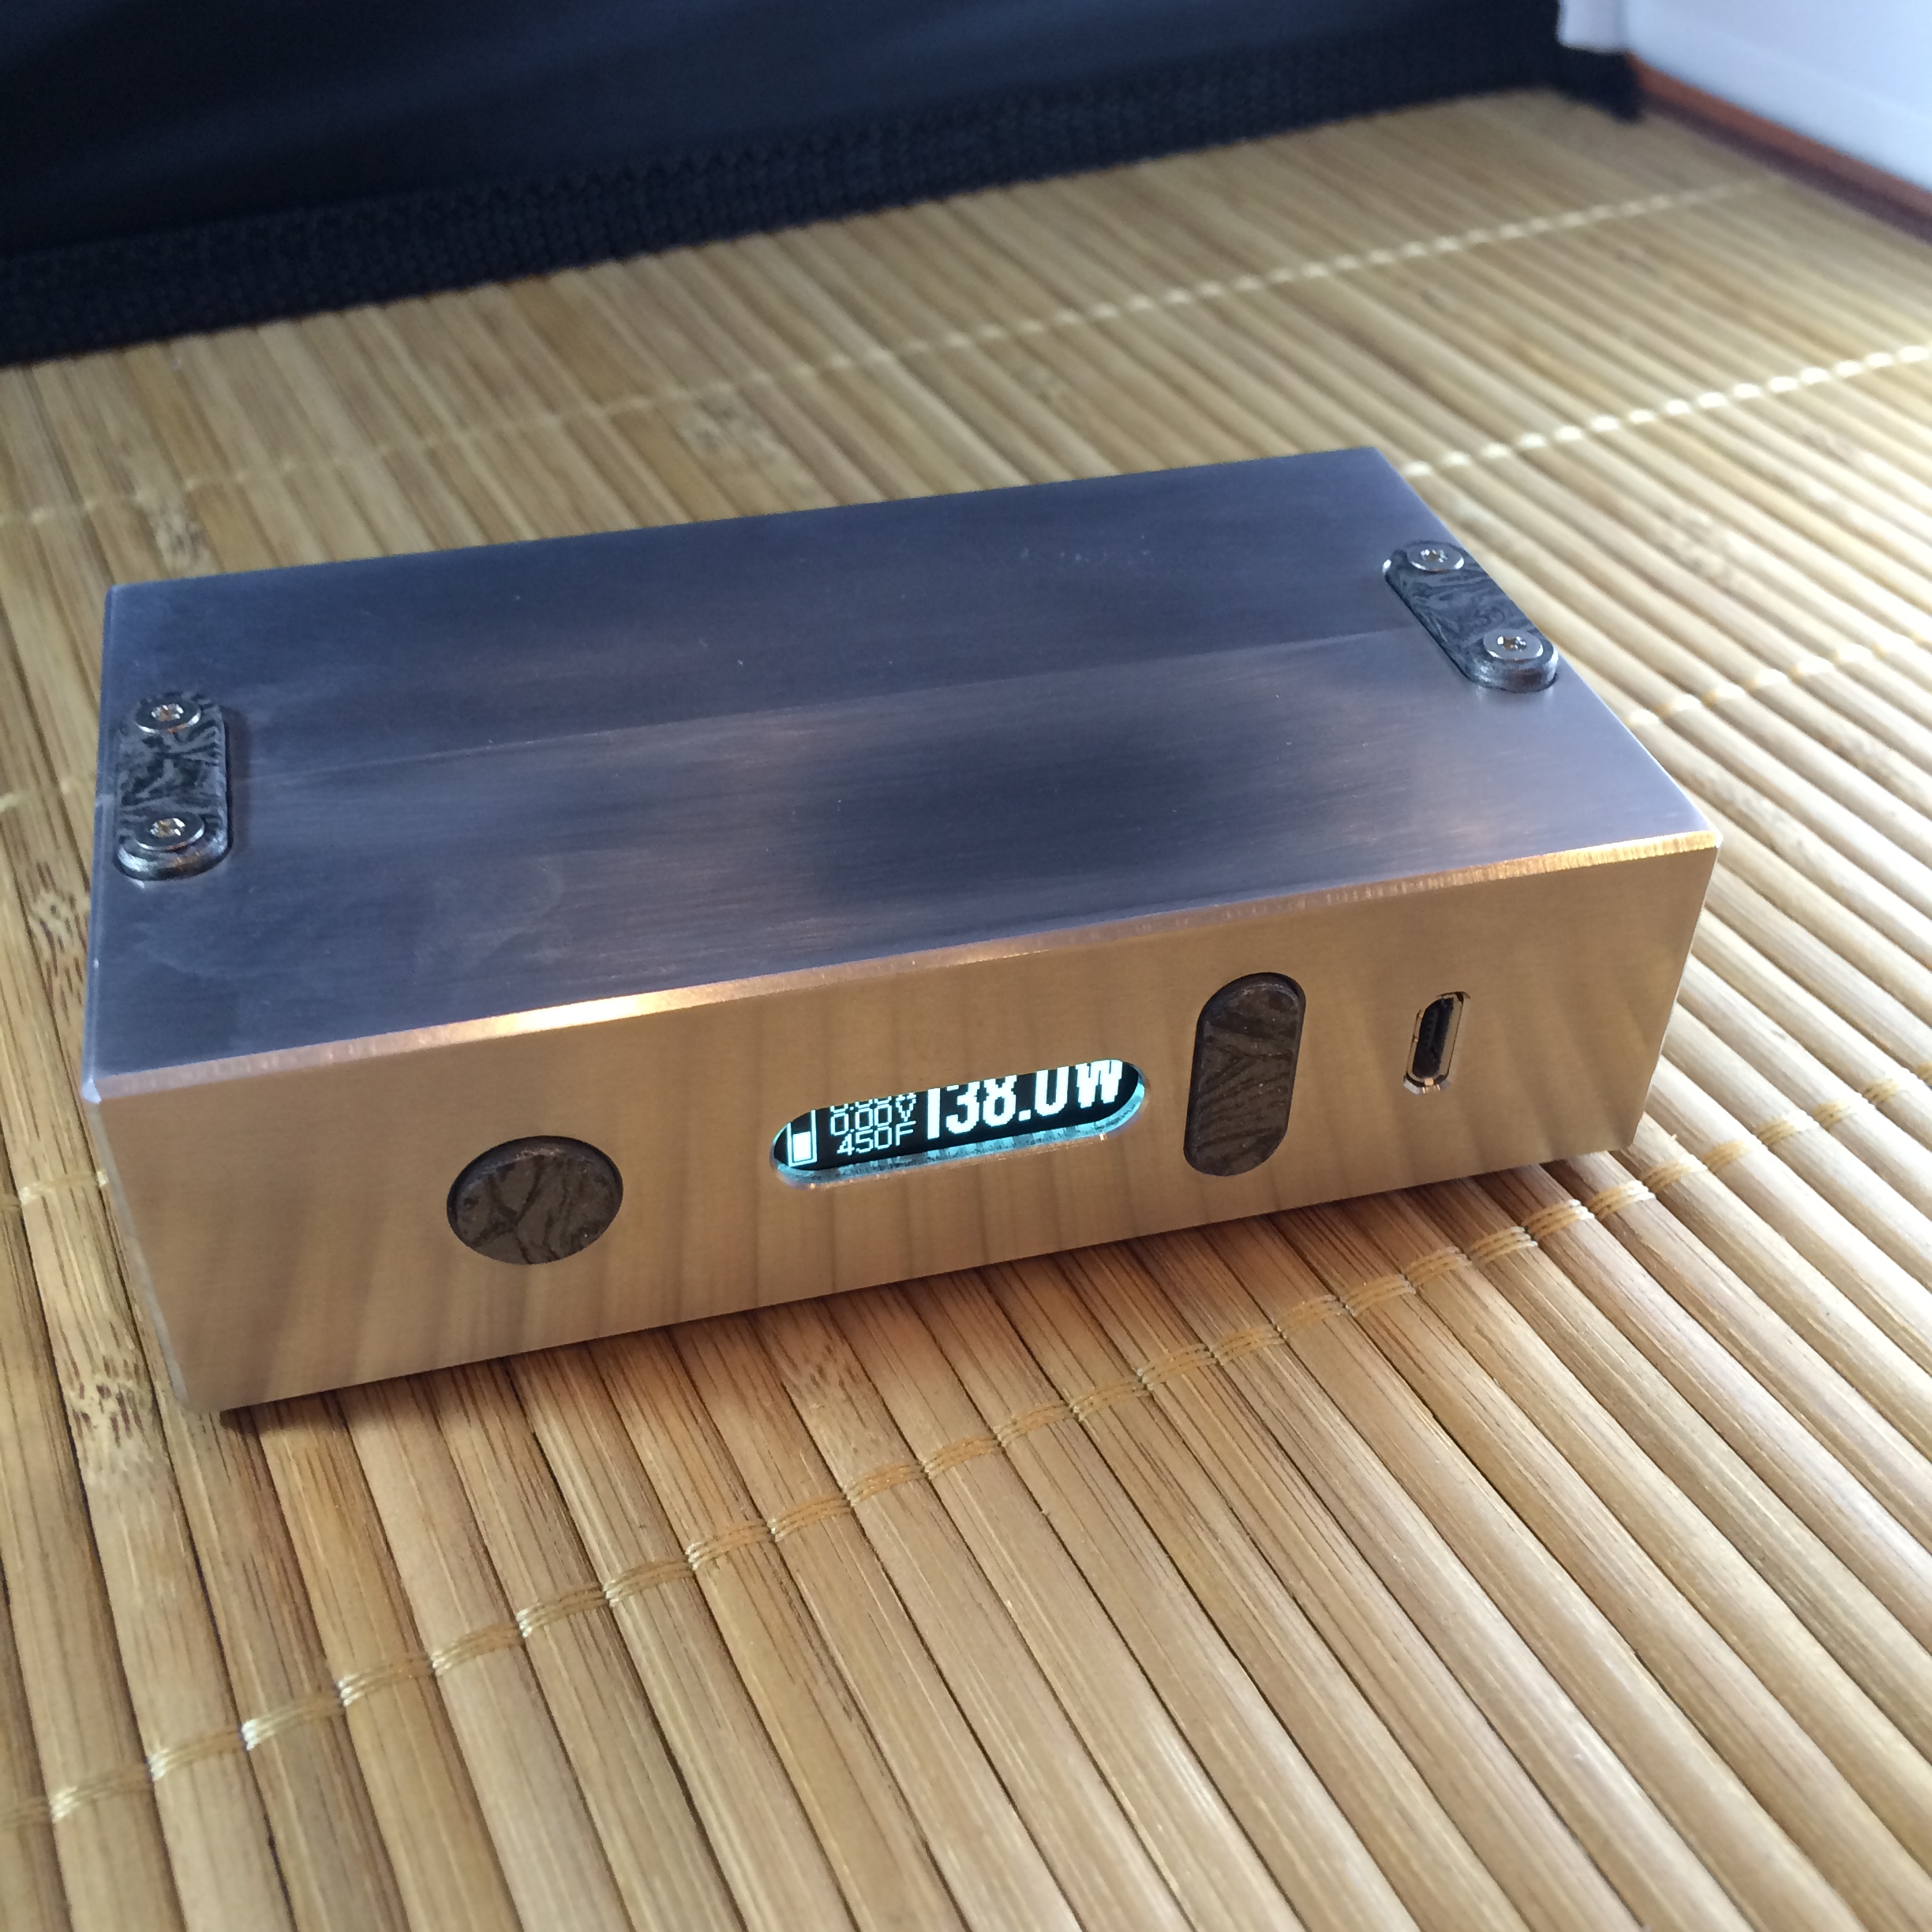
Finally got my split body DNA200 mod done. It's machined from 6061 aluminum and the buttons and side plates are made from damascus style M3 Mokume. There are a couple of small issues I need to address on the next build and the raw aluminum is a fingerprint magnet. Full photo album here:
OK, this battery gets a "Mike's Thumbs UP"!
I got two of these batteries in yesterday.
$11.17 Authentic ZOP Power 11.1V 1500mAh 20C Li-Polymer Battery at FastTech - Worldwide Free Shipping
The battery is rated 1500mAh and they clock in just shy of it, pretty damn close, a lot closer than many other brands.
While they are rated "1500mAh" they are the exact same size in every dimension as the Turnigy 1300. Even more curious is that the sticker on the two I got says 40C not 20C.
Actual unaltered measured dimensions are 71mm x 34mm x 23mm, although the wires exiting the head will eat up another mm. You "could" take off the heatshrink, reroute the wires, reinsulate it, and save a lot more room. I think you could get it down 66mm if you tried.
According to the Evolv Escribe Battery Analyzer:
Bat #1 - 15.49 WH
Bat #2 - 16.17 WH
Also do consider that this was the first cycle on both of these batteries, if anything the storage capacity improves after a few cycles.
Turnigy 1300mAh Avg - 14.14
ZOP 1500mAh Avg = 15.83
ZOP was an average of almost 11% more power for the exact same footprint of the Turnigy.
View my actual battery test results HERE, you can enter your own results too.
The Venom FLY battery (at twice the cost) is the only other tested battery that match this energy density.
Good energy density, at a great price, makes this battery a winner in my book.


Here's the latest. Just got this one done and truly enjoying this board. Pretty much all the features of it's bigger brother but in a tinier package.
http://uploads.tapatalk-cdn.com/20160602/7fa2083dfb7e624d7725551449a032ea.jpg[/
With the way I vape I'm not missing the extra power and have a mod that's pocket friendly and fits very comfortably in my hand. Battery life so far is pretty much what you'd expect, about a day, give or take.
One thing to add, since I've been using the DNA boards I've never had a more satisfying user experience. And with the degree one can customize the board itself its been a total game changer for me. Congrats to Evolv for getting it right.
Cheers.
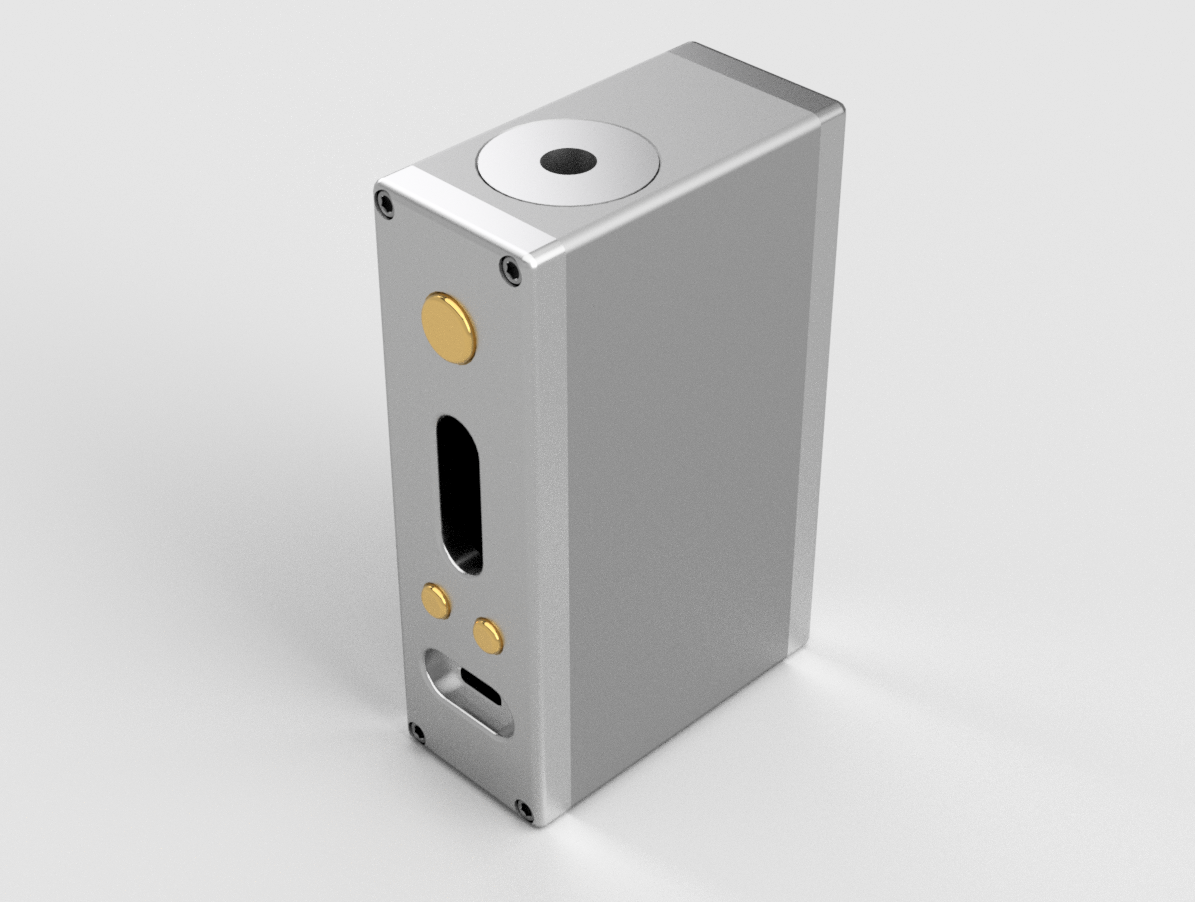
While this all only theoretical right now, this is what I "think" I might be able to do (+/- 20%) over in the Forum that is not to be mentioned........
View attachment 475654
My ECF modeler has sent some preliminary renders of the project, buttons yet to come.
850mAh Beta on the right, my project on the left. Capable of housing a 1350mAh bat.
Aprox actual size
Aprox twice actual size.
What do you all think, is it worth pursuing?
Last edited:
FINALLY!
I finally got the whole thing done! It's not perfect, but fairly close and I'm happy with it although it is a little heavy. One of my main goals was no visible screws and still have battery security. That added some time to construction as did making that mistake with the display offset in the wrong direction. I ended up cutting the box out to allow the whole display to fit into the cutout and making a brass trim piece with a window the right size. It's all finished with a satin or brushed look from 220 grit wet/dry paper.

It's kind of crowded inside, but it all fits. That 12 gauge on the output is a bear to work with and the 14 gauge on the battery isn't a whole lot better.

Maybe, if I ever feel ambitious, I'll make new buttons out of brass stock, but for now the aluminum will do just fine.

Last edited:
Heres the last of the small screen DNA 40s I finally finished up last week....glacial speed modding


Here's my contribution to this thread. It's my first TC device and I'm still waiting for the mailgirl to show up with the SS, titanium and Ni200 wire I ordered. I know I'm late to the party with TC, my excuse being I thought it was all a gimmick at first. Well that's been proven false so I'm going for it now and really looking forward to it.

Special thanks to ECF member laurie9300 who helped me with advice and tips, encouragement and above all else the inspiration to begin working with acrylic.
And of course Mike Petro, thank you for the opportunity to pick up the DNA40 board.
Special thanks to ECF member laurie9300 who helped me with advice and tips, encouragement and above all else the inspiration to begin working with acrylic.
And of course Mike Petro, thank you for the opportunity to pick up the DNA40 board.
I promised some photos a week ago, but other things got in the way. I got to work on the brass low tank mod today.
Some high tech metal cutting in my state of the art machine shop -

Some even higher tech metal cutting -

High tech bending equipment for the back half of the atomizer cut out, the start of the bend -

Finishing that bend with an additional piece of high tech equipment -

No humans or animals were injured during this process.
This will soon be home to a DNA200 from the man, the myth, the co-op legend ... Mr. Mike Petro. Parts are just laying on the counter so the gaps look a bit off, it will be perfect when it's all assembled. The machining is about complete, just need to face off the excess material on the back of the adjustment button actuator. I plan to cerakote the trim rings white and the front and rear covers black.
Last edited:
- Status
- Not open for further replies.
Similar threads
- Replies
- 2
- Views
- 879
- Replies
- 6
- Views
- 825
- Replies
- 24
- Views
- 2K
- Replies
- 0
- Views
- 223
Users who are viewing this thread
Total: 2 (members: 0, guests: 2)