Yes I took the batts out a couple times still nothing. I'm going to splice into the wire before the fuses and see I guess.
Any luck?

Yes I took the batts out a couple times still nothing. I'm going to splice into the wire before the fuses and see I guess.
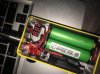
Here is a close up of the inside
Dang man looks pro,
What size box is that yellow one it looks larger than my 1590b
Ok more poking around with meter.
I disconnected sense pins, and got the same results. I then attached a different atty with a 2.2ohm build and it read
3.43v(low) 6.01v(high)
But the real kicker is the my low reading for the 2.2ohm was where the high reading was for .6ohm build.. And the high reading for 2.2ohm was where the low reading for .6ohm was???????
Im so confused, and a little scared to use it ATM lol
***edit***
Tested two more attys, one with a .6ohm build like original, second with a 1ohm build..
These work fine just like the one with the 2.2ohm coil, so it seems my problem was with my TOBH atty....
Still would like to know why my 1s-6s screen went bad... Before i put in another one(this time small 3 wire volt reader)
So right now Im rocking it with no screen, and i haven't re attached the sense pins yet...
Ok i got two together View attachment 380406View attachment 380406
I think you hooked it up right. I have been playing around with one and ran it all thru pin 1 on the 1s-6s and ground the the battery and it worked ok. I still need a dremel and some hand tools before I can mount it.
Did you figure it out?
Hey do you have a pic of the wired chip before heat shrink? Congrats on your build!Here is a close up of the inside
Hey do you have a pic of the wired chip before heat shrink? Congrats on your build!
I didn't take one but I have five more chips to build
Yeah it seems to be working fine with every atty except my TOBH, everything reading fine through my multimeter, i still done know why my 1s-6s screen quit working...
Im ordering one of the smaller 3wire voltmeters tomorrow.
I gorilla glued a magnet in crooked so ima try and get it out with some kind of solvent; or maybe try sanding it. It makes one corner of my lid not fit snug and it driving me crazy lol.
Once all that's done and i get all the small details i wanna keep working on. I plan on sanding it up and taking the hammond lean away, then painting it.
Oh yeah i know what ya mean, soon as i get my new screen the plan is to dremel/file some more room. And tidy it up in there hopefully make it look nicerThe first one so it wasnt a whole lotta fun if you know what I mean.
i hate to ask this but does anyone have a complete parts list for this mod.my cat broke my laptop knocked it off table and broke the charging jack internally and ive lost almost a years worth of collecting parts and stuff i needed to build this mod and several others i had been researching thanks for any help i can get
yeah but its not got the different trimmer resister people are using now with the numbers on it so i thought there must be an updated list thanks though