I have been using 3 of my 8 Saphires. The 1st one I started using started to taste off today. My juice that was in the tank turned brown in color. It was wicking fine so this was kinda strange.
Some changes made in Saphire V2:
1. The wick holder has been made longer
2. 2 gaskets are now used instead of 1 glued to the wick holder
3. The teeth have been raised a bit and some glue is used to hold the tank on so it is a lot harder to remove
4. The wick holder doesn't snap in as deep and it appears some glue is used here ******* ISSUE
5. There is now an o-ring added to just above the battery connector pin
6. A bit more wick is exposed in tank
All these changes were made in like 2 weeks or less!! Chris really must have pushed the factory to improve the Saphire. Thanks Chris for going the extra mile for everyone!!!
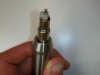
This issue that developed with my Saphire was the glue they used to attach the wick holder got into the atty coil. I have see burnt juice before but this doesn't look like it. This has to be glue and this could explain why some people are reporting issues with the Saphires still. The good news is this is easy to fix. The one you see in the pics I am now vaping and it works even better than it did when I 1st started using it.
To fix this issue:
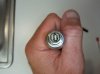
1. Take the tank off the atty part. The 2 rubber gaskets are now glued to the wick holder so they should remain attached.
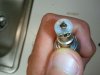
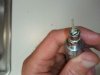
2. Pry off wick holder from atty. Mine came off super easy. It appears they aren't being pressed as deep now but they are using glue instead which is a bad idea.
3. Remove the factory wicking and toss it.
4. Take the atty part and soak in iso proly alc for 1 hour
5. Remove from alc soak and blow out and let dry
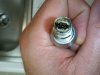
6. Do dry burns until the atty coil and wick look new again
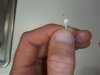
7. Take a piece of CE-2 rev 5 wicking and on one end unravel the wicking so its spread out. The other end is fine the way it is.
8. Take the not unraveled end and insert it from the bottom of the wick holder through the wick holder.
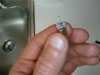
9. Take the raveled end and place it on 1 side of the atty coil and press it down.
10. Now press the wick holder into the atty bottom part
11. Line up the air channel flat edge so that the straight part of the gaskets and press the tank into place.
12. Take a needle and pry out the pin so it extends out. Be careful to re-seat the o-ring if it gets compressed from screwing it on tightly to remove the tank.
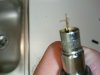
13. Fill and vape. I am getting great vapor and it tastes clean after a few hits once re-assembled.
I hope this helps anyone that is having an issue with the Saphire. The important missing step that I didn't do in the cleaning thread for the V1 was to unravel one end of the wick and place right next to atty coil instead of placing it directly on top of it.
Some changes made in Saphire V2:
1. The wick holder has been made longer
2. 2 gaskets are now used instead of 1 glued to the wick holder
3. The teeth have been raised a bit and some glue is used to hold the tank on so it is a lot harder to remove
4. The wick holder doesn't snap in as deep and it appears some glue is used here ******* ISSUE
5. There is now an o-ring added to just above the battery connector pin
6. A bit more wick is exposed in tank
All these changes were made in like 2 weeks or less!! Chris really must have pushed the factory to improve the Saphire. Thanks Chris for going the extra mile for everyone!!!
This issue that developed with my Saphire was the glue they used to attach the wick holder got into the atty coil. I have see burnt juice before but this doesn't look like it. This has to be glue and this could explain why some people are reporting issues with the Saphires still. The good news is this is easy to fix. The one you see in the pics I am now vaping and it works even better than it did when I 1st started using it.
To fix this issue:
1. Take the tank off the atty part. The 2 rubber gaskets are now glued to the wick holder so they should remain attached.
2. Pry off wick holder from atty. Mine came off super easy. It appears they aren't being pressed as deep now but they are using glue instead which is a bad idea.
3. Remove the factory wicking and toss it.
4. Take the atty part and soak in iso proly alc for 1 hour
5. Remove from alc soak and blow out and let dry
6. Do dry burns until the atty coil and wick look new again
7. Take a piece of CE-2 rev 5 wicking and on one end unravel the wicking so its spread out. The other end is fine the way it is.
8. Take the not unraveled end and insert it from the bottom of the wick holder through the wick holder.
9. Take the raveled end and place it on 1 side of the atty coil and press it down.
10. Now press the wick holder into the atty bottom part
11. Line up the air channel flat edge so that the straight part of the gaskets and press the tank into place.
12. Take a needle and pry out the pin so it extends out. Be careful to re-seat the o-ring if it gets compressed from screwing it on tightly to remove the tank.
13. Fill and vape. I am getting great vapor and it tastes clean after a few hits once re-assembled.
I hope this helps anyone that is having an issue with the Saphire. The important missing step that I didn't do in the cleaning thread for the V1 was to unravel one end of the wick and place right next to atty coil instead of placing it directly on top of it.