I am sorry guys, i meant in parallel not series.
Duh!
Duh!
How are you attaching the different connectors to the RCA jacks?
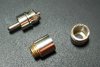
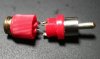
take a close look at the picture that shows the RCA and you will notice the cover was cut so it would fit the connector under pressure, no glue.
That goes for the plastic connectors, the metal one, i cut the cover of the RCA plug to the desired length (so the center prong touches the center prong of the batt connector)
you can then either solder the connector to the metal cover, or glue it...works both ways. i will post a couple of pics later of the inside so you can figure it out better, hope it will help mnealtx
I'm wondering if you can make a 510 socket from a gutted RCA socket or plug ...
Need about 6mm diameter inside.
take a close look at the picture that shows the RCA and you will notice the cover was cut so it would fit the connector under pressure, no glue.
That goes for the plastic connectors, the metal one, i cut the cover of the RCA plug to the desired length (so the center prong touches the center prong of the batt connector)
you can then either solder the connector to the metal cover, or glue it...works both ways. i will post a couple of pics later of the inside so you can figure it out better, hope it will help mnealtx
Thanks for the pics, that makes it a lot clearer.
Could you possibly link to the connectors you used at RS? I might just incorporate something like this into a Nicostick that I'm planning.


Great idea kina, how about you show us some pics of it when you are done?
I already have more adapters than i need, and they are working perfect, that was the purpose of my "creation", to forget about having to deal with connectors every time we build a new mod.
The only thing i will probably try in the near future is getting a 510 (so much buzz about it) and build an RCA adapter for it.
I really hope people catch on on this soon, it has saved me so many headaches and as you have seen has given me the chance to extend my options far beyond what i imagined before.
http://www.batteryspace.com/index.asp?PageAction=VIEWPROD&ProdID=2126oh, I need a parts list for all this stuff.... please. Do you get it at radio shack? Where do the little black boxes come from? Questions and more questions. I and my hubby will try to make one.
I just stumbled upon this. Very nice idea!!! I love the dual 18650 power pack. I think running two of these and stepping it down to 5 volts would be a great idea.
]I finally got my first mod finished. I have been messing with flashlights for a week and without tools kept failing. I have been drilling holes with a sharpened screwdriver while everyone in #vapors irc channel laughs at me. I finally splurged on a cheap soldering iron, hot glue gun and a flashlight just like the maddog vids show. I followed most of his tutorial which surprisingly is very much like what I had started doing on my own before this. My main problem was that I was using a different type of flashlight and no soldering iron.
Overall it went well the second time around and it works, although it needs some airholes because I get almost no air through it. My button worked great until I put it in the case and now you can barely feel the click when you press it. I am overall pleased with the way the rca connector is working and still need to pull it apart and solder it up.
Now for some pics (large on purpose, wanted you to see detail).