
I've got everything soldered together but I'd like to reiterate: the instructions are crap. My 510 is in place, washer, secure to the top... but because it mentions putting the pin in LAST I don't have it connected. And I don't think I can get the rest of the assembly out to do it the way it is clearly supposed to go in.
You are using an out of date browser. It may not display this or other websites correctly.
You should upgrade or use an alternative browser.
You should upgrade or use an alternative browser.
Boxer Mod Dual 18650 Yihi 350J
- Thread starter jstrong
- Start date
- th_trl_thread_readers 0
- Status
- Not open for further replies.
I installed the 510 with the white bushing in the 510. You screw the center pin into the white bushing. If you see in my previous pic, make a loop with the wire so it goes in straight. I used a needle nose plier to screw it in. It takes a bit of maneuvering to get the threads to catch. You don't have to take anything out to get the 510 pin screwed in.I've got everything soldered together but I'd like to reiterate: the instructions are crap. My 510 is in place, washer, secure to the top... but because it mentions putting the pin in LAST I don't have it connected. And I don't think I can get the rest of the assembly out to do it the way it is clearly supposed to go in.
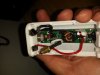
Loop the white wire around so it aligns straight into the 510.

And how do I tightern it? That's what I need. I'm pretty sure I already broke the solder.
The pin should spin inside the nut. If it doesn't, then you soldered the pin to the nut. That was my problem.And how do I tightern it? That's what I need. I'm pretty sure I already broke the solder.
Here's a couple of more pics.


I ended up getting it before you posted that, but I definitely ....ed up the pin somewhere along the way
Yeah I can hear the spring crunching and it's not reading atomizers.
Yay. Can I go to bed now?
Yay. Can I go to bed now?
Alright I got it working... sort of. The center pin really is jacked up, and I noticed part of the insulation near the board on the white wire is ripped. So I'll need a new 510 and to insulate that wire. Sigh.
Also realized I'm out of super glue, will need to get more to do the magnets lol.
Also realized I'm out of super glue, will need to get more to do the magnets lol.
You can put a drop of plastidip on the board. Easy fix.
I actually cut and pulled some of the excess shrink tube down to it, that worked.
The pin doesn't seem to be stuck to the bushing, I think there is too much tension in the spring. It will adjust down fine but then I have to nudge it back up... Not sure how to fix this. It worked fine when it wasn't connected to the top, though.
The pin doesn't seem to be stuck to the bushing, I think there is too much tension in the spring. It will adjust down fine but then I have to nudge it back up... Not sure how to fix this. It worked fine when it wasn't connected to the top, though.
Work it up and down a bit. You can use a pencil to get some pencil dust on the pin. It will make the pin move freely.
Heh... Actually, the bushing was disconnected from the rest of it. I had to break it to get it out. So definitely ordering a replacement from FDV... right now.
Building my 2nd unit today. The trick to the 510 is to clip it first. Then drop a small piece of solder inside. Place the white wire inside and then just heat up the cylinder with your iron which will melt the solder inside to the wire. You can then add a little more solder to the outside making it secure. Without the clip, you have very little room to work with and even a drop of solder on that bushing will cause the "spring" to stick. You have much more room to work with being clipped.
I've never used a VT510 so I can't compare, but this one either is or is exactly like the FDV 510, which is probably the most popular one and what many of the higher-end mods use, BMI, etc...

I've never used a VT510 so I can't compare, but this one either is or is exactly like the FDV 510, which is probably the most popular one and what many of the higher-end mods use, BMI, etc...
I finally got a "Check Battery" message. 32.7k joules. 3.27v on the left battery, 3.29v on the right battery. Not impressive from what I've been reading on the SX350j threads but it lasted 1.5 days for me so it's not bad for runtime.
What settings are you vaping at to only get 32.7k? Granted i should get 20% more than you with 3000mAh HG2's, but Im getting over 100% better. You can see in the pic, my batteries are still at 6.57 (about the same as yours @ 6.56), but i still got another 5k before the check battery. This was strictly in power mode at 80W. Eco mode would have increased the total to around 75K-78K.

I definitely bit off more than I could chew here. Seeing the DIY kit, thinking "I can solder, I'll save some money!" No... they make no mention of the required tools, know how, and time. I live in an apartment so having anything more than a basic tool kit is far fetched.
I built it.
Amazon.com: SE 8019AC12 12-Piece Alligator Clip: Home Improvement
Amazon.com: Generic GEN09015 Plastic Flexible Water Oil Coolant Pipe Hose, 6-Pack: Home Improvement
Core Bamboo™ 11 1/2-Inch L x 13-Inch Cutting Board - BedBathandBeyond.com
I drilled and tapped the cutting board with a 1/2-20.
The right tools are always important. Will make any simple task into a difficult one. After seeing @KTMRider awesome helping hands, I did a search -- figured it was custom, but too lazy to build my own. Found this at Badgerfly....

I'll likely never build another mod again. If I do, it won't be until I have a garage with a workbench and all the tools. Which won't be until I own a house. At the rate I'm going, that will be never ") .
.
.I'll likely never build another mod again. If I do, it won't be until I have a garage with a workbench and all the tools. Which won't be until I own a house. At the rate I'm going, that will be never
Here's a much cheaper setup. Only like $12 on ebay. Also, how I did the 510 washer, and spring. Don't think it is possible without some type of setup like this.


It IS possible... heheh. I actually did a really good job on the washer, but it took a LONG time. I used a clip to keep it in place and leaned it against the handle of the mini pliers I was using. As for the 510, after I cleaned all the solder off the bushing, of course, I was able to carefully place a circle of solder around the wire which held it in place. I'm quite dexterous... If I had the tools it would have been MUCH easier .
.Also, FWIW to any n00bs like me looking through the thread, don't waste your time if you don't have everything you've seen in the last few pages. I was only able to get it all together because I've had experience with difficult solders like this using no assistance in the past. This was far more difficult than any of those. I'm really surprised I didn't burn the everloving hell out of my fingers.
While I had it working, I was pretty happy and I think all the frustration will be worth it once I get my 510 replacement and put it back together.
While I had it working, I was pretty happy and I think all the frustration will be worth it once I get my 510 replacement and put it back together.
- Status
- Not open for further replies.
Similar threads
- Replies
- 577
- Views
- 67K
- Replies
- 0
- Views
- 1K
- Replies
- 0
- Views
- 766
- Replies
- 1
- Views
- 1K
Users who are viewing this thread
Total: 2 (members: 0, guests: 2)