• Locked
Yacht Vape Eclipse 24mm RTA Reviewed by SessionDrummer

1 Lede.png


Yachtvape x Mike Vapes ECLIPSE 24mm RTA

Having watched @MikeVapes's vids waaay back when I FIRST started vaping, and liking his style, I was damned curious to see what he and Yacht Vape came up with. As is often the case, this review was NOT sponsored by anyone, except ME, so buckle up. #NoTeamFree....Today

**Designed by Mike Vapes, and manufactured by Yacht Vape**, the Eclipse was billed as a "5 Star Flavor Banger". Let's just see about that.


**Yachtvape ECLIPSE 24mm RTA Features:**


* Collaboration Between Yachtvape and Mike Vapes
* 24mm Diameter
* 3.5mL Bubble Glass
* Optional 2mL Straight Glass
* Pyrex Glass Reinforcement
* Stainless Steel Tank Construction
* Threaded Top Fill System
* Postless Build Deck - 4 Deck Based Terminals
* Single Coil Configuration
* Side Secured via Hexagon Screws
* Peek Insulator
* Dual Bottom Airflow Control Ring
* Threaded 510 Connection
* Available in Stainless Steel, Matte Black, Gunmetal, Matte Stainless Steel, Gold, and Rainbow

**What's Included:**

* 1 Eclipse RTA
* 1 0.3ohm Prebuilt Coil
* 1 510 Drip Tip Adapter
* 1 Cotton
* 1 Bubble Glass
* 1 User Manual
* 1 Extra 810 Drip Tip
* 1 Coil Lead Guide
* 1 Accessory Bag
* 1 User Manual

The component overview appeared to be fairly standard, and had a total of 5 parts.

2 Exploded View.png


As a 24mm x 30/37mm tank with plenty of extras, I was curious to see how it fared, and if it was the compact flavor chucker it claimed to be.

3 Parameters.png


Let's get INTO it !!!!

4 Box.jpg


Nicely packaged with an outer sleeve, and 2 piece box ...

5 Box Sleeve.jpg


A fairly typical presentation, along with the extras box ..

6 Box Open.jpg


Never leave home without your multi-language fold out poster user's manual ...

7 Box Contents.jpg


Lots of goodies thrown in, including gaskets/o-rings, grub screws, 810 wide bore tip, 510 adapter, and allen key ....

8 Contents 2.jpg


But that wasn't all, as Yacht Vape also threw in a bigger 3.5ml bubble glass (straight glass installed was 2ml), a 3.0mm I.D. coil, shoelace cotton wick, and a coil cutting guide ...

9 Contents 1.jpg


When disassembling for pre-review cleaning, the 5 parts looked well thought out, machined, and o-ringed where necessary ...

10 Parts.jpg

  • Locked
Ground Zero | U.S. War on Vaping Mars Global Debate | Pt. 2 Alex Wodak Interview | RegWatch

  • Locked
VapeSnake, Connect your Billet Box or other DNA device to Escribe!

Hello everyone I'd like to introduce you to the VapeSnake!

Connect your non-usb DNA device to Escribe, set your boost, warmth, make custom boot logos, add a puff counter and much more!

Limited time free US Shipping!

Go to www.VapeSnake.shop or Message me to order now!

Tutorial:
Login to view embedded media

Attachments

  • IMG_20221012_222826.jpg
    IMG_20221012_222826.jpg
    699.2 KB · Views: 28
  • 20221019_172159.jpg
    20221019_172159.jpg
    580.2 KB · Views: 28
  • 20221008_134859.jpg
    20221008_134859.jpg
    1 MB · Views: 25
  • Like
Reactions: Izan

  • Locked
Innokin Coolfire Z60 Kit Review by Dreamvaper

Hello fellow ECF members. :toast:

I'd like to discuss the Innokin Coolfire Z60 Kit that was sent to me by Innokin for the purpose of providing a fair and honest review. :thumb:

As I already mentioned before, from my experience, Innokin devices almost never fail to deliver great quality for a reasonable price. Also they always try to provide something innovative to a new model they release so it's always a pleasure to review the new devices from this brand. You can check my previous reviews for the Innokin products - Klypse, Sceptre 2 and GoZee

Let's see what we have with this new Z60 Kit.
An intro from Innokin:

The Coolfire Z60 kit combines Innokin’s cutting edge technology with the all-new Zlide Top tank. It comes with 60W of variable power,
all-day battery life, 4th gen vape tech, top airflow and DuoPrime coils.

Sounds pretty interesting. Let's see the options first.

Colour options available:

zopt.png

• Purple
• Blue
• Gunmetal
• Stainless Steel
• Black
• Pink
• Red
The frame of the Coolfire Z60 comes in 2 colors; Black and Stainless Steel while the Zlide Top Tank comes in 4 colors that match the frame of the Coolfire Z60; Silver Grey, Gunmetal, Blue and Black.


Key Stats:
  • Construction: Zinc Alloy
  • Dimensions: 75mm x 36.6mm x 27.2mm (without tank)
  • Weight: 129 grams
  • Input Voltage: 3.2V – 4.2V
  • Charging: Type-C USB 5V/1.7A
  • Resistance Range: 0.2 – 3.5 ohms
  • Output Wattage: 6-60W
  • Output Voltage: 1V-7.5V
  • Output Mode: Variable Wattage/Voltage, Coil+ and Coil Refresh
  • Output Current: 17.5A
  • Battery Specification: Internal 2500mAh 3.7V 9.25Wh
  • Chipset: 4th Gen Technology
  • Display: 0.96inch OLED Color Screen
  • Tank compatibility: 26mm (27mm max)
  • Cut-Off Time: 3-18 seconds adjustable
  • Battery Cut-Off Switch
  • 2 Coils in a package including the preinstalled 0.6 ohm one
fea.JPG

Short Description and Key Features:

The Innokin Coolfire Z60 kit is a newest addition to a famous Coolfire Series by Innokin. It's a Mouth-To-Lung (MTL) and Restricted-Direct-To-Lung (RDL) device, powered by an internal 2500mAh capacity battery firing up to 60W. It’s essentially a variable wattage/variable voltage mod but with the inclusion of Coil+ and Refresh technology.

Coil+ mode will automatically pulse your coil after each vape, effectively clearing residue and drawing e-liquid to the coil in readiness for your next draw. Refresh will revitalize your coil by heating it to 40% of your set vaping wattage to help saturate your wick.
This technology has proven to prolongue the live of your coils and bring even more pleasurable experience while vaping.:vapor:
  • 4th generation vape technology - Coil+ and Refresh modes extend coil life, reduce residue build up and ensure vivid flavour production for a longer time.
  • Zlide Top Tank, mess-free refills - The brand-new look Zlide Top features top airflow, eliminating all leaks. The redesigned airflow system allows for greater control than ever before.
  • DuoPrime coils - DuoPrime coil technology arrives to the Z-coil line. The Zlide Top tank is pre-installed with our new 0.6Ω DuoPrime Z-coil, with better saturation, flavour production and coil longevity.
  • All-day battery life - The Coolfire Z60 is equipped with a 2500mAh internal battery and USB-C charging. That means all-day battery life and reliable rapid charging.
  • Battery master switch - The Coolfire Z60’s master which allows you to fully shut off the device at any time.
  • Compatible with all Z-coils - The Zlide Top tank is compatible with all our industry-leading Z-coils, delivering a huge range of vaping experiences.
Let's check the Real Coolfire Z60 kit (I actually received 2 of them, thanks Innokin):

i1.jpg


As usual we see a recyclable packaging Innokin is using for its latest devices. It may not look as luxury as some other fancy packages but extra points for the environment protection :nun:

On the back you have all the needed info - QR code and authenticity check.

Opening the box:
i2.jpg

Stylish black colour with the tank matching the device.
Btw, the package looked like that when I received it. It was preopened. Seems like the customs inspector thought for a long time whether to keep the device, but decided that I would still need it more and shoved all the parts back in, tearing it a little inside. Fortunately, the device and parts were not damaged. Thanks dude :nun: If there's a chance you might reed this review and you are a smoker, I really hope you will switch to vaping. Not by stilling the devices from the packs you are checking though, go to a brand store like
for example Innokin Store and get yourself a device.

i4.jpg


Let's see what was inside the box:
i3.jpg

Packing List:

1x Coolfire Z60 Mod
1x Zlide Top Tank (3ml)
1x Z-Coil 0.3Ω
1x Z-Coil 0.6Ω (pre-installed)
1x Replacement glass (4.5ml)
1x Spare Drip Tip
1x Set of O-rings
1x USB-C cable
1x User Manual
1x Warnings

Another interesting Feature - on/off on the bottom of the device:
Good luck to those who will not check the details and will keep on trying to turn it on with the fire botton :greengrin:
i5.jpg

Innokin Zlide Top Tank Specs:
Dimensions: 25 x 51mm
Capacity: 3ml (there are options with 2, 3 and 4.5ml tanks)
Liquid refill: from above (with a sliding top fill option)
Airflow: From above
Z-Coil 0.3Ω (30-40W) (compatible with all Z coils)
Duo Prime Z-Coil 0.6Ω (9-13W) (pre-installed)

Duo Prime Z coil is one of the main features of this kit.
Let's check what is it all about:
Duo Prime coil which works by implanting an outer layer of mesh between the wicking material and inner coil. The outer layer of mesh is of a higher resistance than the inner coil. This means it heats slowly, but this heat and structural change draws e-liquid into the wicking material and inner coil rapidly. Unlike traditional coils, DuoPrime coils maintain full saturation between every vape. This dramatically impacts coil performance and longevity.
I've tested the "withstanding longer and more frequent puffs" and I can tell that it really holds well with the longer and more frequent puffs. Device is getting a bit hot after some time though.
i7.jpg

Remember to saturate the inside of the coil before the first use. Refilling can be done via sliding the top part of the tank.
i6.jpg

Tank itself is pretty compact and light and easy to use.
Compared to the Innokin Klypse:
i8.jpg

A bit longer and slightly wider than Klypse.
Still a very compact kit and it holds in a hand pretty well.
Control is achieved by the 4th generation chipset and the User Interface (UI) is a 0.96inch OLED colored display. It’s located on the front of the Coolfire Z60 in-between the fire button and the +/ – buttons on a black matt transparent finger plate.
Fire button is just a bit loose but overall, buttons are good and easy to use.

Pros:
Reasonable price (around £45 in the UK)
New technologies: 4th gen chipset, Coil+ and Refresh technology and the Duo Prime Z Coil
Nice design
Quality build
Easy to operate
Master bottom on/off switch
True 2500mAh built-in battery with quick Type-c charging
One of the best tanks - Zlide Top - included in the kit

Cons:
Device gets fairly warm when doing series of longer puffs and while charging
I've got few spit-backs while testing

My Final Thoughts on Z60 kit:
Innokin didn't fail to deliver the improved Coolfire family member with Z60 Kit.
It is packed with the new technologies/upgrades and cool features.
One of the best tanks compatible with all Z coils is also included in the kit. They surely complement one another with the device.
As a result we have a modern, good looking, compact vaping kit at a reasonable price.:2c:

Overall rank 8.5/10 by Dreamvaper.
Can recommend this device :thumb:

Thanks for reading :toast:

  • Locked
Voopoo Argus P1 Pod Mod - Review by Javichu

Hi there fellow vaperinos.

Weekend with time to spare so lets get started with today's review.
Following my usual MO i will get us started with some pics that will give you a broad view of the device i will be reviewing today.

Colors

colors.jpg


Features


features.jpg


Specs

specs.jpg


Charge

charge.JPG


Airflow


airflow.jpg


Contents in the box:


1 x Argus P1 Device

1 x Argus Pod (Empty Cartridge)

1 x ITO-M1 coil (0.7ohm)

1 x ITO-M3 coils (1.2ohm)

1 x Type-C USB Cable

1 x Lanyard

1 x User Manual

Full list of features and specs:

VINCI POD SE


Material: Aluminum Alloy

Output Power: 11-15W

Battery Capacity: Built-in 900mAh

E-liquid Filling: Top Filling

Chip: GENE.TT 2.0

Charging voltage: Type-C fast charge (standing when charging)

Compatible cartridges: The cartridge of VINCI POD SE is fully compatible with VINCI POD, VINCI Q, VINCI POD Royal Edition and Drag Nano 2.

Airflow: The 4-hole air inlet of VINCI POD SE catches sufficient airflow from each direction in balance and ensures a smooth taste .

Leakage Proof: VINCI POD SE adopts multi-layer leakage proof. Integrated Airway Structure greatly improves the air tightness; double rings design upgrades the leakage proof function; condensate isolating room and micropore structure drain the condensate down and isolate it at the bottom.

Anti-bacterial mouthpiece: Antibacterial silver ion mouthpiece with over 99% antibacterial rate enables reassuring vaping experience.

Charging: The Type C charge port on the body side enables the device to stand during charging and avoids abrasion due to improper device placement.


Unboxing and first impressions:

Nice little box with a plastic tray that has a cut out for the little pod to be in and then a layered box in the top that contains the rest of items.
All neatly tucked in and well packaged,spare pod cartridge in its own little baggy which is a nice detail.

Take out the pod mod out of the box and ok this is tiny,i mean i am use to my regular big ol' mod (Jackaroo 100w) so this is like a little toy you get out of one of those Kindeer eggs he he.

But ....dang,this little itsy bitty thing feels like a Sherman tank and it does have some weight to it,despite it being so small but a lot of work got into this little device.


Vaping time:

Recently reviewed another pod mod like device and i struggled a bit with the nic salts so decided to use my regular e-liquid (70/30,6mg nic and flavor wise its Bubblegum/Red Bull/fresh molecules...yeah i know it's weird do not judge me lol)

Since this mod is pretty straight forward (auto draw and no menu) i went ahead and filled the cartridge and let it sit for 15 minutes while i was browsing the internet.
I started with the ITO-M1 coil (0.7ohm) and since i am not a MTL vaper i decided to leave the airflow all the way open.

After 10 or 12 puffs i gotta admit,not bad not bad at all.
Nice hit,good amount of flavor in each puff and a decent cloud,don't get me wrong hit and cloud wise it is not what i am use to but for a device this small to perform that well,that is a pretty good achievement.

With mos pod mods i cycle thru the coils pretty fast and don't use them once i write the review since its just not my vaping style,nothing wrong with the product.
In this case i even ordered some spare coiils,i call this my ''carry'' mod.

With all the stuff i need to do at home its a pain to vape,washing the dishes i need to rinse them hands,dry them out and take a couple of puffs then back to washing the dishes.
Not in this case,thanks to the Lanyard that comes in the box i can do all my chores at home and not have to carry a heavy mod around,that is a huge plus for me at home.

Funny story,pops can't really bend down that much or bend his knees that much so once i week i trim his toenails,did this like 2 days ago and i made him hold the Argus P1.
Clip here,cut there and then i would look up and say puff puff and he would hold the mod up so i could take a quick puff rofl.

Design wise well what can i say,i wish bigger mods looked like this.
I mean wow,love the mix of metal (zinc alloy) with clear plastic (PC) on the side,the bit where the Lanyard is attached goes all the way from the top to the bottom of the mod,golden played tube that you can see thru the PC plastic,looks awesome.

There is no screen on this pod mod but there are 4 lights that serve a double function,lets you know how much battery you have left and it tells you when the device is fully charged.

When using the device this is how the lights let you know how much battery you have left:

One light = 1-25%
two lights = 25-50%
three lights = 51-75%
four lights = 76-100%

When charging the device it will flash from the bottom to the top filling in the lights as it gets charged,once all 4 lights are solid and not blinking you can unplug because this little baby is fully charged.

Coil wise i bought spares of the 0.7 ohm coil,the 1.2 ohm pod wasn't bad but i just got a bit more hit and flavor from the 0.7 ohm coil (airflow always fully open)

Pros:

-Perfect carry around town pod mod
-Superb futuristic design
-Well built with quality materials
-No condensation or leaks after much use

Cons:

-Can't really come up with any,pod mod does its job and then some


Would i recommend this device:

If you're after a small device you can carry around your neck and enjoy MTL vaping this is the one to get.
No fuss with menus or options,full the cartridge,let it sit for awhile so it can properly soak the nectar of of the gods and you're golden.

Thanks to my friends at Voopoo for sending me this product so i could review it,here is the link to their website with more info about this product:


Hope you enjoyed reading my review and thanks for taking the time to give it a look.

  • Locked
HellVape Hell 200 Mod With TLC Top Coiler Tank Review By Frenkyou

Hellvape-HELL200-Kit-1.jpg


Hi, today let's take a look at Hellvape HELL200 Box Mod Kit. I will examine in this Test each of the characteristics that distinguish this item. I hope that by the end of this reading you may have understood this product, and therefore decide whether to invest in it or not. As always, my opinions are free and based on my personal experience.
• Enjoy the reading.

► Hellvape HELL200 Box Mod Kit; Before starting let's see together some special features indicated by the manufacturer:

1. Ultra light and compact mod
2. Dual 18650 battery with 200W max
3. 0.96 inch color screen
4. Multiple output modes for your choice
5. 5ml / 6.5ml capacity, top filling
6. Adopt the best coil system
7. Suitable for TLC atomizer and Launcher atomizer
8. Suitable for Coil T7-01 / 02 and Coil W8-01 / 02
9. Multiple safety protections for safe use
10. Precision CNC machining and aerospace aluminum material

Hellvape-HELL200-Kit-2.jpg


► Hellvape HELL200 Box Mod Kit; Packaging:
On the front of the two-tone red / black box you can see; the brand (Hellvape), the image of the kit and its name (Hell 200 Mod Kit). On the back you can read; the content, the manufacturer's support addresses, barcode, scratch & check, color of this sample, trademarks and logos required by law. On the remaining sides of the box are; a stylized image of the kit and the words "Evolve Your Vaping Genius".

Hellvape-HELL200-Kit-3.jpg


Hellvape-HELL200-Kit-4.jpg


► Hellvape HELL200 Box Mod Kit; Packing List:
• 1 * Hell 200 BOX MOD
• 1 * TLC Sub-Ohm Tank
• 1 * Replacement Bubble Glass
• 1 * Mesh Coil T7-01 KA1 0.15Ω Range 60-70W
• 1 * Mesh Coil T7-02 KA1 02Ω Range 50-60W
• 1 * Type-C cable
• 1 * Oring bag and gaskets
• 1 * Warranty Card
• 1 * User Manual

Hellvape-HELL200-Kit-5.jpg


► Hellvape HELL200 Box Mod Kit; Specifications:
• Dimensions of the Mod: 80.0 * 43.0 * 35.5mm
• Net weight: 86g
• Battery: Dual 18650 (not included)
• Power range: 5-200W
• Output voltage: 0.5-12V
• Charging voltage: Type C 5V / 1.5A
• Output mode: VW / Bypass / VPC / TC
• Screen: 0.96 inch colors
• Overload protection
• Over discharge protection
• Short circuit protection
• Reverse polarity protection
• Overheating protection
• 10S Cut-Off protection

Hellvape-HELL200-Kit-6.jpg


► Hellvape HELL200 Box Mod Kit; Available colours:
• Black
• Gunmetal
• Black silver

Hellvape-HELL200-Kit-7.jpg


► Hellvape HELL200 Box Mod Kit; First Impressions:
Hellvape is a leading company in the production of Sub-ohm Tank, RTA, RDA and RDTA, among them there are several high potential vaporizers that to be exploited worthily require MODs of great power and with at least two batteries. A Hellvape Dual Battery Mod (like this one) has been waiting for it for a long time and finally now it's here! The Kit includes a Mod with a classic design that immediately impressed me for the low weight and the excellent degree of finishes, there is also an innovative Tank with replacement of TLC Coils directly from above and even with the tank full of liquid! However, as I said before, the 200W Mod is able to host and manage all Hellvape vaporizers in the best possible way, even the wildest and most unleashed ones.

Hellvape-HELL200-Kit-8.jpg


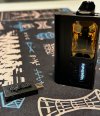
In the image below you can see the HELL200 Dual battery with its TLC Tank, The tank is large, it has a diameter of 28mm, but since the TLC Tank is connected downwards, its base has a width of only 25mm and this allows to beautifully adapt it to another great Hellvape Box Mod which is the Arez 120 with single 21700 battery.

Hellvape-HELL200-Kit-9.jpg


► Hellvape HELL200 Box Mod Kit; How it is made:
Hellvape has really done a good job, used high quality materials such as lightweight aerospace grade aluminum of exceptional strength to withstand wear and corrosion, the Mod has been carefully CNC machined to every little detail. There are 3 colors of choice for this Kit and Hellvape sent me 2! They are both beautiful, one is gunmetal including the TLC tank, and the other is silver with beautiful shades of black, the tank of this version is completely silver. The triangular form factor with chamfered fittings is truly classic, but offers great ergonomics. There are no decorations or large intrusive writings, the only decoration is on the back (handle) and is represented by two deep vertical grooves, below them there is a small white writing "Hell 200". The front is narrow and has a built-in bridge in a protected position. The keys have a metallic texture and excellent tactile feedback, in the center there is the 0.96 "colored display with bright colors, the display shows all useful information such as; Indication of the current mode, graphic level of charge of the cells, power set, Ohm, Volt Puff time, Pufff counter.

Hellvape-HELL200-Kit-10.jpg


Hellvape-HELL200-Kit-11.jpg


► Hellvape HELL200 Box Mod Kit; Operation Guide:
• 1. Power On / Off: Press the Fire button 5 times in 2S to turn the device on or off.
• 2. Mode settings: In the main interface, press the Fire button 3 times within 2S to enter the mode settings; press "+" / "-" buttons to choose between POWER / TC-NI / TC-SS / TC-TI / TC-TCR / VPC / BYPASS modes, press and hold the Fire button for 1S to confirm and exit , or the device will automatically save the settings and if no other operations are performed within 5S it will automatically exit and return to the main interface.
• 3. Power Mode: Press the "+" / "-" buttons to adjust the power, the power will be raised / lowered by 0.5W at a time, long press the "+" / "-" buttons, the power will be raised / lowered quickly by 1W at a time.
• 4. TC mode: Press "+" / "-" buttons to adjust the temperature between 200 ° F-650 ° F / 100 ℃ -345 ℃
• 5. VPC mode: Press the Fire button 3 times quickly to enter the mode setting status, then press the Fire button to select P1 / P2 / P3 / P4 and press the "+" / "-" buttons to adjust the wattage, then press the Fire button for 1S, or confirm the settings by not pressing anything for 5S. When vaping, the output power for the first 4S is based on P1-P4, while between 5-10S the output power is based on P4.
• 6. Bypass mode: In bypass mode, the output voltage is 4.15V (maximum output power and maximum output current are self-adjusting).
• 7. Lock / unlock buttons: To lock / unlock the "+" and "-" buttons. Simultaneously press the "+" / "-" buttons
• 8. Clear Puff: In any output mode (except VPC mode), quickly press the Fire button 3 times, then press the Fire button to select the "P" setting and press the "-" button to clear the number by Puff.
• 9. Brightness Adjustment: Long press the Fire button and "-" button at the same time to dim the screen. Long press the Fire button and the "+" button to increase the screen brightness.

Hellvape-HELL200-Kit-12.gif


► Hellvape HELL200 Box Mod Kit; 510 thread:
The Hell200's top base features 3 French screws and a small steel cup which is cleverly raised above the base to allow you to safely screw on / off the tank without damaging the paint. The thread is smooth and the pin is gold plated and spring loaded. The space to insert giant atomizers is considerable and among these the gigantic Hellvape S30 RDTA also finds a convenient location!

Hellvape-HELL200-Kit-13.jpg


► Hellvape HELL200 Box Mod Kit; Battery compartment:
The lower base of Hell200 guarantees great stability to the Mod, it also has 6 safety vent holes for the cells. The opening mechanism is controlled by a sliding button which is positioned inside a part not exposed to shocks. When you slide the button, the spring loaded flap opens snappy and quickly, you can now insert your 18650 cells following the correct direction of insertion which is marked by the symbols "+ and -" above the gold plate. When you close the door you have to slide the button, and a sturdy steel tab will ensure you a perfect closure!

Hellvape-HELL200-Kit-14.jpg


Hellvape-HELL200-Kit-15.jpg


► Hellvape TLC Sub-Ohm Tank:
To worthily accompany the HELL200 Mod there was a need for a sturdy tank and able to support the Vaping DL and RDL so Hellvape has designed this tank equipped with 510 thread with 3 large slots for adjusting the airflow from the bottom to the top. high that are able to maximize performance.

Hellvape HELL200 Kit 16.jpg


Hellvape HELL200 Kit 17.jpg


► Hellvape TLC Sub-Ohm Tank; Top Loading Coil System:
I have been collaborating with Hellvape and Wirice for a long time and I was one of the first to touch the "Top Loading Coil System" first hand, it is a fantastic technology of quick change of the resistance from the top, leak proof, even with a tank full of liquid! According to a lot of feedback collected by the two companies through its customers, it would turn out that a boring problem for those who use tanks with replaceable heads is to install and replace the coil. For this reason Hellvape took its cue from the previous Launcher Sub-ohm Tank and Launcher Mini MTL. I was favorably impressed the first time and I must say that I was expecting this system from Hellvape applied to a new Sub-ohm tank, and here it is!

Hellvape HELL200 Kit 18.gif


The tank essentially consists of; a pyrex glass, an upper base with two large slots for liquid refilling, a knurled top cap and a one-piece structure that also includes the cylinder that houses the resistance with the spring loaded system. The AFC base is equipped with knurls to facilitate adjustment of the AFC system. The Drip-Tip has two silicone rings that fit inside the removable pin. All easily removable for periodic cleaning operations.

Hellvape HELL200 Kit 19.jpg


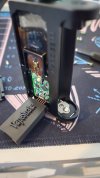
Without removing the Top-Cap, just unscrew the base of the Drip-Tip and turn the Tank over, letting the coil come out directly, even with the tank full of liquid and without spilling a drop. Then all you have to do is drop the new Coil from above directly into the TLC Sub-Ohm Tank, this makes operations easier and faster than ever. The inside of the Tank is spring loaded and this mechanism (when the base of the Drip-Tip is unscrewed) activates some bulkheads that close the Tank's feed holes, preventing any loss of liquid. Then with light pressure you can insert the resistance from the narrow side with the widest part facing up and simply screw the base of the driptip back to lock the resistance and the liquid supply holes will open.

Hellvape HELL200 Kit 20.jpg


Hellvape HELL200 Kit 21.jpg


► Hellvape TLC Sub-Ohm Tank; TOP Refil:
The top cap has knurls for a better finger grip on the surface and a sliding 1/4 turn thread. The filling operation is easy thanks to two large filling slots, you can insert up to 5ml of e-liquid. If you like it, you can install the convex glass present in the package and TLC Sub-Ohm Tank can hold up to 6.5ml of e-liquid.

Hellvape HELL200 Kit 22.jpg


► Hellvape TLC Coils:
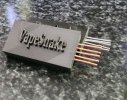
Hellvape always proves generous and on the occasion of the test of this kit sent me two packs of the new TLC coils T7-01 and T7-02. The structure of these coils has recently been updated with a higher thickness of the nets, moreover the breathable material uses a double layer of 100% natural cotton. According to Hellvape, this update provides 70% durability and flavor improvements. In the second image below you can see the whole range of coils compatible with TLC Sub-Ohm Tank including the W801 and W802 which were standard on the Launcher Tank.

Hellvape HELL200 Kit 23.jpg


Hellvape HELL200 Kit 24.jpg


► Hellvape HELL200 Box Mod Kit; Vaping Test and Final Impressions:
I really liked this kit a lot, starting with the Mod which is light and really sturdy. The finishes are excellent, the Mod has an attractive appearance without unnecessary and flashy decorations and it carries quite well. The chipset includes many vaping modes, is accurate in reading the coils and manages the battery life well. TLC sub-ohm Tank is truly innovative to improve user feedback towards the world of vape. It is also a perfect tank for making some nice clouds full of flavor. For the Svapo test I used a tropical aroma mixed with VG / PG 70:30 base.

• Mesh Coil T7-01 KA1 0.15Ω Range 60-70W:
The resistance starts well immediately and without strange flavors already from 40W, however I immediately set the minimum power which is 60W. The flavor is perceived immediately and is very good and super concentrated the vapor clouds are among the thickest and densest I've ever seen with a sub-ohm tank! The liquid consumption is considerable, so I soon installed the bubble glass on my silver colored TLC.

• Mesh Coil T7-02 KA1 02Ω Range 50-60W:
The behavior of this Coil is not very different from the previous one. The performances are also impressive in this case, perhaps this is a slightly less thirsty coil for e-liquid so I installed it on my gunmetal TLC Tank with 5ml pyrex. This TLC tank really impressed me, I conclude and thank you by leaving you my Highlights regarding the Mod and the Tank.

• Pleasant Mod aesthetics with high build quality.
• Lightweight and sturdy mod.
• Precise and feature rich chipset
• The Initiative Top Loading Coil System (T.L.C) of the tank is a real step forward and simplifies coil changing operations.
• Optimal AFC adjustment for DL / RDL.
• Updated Mesh Coils of the T7 series among the best on the market for DL / RDL
• No liquid loss.

I would like to thank Hellvape for providing me with the kit. I hope this review was useful for anyone who wants to buy HELL200 Box Mod Kit.

Thanks for reading.

Hellvape HELL200 Kit 25.jpg

  • Locked
Dual Topside not reading the A battery

The red/black Topside Dual I bought recently is not working correctly. It won’t read the battery level1 in the A battery slot. Doesn’t matter which manufacturer but it was ordered on 8/30 but I can’t remember when it actually got here. I contacted Health Cabin via email yesterday and received a very nice return email.

Just like all the other returns, I need photos of it showing no battery and a short video. Seems to be the way of it now so no big deal. So I’ll soon find out if customer service is any good from Health Cabin.

I don’t even like this mod and plan on selling it and the blue/black one too.

  • Locked
OXVA Velocity LE Kit ~ A review by AngeNZ

OXVA Velocity LE Kit ~ A review by AngeNZ


5093brv-jpg.983245


Introduction:​

This device was sent to me from Sourcemore for the purposes of an unpaid, neutral review. I've really enjoyed putting this device through its paces over the past two weeks. It features something for new vapers and us older vapers alike.

The Oxva Velocity LE kit brings out new designs for this 21700 feature packed device. Along with being a 5ml top-filling pod mod, the Velocity kit includes a strong 510 adaptor to convert it to a 21700 box mod. There's also a Unipro RBA available for purchase, which gives you even more flexibility. It boasts a non-leaking design and being the world's smallest 21700 box mod. Included with this kit are two Unipro coils, a 0.3Ω and a 0.15Ω coil.

It has four designs available including the Carbon fibre I received:

colours-jpg.983259


Specifications:

Output Power: 5-100W
Chip Output Type: Photon Buck-boost
Mode: Smart/Power/Volt
Output Voltage: 0.5-8.0V
Battery: 21700/20700/18650 Battery (battery sold separately)
Unipro Cartridge Capacity: 5ml
Cartridge Compatibility: Unipro & Unicoil Cartridge
Coils
Unipro: 0.15Ω/ 0.3 Ω/ RBA
Unicoil: (requires Unicoil cartridge - not included) 0.2ohm / 0.3ohm / 0.5ohm / 1.0ohm / RBA
Resistance Range: 0.1-2.5ohm
Drip Tip: 510 Drip Tip
Refill: Top Refill
Airflow Control: Internal Adjustable Airflow
Charging: Type-C / 5V / 2.5A
Screen Size: 0.69" OLED
Size: 120*35*27mm
Weight: 147g
Material: Zinc Alloy+PCTG+ABS/Leather


ingred-jpg.983260


The contents of this LE kit version do differ from Oxva's original Velocity kit. You receive only the Unipro cartridge/tank. The Unicoil cartridge/tank needs to be purchased separately. And you no longer have a tool to remove the 510 adapter - more about how to that below.

Tank and Coils:​


The 5ml Unipro tank (cartridge) is a simple design, but one that has clearly been designed to deliver. It uses a standard 510 drip tip, so you can also use your own. The airflow adjustment is via a metal ring, which screws onto your coil:
tankcoilinsert-jpg.983254

The airflow adjustment ranges from a restricted direct lung (RDL) to a wide open direct lung (DL).

To set up your tank you need to screw on the airflow ring to the base of your coil and then push the coil up into the tank. There's 2 notches either side of where the airflow ring/coil sits. If you align the airflow ring's open sides to the airflow slots on the mod, it seats evenly.

The tank has a top-fill rubber port, which of course you open to fill it up with juice. Out of all the pod tank rubber ports I've used, this is up with those at the top. It's strong and well fitted and I love that it is a top-fill pod tank.

If you find your tank it is gurgly, or leaking, or flooding, your coil hasn't been inserted properly. Do I know this purely from my experience after 4 years of vaping? Nope, I messed up, didn't push my coil in right and it gurgled. You hear a slight click sound when it's in place properly.

On the subject of leaking: here's my mod after using the pod tank for two weeks, with correctly installed coils!
deck-jpg.983261


There's two coils available for this Unipro tank and you receive both. There's also an RBA available for those of us who enjoy our own coils.

coils-jpg.983264


0.3Ω Coil:

As you can see from the above photo, this coil looks a bit more restricted than the 0.15Ω coil. But with the airflow adjuster set wide open, it's still on the looser side of a RDL. This is my happy spot. There's plenty of room with the airflow adjuster to tighten down to your own preference.

I started it at 20 watts, with a berry flavour. Straight away I was getting plenty of flavour, vapour and a smooth cooler vape. Up at 30 watts is where it shines for me. The flavour is top notch, dense and smooth vapour and it's a slightly warm vape. Up at 40 watts I got even more flavour and vapour, and it's a warm vape.

I don't normally pay much attention to the manufacturer's recommended wattage, but for this coil they've got it spot on.

0.15Ω Coil:

With the airflow wide open, I started it at 40 watts and got great flavour and vapour. Up at 50 watts was my personal sweet spot, still a coolish vape, fantastic flavour and plenty of vapour. 60 watts was of course warmer, but I did get slightly better flavour and clouded out the room. 70 watts was too warm for my tastes, however the flavour is still top notch and it was extremely cloudy.

If you are new to vaping, please make sure you are using an appropriate battery for your wattage. Check Mooch's recommended batteries tables if you are unsure:
Mooch's Recommended Batteries

Device:​


This is a gorgeous device. For a 21700 pod mod it is tiny. Even compared to some 18650 pod mods, it's small. The Velocity is also an ergonomic mod to hold and use. It is grippy and has no sharp edges. It has a battery hinged door, which slides and clicks into place firmly. The buttons are responsive and clicky, and not annoyingly loud. With a 21700 battery and full pod tank, it weighs 208 grams. It's a solid, well made, quality device.

This is my first Oxva mod and I've found the Photon chip fantastic. It fires extremely fast and it reads the coil's resistance accurately. When comparing how it hits wattage-wise to my other mods, it's right near the top. I like that it's a buck-boost chip as it means that even when your battery is nearly flat, it's still giving you full power. The battery life, even with an 18650 is very good. I'm now a huge fan of the Photon chip.

screen-jpg.983253

The layout of this chip's screen is clean and uncluttered. It's a simple chip to navigate, with three modes - Smart, Power (Wattage) and Voltage. 3 clicks of the fire button brings up the menu, here you can select the three modes and change the colour of the screen. To adjust your wattage or voltage use the two lower buttons to increase or decrease it.

Smart mode (default): This is wattage/power mode that automatically sets the wattage range of your coil based on its resistance. If you want to go higher than this range, switch to Power mode.

Power: You set the wattage 5 - 100 watts

Voltage: 0.5 - 8.0 volts

Navigation:
3 clicks of the fire button enters the Menu
5 clicks of the fire button turns the device on or off
Holding down the + (top) and - (bottom) buttons together locks and unlocks those two buttons but not the fire button.
Holding the fire button and + button brings up the colour option menu
Holding the fire button and - button clears the Puff counter.

510 Adaptor:

510mode-jpg.983262


By including this adaptor, Oxva has made this an ideal kit for a new vaper who may want to use their own tanks in the future. The adaptor cleverly uses the airflow slots to click in, along with a very firm magnet.

This isn't one of those adaptors that comes loose easily, as I found out when I stuck it on to try it! How do I take it off? I tried brute strength, which I'm sadly lacking - no joy. Holding my tongue right - didn't work. I eventually resorted to google. The original Velocity kit came with a tool, which isn't in this version. However using a tank screwed into the 510 and levering it towards the side, unclicks the adaptor.

Extras:​


Unipro RBA:
There's a Unipro Rba available for this pod tank which has some innovative features. It includes a 1.5mm id insert which allows this rba to also be used as a MTL rba coil. The airflow ring includes large slots for RDL/DL and smaller holes for MTL.

Judging by the flavour of the Unipro coils and the flavour from their Arbiter series of rtas, this looks like a fantastic rba.
rba-jpg.983252


Unicoil Tank:

Oxva's Unicoil tank is compatible with this device. The Oxva Unicoil range includes a lower wattage 0.5Ω coil and a 1Ω MTL coil

unicoils-jpg.983272


The Bottom Line:​


Usually when you buy a pod mod, you get just a pod mod. The fact Oxva includes a decent 510 adaptor with this kit, along with having a decent RBA available just makes it appeal so much more and to more people. Add in to that the top-notch flavour of these Unipro coils and you have a winner.

I've had no problems at all with the quality if this device. I've loved seeing the cleverness and innovation that Oxva have brought to this kit. Especially with regards to the top-fill non-leaking Unipro tank and coils. I also like how small it is for a 21700 pod mod, though it is a taller mod with the 510 adaptor installed.

For me the real test of any new device is whether I carry on using it, or go back to one of my favourites. The smoothness and flavour from the 0.3Ω Unipro coil at 30 watts, on this 21700 ergonomic device has very much made it a new favourite. It's a keeper.

Thank you to @Ema from Sourcemore, I've really enjoyed showing off this kit.

It's available for $34.19 from Sourcemore with the discount code: VELEK
OXVA Velocity LE Kit

  • Locked
VOOPOO ARGUS P1 kit review by Devin Brent

I got this nifty little pod kit to review and i gotta say its small but mighty. Slightly smaller than the Freemax Galex Nano in fact. It has a draw detector that determines whether to produce MTL or DTL vapor based on how you inhale. It comes with a lanyard hole and a lanyard included which is nice and was very much appreciated since the Galex Nano doesnt come with it.

Device:

Name: ARGUS P1

Material: Zinc Alloy+PC

Battery: 800mAh

Output Power: 5-20W

Output Voltage: 3.2-4.2V

Resistance: 0.5-3.0Ω

Battery Capacity: 800mAh Built-in Battery

Size: 74.6x46.7x17.4mm

Recommended E-liquid: Nicotine≤50mg

Colors: Gunmetal, Black, Forest Geen, Silver, and Red.

It also has all of the following:

1.PD Fast Charging (18mins): The PD fast charging speeds up to 18 minutes from 0 to 100%.

2.Futuristic Mechanical Style: Designed in a futuristic mechanical style, the half metal and half transparent device demonstrates sturdy and sophisticated beauty. To create its natural delicate grip feeling, the body is designed in gentle angles. ARGUS P1’s 4 LED beams light on and off with soft and clear light.

3.AI Output Adjustment:GENE. AI 1.2 Chip adjusts the matching powers by sensing each puff automatically. Meanwhile, the LED lights show real-time output power and battery life.

4.ITO Atomization Technology:Equipped with VOOPOO's ingenious ITO atomization technology, ARGUS P1 brings you a delightful MTL experience.

5.Patented Leakage-Proof Design:Air-Tight Silicone Ring, Air-Tight Silicone Seal and 4-Hole Leakage-Proof Structure

6.The cartridge is compatible with ARGUS POD

Thoughts:

Its definitely a sturdy little pod device that can handle being dropped even if its not rated for that which ive done. Dropped it 2x in the last day onto concrete and it keeps on ticking. Another nice fewture is that the coil isnt built into the pod so you dont have to throw out the whole thing when only the coil is bad. Another thing that is nice is that it doesnt suck up the juice. Like its not a thirsty device. It sips it doesnt gulp. Oh and the flavor is far better than the Galex series devices. Im using an iced coffee flavor and it literally smells like i walked into a coffee shop and tastes like my colombian coffee which is something only my Maxus Max 168W pod device with its 2 18650 batteries can match. Its honestly astounding that its able to do that!

Verdict:
Wish it came in a resin edition or more flashy colors. Overall though its a solid little kit with a big flavor punch. Definitely worth picking up. I actually picked up a second one in the Forest Green that its available in. Its the first one ive reviewed that i actually went and preordered or even bought a second one. Thats saying something because i dont do that....ever.

  • Locked
Closed/Sold Drippers, drippers, and more drippers!

Here's a lot of ten squonk rda clones with bf pins and some with accessories. Looking to sale for $60.00, US only, PP friends and family with no mention of ecigs, shipping included.
Attys are used, in good condition. Some have hairline scratches and beauty ring marks but can easily be buffed out...

"All attys are sxk clones"
1. Split rta with 24mm x-tank
2. No Name 24mm rda with spare cap and both pins
3. Hadley 22mm rda with spare post screws and clamps
4. Hellfire saber 22mm rda with bf pin
5. Hellfire strike 22mm rda with bf pin
6. A-atty rda with spare cap
7. Hellfire sentinel 22mm rda with spare cap and airflow rings
8. Haku venna 22mm rda with spare ultem cap
9. Hellfire short cranked 22mm mtl rda
10. Citadel 22mm rda with ultem cap.

Rrp over $100 with some attys costing over $25 when purchased not including the spares. Asking for $60 for everything.

20221022_125015.jpg20221022_130829.jpg20221022_132037.jpg20221022_132605.jpg20221022_133027.jpg20221022_133555.jpg20221022_133910.jpg20221022_134256.jpg20221022_135008.jpg20221022_135227.jpg

  • Locked
Closed/Sold Modz, modz, and more modz

Hi fellow vapers, as you all know I dont like posting single for sale items anymore. I rather just sale as a batch so I dont have to make multiple trips to the post. I try my best to keep the price as fair as possible for each lot.

Today for sale I have a total of six mods all in working condition. Some have signs of ware and minor scratches and tiny marks but all work as they should. Almost 1k rrp for only $250.00 shipped within the US, PP friends and family with no mention of ecigs.

1. Customized Therion dna 166 mod. Sand blasted by one of our very own members. I will include an rda and spare authentic XL canvas cut out with original leather piece and template for the door.

2. Rave mini 67 18350 ultem mod sqounker clone by SXK. Minor hair line scratches no dings in good condition.

3. Two Mixx SBS modz, one grey and one black both in good working condition. Gray has a visible scratch from my allen key slipping when taking it apart to switch the color tubes. Black has no visible scratches.

4. One og Triade dna 250 mod in working condition. Mod has signs of ware from daily use. Was thinking of cerakoting it because of the powerful dna 250 chip that handles every crazy low ohm build i put on it. Just never got around to it.

5. One Pulse squoker mod in a very used condition. The panels show signs of ware and the mod has visible scratches on the bottom. The mod still operates flawlessly with the vandy chip. It was my edc for its reliability. A serious work beater mod for those that work in harsh environments that need a reliable work mod.

Just $250.00 for six mods that will last a life time...

20200718_121805.jpg20200718_130912.jpg20221001_182652.jpg20221001_182613.jpg20221001_180741.jpg20221001_182137.jpg20221001_182009.jpg20221001_182239.jpg20221001_182300_01.jpg

If you need more pictures just pm me. Than you for looking

  • Locked
Joyetech Ego Air Pod Kit Review By Frenkyou

Joyetech-Ego-Air-Pod-Kit-1.jpg


Hello, this time we talk about Joyetech Ego Air Pod Kit. I will examine in this Test each of the characteristics that distinguish this item. I hope that by the end of this reading you may have understood this product, and therefore decide whether to invest in it or not. As always, my opinions are free and based on my personal experience.
• Enjoy the reading.

► Joyetech Ego Air Pod Kit; Before starting let's see together some special features indicated by the manufacturer:

• 1. 650mAh battery capacity
• 2. 2ml e-liquid capacity
• 3. Mesh Coil inside
• 4. Easy filling without leaks
• 5. No buttons
• 6. Two options: With driptip 510 without filter, or with filter
• 7. Restricted airflow for MTL vaping

Joyetech-Ego-Air-Pod-Kit-2.jpg


► Joyetech Ego Air Pod Kit; Packaging:
A simple white package, faded upwards with the color similar to the device it contains. The package frontally reports; the logo, the brand, the product image, some main features in the form of icons and the name "EGO AIR". On the back there are; content, specifications, scratch & check, color of the sample, barcode, warnings, logos and legal trademarks. Sideways find; disposal indications, references to the social media used by Joyetech for the promotion of its products, reference addresses of the manufacturer.

Joyetech-Ego-Air-Pod-Kit-3.jpg


Joyetech-Ego-Air-Pod-Kit-4.jpg


► Joyetech Ego Air Pod Kit; Packing List:
• 1x eGo AIR Battery Body
• 1x eGo AIR Pod
• 1x USB Type-C cable
• 1x Cotton filter
• 1x User Manual
• 1x Warranty certificate

Joyetech-Ego-Air-Pod-Kit-5.jpg


► Joyetech Ego Air Pod Kit; Specifications:
• Dimensions: 16 x 122.5mm
• Battery: built-in 650mAh
• Tank capacity: 2ml
• Resistance: integrated 1.0Ω
• Vape mode: Constant voltage

Joyetech-Ego-Air-Pod-Kit-6.jpg


► Joyetech Ego Air Pod Kit; Available colours:
• Stellar Black
• Twilight Blue
• Blazing Red
• Metallic Gray

Joyetech-Ego-Air-Pod-Kit-7.jpg


► Joyetech Ego Air Pod Kit; First Impressions:
In the last period I got acquainted with some Pod-Basic devices of the Joyetech brand, such as; Evio Pod and Evio C. These vaporizers in their low-cost product segment, in my opinion are worthy of attention as they performed well during my tests. So I was also quite intrigued by the newcomer that I will tell you about in this article.

Joyetech-Ego-Air-Pod-Kit-8.jpg


The Joyetech eGo Air POD is a super simple e-cigarette with a fountain pen form factor, absolutely ideal for beginners as it does not feature complicated key combinations, displays or anything else that is difficult to learn, plus it is truly pocketable. Joyetech sent me two different samples; one in "Stellar Black" color and the other in "Metallic Gray" color. This all-in-one has the body made of metal and is quite slender in the face of a small diameter of only 16mm. It carries two white writings "Joyetech" and "EGO AIR" as the only decorations, thus maintaining a serious and sober appearance. Judging by the small size of the single air inlet hole, this is a device designed for MTL.

Joyetech-Ego-Air-Pod-Kit-9.jpg


Joyetech-Ego-Air-Pod-Kit-10.jpg


According to Joyetech, the USB Type-C charging socket would guarantee a complete recharge of the electronic cigarette within an hour. And the nearby small LED has the task of signaling the battery charge level as follows:
• 60-100% The LED flashes slowly
• 20-59% The Led flashes moderately
• 1-19% The LED flashes rapidly
• Furthermore, during recharging, the LED remains lit in white and at the end of recharging it turns off.

Joyetech Ego Air Pod Kit 11.jpg


Joyetech Ego Air Pod Kit 12.JPG


The bottom of the compartment / pod has a hollowed-out drainage channel which should be used to collect condensation accumulations by keeping the contact pins and the sensor of the automatic puff sheltered and dry. There are also two small magnets to hold the cartridge firmly when inserted.

Joyetech Ego Air Pod Kit 13.jpg


The PCTG cartridge is dark in color, but this does not prevent you from checking the level of the internal e-liquid. The refill is of the lateral type and allows you to comfortably insert up to 2ml of e-liquid even without removing the cartridge from the Mod.

Joyetech Ego Air Pod Kit 14.jpg


Joyetech Ego Air Pod Kit 15.JPG


A real peculiarity of this device is that you can use either the 510 drip tip you prefer, or the original drip tip with or without the supplied filter.

Joyetech Ego Air Pod Kit 16.jpg


The 1.0Ω Mesh Coils are permanently installed so when it runs out you will have to buy replacement cartridges, according to Joyetech these coils guarantee a first-class taste experience and convince with their long life.

Joyetech Ego Air Pod Kit 17.JPG


► Joyetech Ego Air Pod Kit; Final Conclusions & Vaping Test:
All in all, Joyetech eGo Air POD is really ideal for beginners, as it is the easiest vaporizer possible to use, this kit is also light, sturdy and extremely handy, ideal for everyday use. My Svapo test has clearly indicated that Ego Air Pod is well calibrated for MTL use, in fact the shot is sufficiently narrow, moreover it returns a good taste and an equally good perception of Hit (Shot in the throat). Personally I like to use this little vaporizer without the paper filter, this way I get a slightly more direct and loose puff and with more heat as I like it. Perhaps those who have just quit smoking will be able to find useful psychological support by adopting the filter.

I would like to thank Joyetech for providing me with the kits. I hope this review was helpful for anyone looking to buy the Ego Air Pod Kit:

Thanks for reading.

Joyetech Ego Air Pod Kit 18.jpg
  • Informative
Reactions: gloopdegurp

  • Locked
OXVA XLIM SQ POD KIT review by hittman

It’s been quite some time since I’ve done a review for Oxva but here I am finally. I was sent the Oxva Xlim SQ by Oxva in order to attempt to provide a fair and honest review. The Xlim SQ is a square shaped pod device like I’ve seen from other manufacturers. As a matter of fact, I just finished reviewing two other small square shaped pod devices. The SQ has a 900mah internal battery which is a step above some of the other similar sized pods I’ve tested. A larger battery is always a welcome addition. I did think it was odd that the Oxva website says that the SQ comes with .6 and .8 ohm pods but the one that I received came with a .8 and 1.2 ohm pods. Evidently there must be two different kits. Anyway, the SQ boasts USB-C fast charging and can charge up to 80% in less than 30 minutes. The pods included in the kit are the Xlim V2 pods like I used on the Xlim V2 when I reviewed it and have a liquid capacity of 2ml which is pretty standard. These pods are compatible with all Xlim devices. One thing that helps the SQ stand out is that it does have adjustable airflow which is an important feature to me. The SQ has an output range of 5-25 watts which is higher than other pods like this I’ve seen.

otIw1vz.jpg


HmBMkkA.jpg


JIZjR9H.jpg


WHAT’S IN THE BOX?(According to the website)

1 x XLIM Cartridge V2 0.6Ω (Pre-installed)
1 x XLIM SQ Device
1 x Lanyard
1 x XLIM Cartridge V2 0.8Ω
1 x Type-C Cable
1 x User Manual


The sample I received included a .8 ohm V2 Pre-installed and a spare 1.2 ohm cartridge. I did not receive a V2 .6 ohm cartridge.

SgZmjT1.jpg


SPECIFICATIONS:

Output Power:5-25W
Cartridge Capacity: 2ML
Battery Capacity: 900mAh
Material: Aluminum Alloy+PCTG
Charging: DC 5V/1A, Type-C
Spec of Coils: 0.6Ω (20-25W) & 0.8Ω (12-16W) &
1.2Ω (10-12W)
Dimension: 14mm×47mm×68.5mm
Weight:44g


aICIXSM.jpg


FEATURES:

1/X-TREME FLAVOR & STRONG THROAT HIT

2/ Highly leak-resistant
Anti-leaking design to prevent condensation at the bottom

3/High Compatibility - Xlim V2 cartridges,
The 0.6Ω cartridge works great on freebase as well

4/Ergonomic AFC
Airflow control on the side to find your best draw precisely.

y79yrKI.jpg


Y1vYeXE.jpg


4LlR8Me.jpg


Ob1NuVN.jpg


INITIAL THOUGHTS:

The Xlim SQ arrived in a very bright and colorful box. The color picture on the front of the box unfortunately was not the color version that I received. The one on the box was a nice fade from pink to black but the one I received was just pink. I can honestly say that if I had a choice, I would have picked any other color besides the one I received.

The front of the box shows the Xlim SQ name in large lettering and tells you in the top left corner which version is inside and once again, unfortunately I received the .8 and 1.2 ohm version. I would have preferred to try the .6 ohm pod. Most companies that I do reviews for would have sent one sample of each for a review but sadly this did not happen with this one.

The back side of the box has a brief description, contents list, Oxva company information, and a scratch and check authenticity code. The box for the SQ doesn’t have the normal lift off top but instead opens from either end. The SQ sits in a plastic tray with the .8 ohm pod pre-installed and the spare 1.2 ohm pod, lanyard, USB-C charging cable, and user manual are sitting underneath the plastic tray when you slide it out.

1666398328115.png


1666398359245.png


1666398392460.png


As you can see in the picture above, the front of the SQ just has the Oxva name and a single indicator light on the front. The light tells the user what the battery level is. It starts out with green then switches to blue and then red as the battery drains.

  • Green = 65-100%
  • Blue = 30-65%
  • Red= Less than 30%
The opposite side has the Xlim SQ name printed on it and nothing else.
1666398567541.png


On one end there is the airflow adjustment. There are three airflow holes and the airflow can be adjusted from a tight MTL to an RDL. Once again, I wish I had gotten the .6 ohm pod to try it out in RDL. On the opposite side are the two openings in the aluminum body that provide a place for you to connect the included lanyard if you choose to use it. Myself, I don’t like lanyards and don’t use them. However, the SQ is very lightweight and could easily be hung from the neck by a lanyard without feeling heavy.

1666398620226.png


1666398649511.png


The top of the SQ has the pod opening has the standard gold plated spring loaded contacts as well as two magnets to hold the pod securely. Also is the raised airflow inlet for the auto draw. It is raised on this one and many others I’ve seen in order to prevent liquid from getting into the opening and causing the unit to fail. Also on top is a textured black section which is more of a decoration than anything. It almost looks like it is rubber but it is just hard plastic. The bottom of the SQ is where you will find the USB-C fast charging port so you won’t be standing this one up to charge. Not a big deal to me.

1666398709840.png


1666398738514.png


The pods included with the SQ are the Xlim V2 cartridges. They are available in .6, .8, and 1.2 ohm resistances. They are compatible with all versions of the Xlim. The cartridges are slightly tinted and not clear like they appear in the pictures below. However, you can still pretty easily see the liquid level in normal lighting. When the liquid level gets to the level of the body of the pod then it’s about time to refill.

BrXfmWd.jpg


HsczWNO.jpg


The pod that comes pre-installed is the .8 ohm pod in my kit that is rated for 12-16 watts and comes with a plastic cover over it to protect it from being fired before filling. The spare pod in my kit was a 1.2 ohm rated for 10-12 watts. Both pods have two magnets, two gold plated contacts, and two airflow holes.

The pods are a side fill with a rubber plug. I would have much preferred a top fill as that is what I prefer to use when using pods. I don’t have good fingernails and had a bit of difficulty opening the rubber plug at first. Once open, I was able to fill with a plastic 10ml bottle easily without making a mess. I found the mouthpiece very comfortable to use.

1666398917211.png


1666398975899.png


QZ90wHt.jpg


FINAL THOUGHTS:

I felt like the Xlim SQ delivers on what it promises to do. Although I don’t care at all for the color that I received for the review, it delivers a nice throat hit and pretty good flavor when using the .8 ohm pod. The 1.2 ohm pod was a little low on output for me. I had to tighten the airflow down quite a bit to warm the vapor up and boost the flavor some. It wasn’t bad. As I mentioned earlier, I think the SQ would have come alive for me with more output had I received the kit version with the .6 ohm pod.

I do like that Oxva was able to incorporate a 900mah battery where others of similar shape or size seem to be 800mah or less. I have recently tested several that were 800mah and could definitely tell a difference in how much liquid I was able to go through compared to the lower mah batteries. Most 800mah batteries allow me to go through 3-4ml of liquid and was able to fill the pod twice and a little more before the battery had neared its end and I could tell that it was time to recharge since the output seemed reduced. When you’re dealing with a 2ml pod then another 100mah can really make a difference.

So, would I recommend the Oxva Xlim SQ? If you’re looking for a small square auto draw only pod then this is a good one. If you like lanyards then that’s another plus for you. The extra battery capacity and fast charging are definitely something to take into consideration. I personally prefer top fill pods but if you don’t mind a side fill then this might be a good one for you.

I’d like to thank Oxva and Jocelyn for sending the Oxva Xlim SQ for this review. Thanks also to the readers as you have made it to the end of another one of my reviews. Below is a link to the website if you’d like to take a look around.

XLIM SQ – OXVA
KeDoDuw.jpg

  • Locked
New Nanograf 18650 4.0Ah. Will it be safe for vaping?

This came across my feed this morning. Curious to see if it’s safe for vapes. Unable to find discharge rate.

  • Locked
Smoktech SMOK T-Air Subtank Tank Clearomizer

Smoktech SMOK T-Air Subtank Tank Clearomizer
authentic / 5ml / TA 0.2ohm coil & TA 0.15ohm dual coil / 32mm diameter
T-air10.21.jpg


Details:
If you're looking for a tank to provide a range of practical and functional features, look no further than the all-new T-Air Subtank, which raises the bar for what an excellent tank should be. Its top dual-slotted honeycomb airflow control is designed to produce unprecedented flavor and vapor, while its top fill system with dual filling ports puts an end to leakage. Innovation keeps changing the vaping experience!

TOP AIRFLOW, TOP NOTCH FLAVOR: The top airflow system features a dual-slotted design with honeycomb airflow control that shortens the airway and reduces air loss for increased vapor and enhanced flavor.
T-Air Subtank is meticulously designed to be completely leak proof.
PUT INGENUITY INTO YOUR TANK: The quarter-turn top cap and dual filling ports facilitate e-liquid filling process.
REPLACEABLE 810 DRIP TIP: T-Air Subtank's drip tip is a standard 810 drip tip with a diameter of 16mm that fits perfectly into your lips.
5ML E-LIQUID CAPACITY: The newly developed bulb glass tube measures 32mm in diameter with an e-liquid capacity of 5ml. It guarantees a durable vaping enjoyment, as there's no need to add the e-liquid frequently.
Coil Specification: TA 0.2ohm Coil(2in1 single meshed, 50-70W/best 65W) / TA 0.15ohm Dual Coil(Dual meshed, 40-60W/best 55W)
32mm Overall Diameter
510 Threading Connection

Filter