Thanks Kitten...I assume it works better than cotton similar to any other atty?
How do you wick the tails....you wouldn't have a picture by any chance would you?
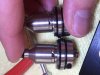
This is what I've been doing:
1. Cut wicks till they're flush with the deck's threads.
2. Fluff them up a bit by blowing on them.
3. Juice up the bottom 1/3rd of each tail then point them down and stick them about 1.5-2mm into the channel
4. Put the chimney base on.
5. Juice up the rest of the wick and gently guide it down and out like in Trevor's video.
No dry hits and no leaking when on it's side all night... only slight leaking from the fill hole screw.
I wouldn't cut the wick any longer than described... cuts off airflow a lot.
Sometimes it takes me 2-3x trying to get the right wick density in the coils. Too little or too much and I get dry hits.
Too much wick in the channel also leads to dry hits. I'm using 50/50 and have yet to put too little in the channel.