Status
Not open for further replies.

Scubabatdan

Vaping Master
ECF Veteran
Verified Member
Jul 14, 2009
4,749
6,733
62
Dothan, AL
Dan, we have to officially label you the atty, carto, tank, and tiny soldering, King!

edit: cant forget the pill fobs lol


LOL, Thanks... Nope cant forget them!

Dan,

That looks Awesome!

How does it vape?

Did you press the 510~510 modders connector in the bottom? I guess not since you used your genesis atty in lieu of a regular atty or CE2.

Nope I used a CE2 connector pressed it in, no o-ring not worried about leaks as the delrin is one piece, the tube connecting the two pieces allows air through and has the electrical wires going to the coil.
Here it is filled with the power button pressed... ahhh vapor:
iPhone 022.jpg

And here it is in operation...
iPhone 023.jpg

Working like a champ!
Just need to make screw post for quick change of the coil.
Dan
 
Last edited:

PKZap27

Resting In Peace
ECF Veteran
Jan 22, 2011
1,848
675
USA - Ohio
Dan,

Did you wiggled the outer tube off of the CE2, or did you cut the tube like how it’s originally done with the MAP tank before pressing the CE2 into the delrin.

I’m also guessing you removed the ceramic cup off of the little metal tube in the center of the CE2 along with the black shrink wrap leaving the silver tube in the center and just attaching the wires to your genesis atty.

Also, from what I can see, it looks like in the lower part (juice tank), you machined that area out of the delrin leaving enough to house the wiring going up through the center.
 

Scubabatdan

Vaping Master
ECF Veteran
Verified Member
Jul 14, 2009
4,749
6,733
62
Dothan, AL
Dan,

Did you wiggled the outer tube off of the CE2, or did you cut the tube like how it’s originally done with the MAP tank before pressing the CE2 into the delrin.

I’m also guessing you removed the ceramic cup off of the little metal tube in the center of the CE2 along with the black shrink wrap leaving the silver tube in the center and just attaching the wires to your genesis atty.

Also, from what I can see, it looks like in the lower part (juice tank), you machined that area out of the delrin leaving enough to house the wiring going up through the center.

Correct the only part of the CE2 is the tube and the connector, I wiggled it loose, no tubing connected. The complete top part was removed. Yes think of a dumbell the way it is shaped, I dilled a 3/16 hole in it first then shaved it down to .005" under .75" so it went in the poly smooth. Then I cut the o-ring grooves, which I made a mistake on, I ordered 1/8 instead of 1/16. Will change that on the next one. The I reemoved the center section where the juice goes. Cut it off and dilled a 11/32 hole for the connector. Ran the wires, connected the nichrome and dropped the SS with the coil in place and finished by putting the tube over it. The used a 18ga needle and filled it. I made the holes for the SS a little bigger than the actual SS wrap so I could fil there and when it is tllted the juice flows good. If I stand it back up the excess drains back into the main compartment. Would rather have a wet wick than a dry one. It works really good and I am thrilled with it.
Dan
 

perlionsmitnick

Super Member
ECF Veteran
Sep 14, 2010
459
135
TX
Correct the only part of the CE2 is the tube and the connector, I wiggled it loose, no tubing connected. The complete top part was removed. Yes think of a dumbell the way it is shaped, I dilled a 3/16 hole in it first then shaved it down to .005" under .75" so it went in the poly smooth. Then I cut the o-ring grooves, which I made a mistake on, I ordered 1/8 instead of 1/16. Will change that on the next one. The I reemoved the center section where the juice goes. Cut it off and dilled a 11/32 hole for the connector. Ran the wires, connected the nichrome and dropped the SS with the coil in place and finished by putting the tube over it. The used a 18ga needle and filled it. I made the holes for the SS a little bigger than the actual SS wrap so I could fil there and when it is tllted the juice flows good. If I stand it back up the excess drains back into the main compartment. Would rather have a wet wick than a dry one. It works really good and I am thrilled with it.
Dan

Please say there is a tutorial on this one in the near future ! Awesome !
 

PKZap27

Resting In Peace
ECF Veteran
Jan 22, 2011
1,848
675
USA - Ohio
PKZ...I'm really diggin' the ego adapter setup...that should simplify stuff a ton!! Great job!!

I'm thinking about drilling two holes in the neck of the 510~eGo adapter that has the fine threads to make sure I get air flow (I don't see why it wouldn't, best to test though), along with seeing how I could modify this one to press or screw it into the bottom delrin cap for the tank as another option.

The smallest drill for the two holes that I have is just a tiny bit bigger than the factory holes in other adapter, should still work though. Doing this will keep me busy until I get the large thread adapters. I'm thinking I could tap larger threads right over the fine thread or machine it down first then run a tap over it, to get better holding threads into this adapter. or just press it in after i machine it down.
 
Last edited:

PKZap27

Resting In Peace
ECF Veteran
Jan 22, 2011
1,848
675
USA - Ohio
Correct the only part of the CE2 is the tube and the connector, I wiggled it loose, no tubing connected. The complete top part was removed. Yes think of a dumbell the way it is shaped, I dilled a 3/16 hole in it first then shaved it down to .005" under .75" so it went in the poly smooth. Then I cut the o-ring grooves, which I made a mistake on, I ordered 1/8 instead of 1/16. Will change that on the next one. The I reemoved the center section where the juice goes. Cut it off and dilled a 11/32 hole for the connector. Ran the wires, connected the nichrome and dropped the SS with the coil in place and finished by putting the tube over it. The used a 18ga needle and filled it. I made the holes for the SS a little bigger than the actual SS wrap so I could fil there and when it is tllted the juice flows good. If I stand it back up the excess drains back into the main compartment. Would rather have a wet wick than a dry one. It works really good and I am thrilled with it.
Dan

I agree, the 1/8" O-Rings are over kill in this application, and makes it harder to get the delrin caps in and out of the polycarbonate tubing. The 1/16" O-Rings seem to be the best ones to use.

Good analogy with the dumbbell!
 
Last edited:

PKZap27

Resting In Peace
ECF Veteran
Jan 22, 2011
1,848
675
USA - Ohio
PKZ...grab a pin vise from your local modeling shop..they are just great for drilling those side holes in connectors...plus you don't risk chewing stuff up.

Thanks wolflrv!

I'm getting ready to put this in a small vise that I use with my drill press to drill the holes. I have to take the inside pieces of the adpater out first. Still trying to find the right size drill bit, I know I have one. Somewhere! If not I'll just use the one that I found that is a little bigger.

wolflrv

Are you refering to one of these? If so, I didn't know it was called a pin vise.

Pin Vise
PinVice.jpg
 
Last edited:

PKZap27

Resting In Peace
ECF Veteran
Jan 22, 2011
1,848
675
USA - Ohio
Correct the only part of the CE2 is the tube and the connector, I wiggled it loose, no tubing connected. The complete top part was removed. Yes think of a dumbbell the way it is shaped, I drilled a 3/16 hole in it first then shaved it down to .005" under .75" so it went in the poly smooth. Then I cut the o-ring grooves, which I made a mistake on, I ordered 1/8 instead of 1/16. Will change that on the next one. The I reemoved the center section where the juice goes. Cut it off and drilled a 11/32 hole for the connector. Ran the wires, connected the nichrome and dropped the SS with the coil in place and finished by putting the tube over it. The used a 18ga needle and filled it. I made the holes for the SS a little bigger than the actual SS wrap so I could fil there and when it is tllted the juice flows good. If I stand it back up the excess drains back into the main compartment. Would rather have a wet wick than a dry one. It works really good and I am thrilled with it.
Dan

The 11/32" connector hole was drilled so you could press in the knurled part of the CE2 and the 3/16" hole is the one that goes all the way through the middle of the delrin. Right?

Correct the only part of the CE2 is the tube and the connector

This tube is the center silver tube on the CE2. Right?

You used nichrome in lieu of kanthal for your genesis. Right?
 
Last edited:

jonboyusmc

Super Member
ECF Veteran
Dec 9, 2010
886
4,215
Illinois
I built this one back in February, using the long 510-510 connector. Kind of a poor mans AFS. I also have one with the modder connector with a tank that mimics what the Precious does. I didn't like the inconsistent vape I was getting with either of them. I have another atty tank drawn up, just have to find time to get it built.


Uploaded with ImageShack.us
 

Scubabatdan

Vaping Master
ECF Veteran
Verified Member
Jul 14, 2009
4,749
6,733
62
Dothan, AL
The 11/32" connector hole was drilled so you could press in the knurled part of the CE2 and the 3/16" hole is the one that goes all the way through the middle of the delrin. Right?

This tube is the center silver tube on the CE2. Right?

You used nichrome in lieu of kanthal for your genesis. Right?

Right, Right, and right you are again :)
Started with a 2" x 7/8" piece of derlin and end with what you see.
Dan
 

Scubabatdan

Vaping Master
ECF Veteran
Verified Member
Jul 14, 2009
4,749
6,733
62
Dothan, AL
Thanks Dan.

What are you going to call this one.

How about calling it the "Dumbbell"? :D

Really, the name fits! :blush:

LOL, well if you look at most of the Gen mods, this is the standard shape. The only difference is I positioned the SS and coil directly over the the center hole like the CE2. Where as most gen mods the SS is one piece that is vertical and they typically have an air inlet hole to the side where the SS coil is sittng in the vapor chamber. I like the name "Crossover" since it crosses from one side to the other and is a cross between CE2 and Gen mods.

This was my original design I posted in the Gen thread:
Gen Tank.jpg
Pretty close huh... :)
Dan
 
Last edited:

Scubabatdan

Vaping Master
ECF Veteran
Verified Member
Jul 14, 2009
4,749
6,733
62
Dothan, AL
I think the only thing I will change is the top of the "dumbell" If you where to cut it in half, the new design would look like this:
New Top.jpg

The main differance would be the V channels, this would allow excess juice to collect and run back into the lower chamber. Also the air channel for the coil would also be elevated to keep juice from being able to run into it.
What do yall think?
Dan
 

Scubabatdan

Vaping Master
ECF Veteran
Verified Member
Jul 14, 2009
4,749
6,733
62
Dothan, AL
I built this one back in February, using the long 510-510 connector. Kind of a poor mans AFS. I also have one with the modder connector with a tank that mimics what the Precious does. I didn't like the inconsistent vape I was getting with either of them. I have another atty tank drawn up, just have to find time to get it built.

No Time like the present!
Get er done!
Dan
 

PKZap27

Resting In Peace
ECF Veteran
Jan 22, 2011
1,848
675
USA - Ohio
LOL, well if you look at most of the Gen mods, this is the standard shape. The only difference is I positioned the SS and coil directly over the the center hole like the CE2. Where as most gen mods the SS is one piece that is vertical and they typically have an air inlet hole to the side where the SS coil is sittng in the vapor chamber. I like the name "Crossover" since it crosses from one side to the other and is a cross between CE2 and Gen mods.

This was my original design I posted in the Gen thread:
View attachment 37098
Pretty close huh... :)
Dan

Dan,

I like the Crossover name it fits even better.

I gotcha. I started reading the gen tread then jumped to Raidy's thread and I'm almost done with Raidy's Thread. I'll eventually get through the gen thread to see it. I'll appreciate it even more then I'm sure.

I think the only thing I will change is the top of the "dumbell" If you where to cut it in half, the new design would look like this:
View attachment 37100

The main differance would be the V channels, this would allow excess juice to collect and run back into the lower chamber. Also the air channel for the coil would also be elevated to keep juice from being able to run into it.
What do yall think?
Dan

First thoughts, I think it's outstanding.

Maybe square off the top edges, where the delrin caps meet the tubing on the top far right and far left of you drawing. like you have it in the middle where the SS mesh goes over the top of the parts that look like two cones on the drawing. Make the two outer edges flat on top not pointy. It's probably just your drawing turning out like that though. I'm sure you would end up turnning those points down just a tiny bit anyway on the lathe. The juice will still flow back down in there.
 
Last edited:

PKZap27

Resting In Peace
ECF Veteran
Jan 22, 2011
1,848
675
USA - Ohio
I drilled the two vent holes into the neck of the 510~eGo adapter, (the one with the fine cone threads) put the inside pieces back into the adapter backwards as discussed earlier, put an O-Ring on an unmodified steel CE2 for testing, screwed it onto the adapter, then screwed that on to my ProVari, the CE2 fires but no air flow.

I then messed around with the 510~eGo adapter bushing for a while and got air flow. The only way I was able to get air flow is by removing the bushing(s) from the side that has the two air holes drilled in the neck. I kept the bushing on the center piece for the other side. The CE2 fires this way and I get what seems to be a good air draw off of the CE2. Screwing the center pieces together or apart serves no function and you would not be able to adjust air flow this way. If you screw the two pins (center pieces) in the adapter together too far it will not fire the CE2 because it is not making contact with the battery. This draw seems right for me; the two holes I drilled are 180 degrees apart (I drilled one hole straight through both sides). You could drill four holes 90 degrees apart to get more air flow that would most likely be, IMHO close to how the original MAP tank draw is. NOTE: I did the air flow test through the unmodified steel CE2 without any juice in it, I feel the air flow would be the same with or without juice. However, I did miss out on a good hit of nicotine that would have been nice at that moment.

510~eGo_CE2.jpg
Modified 510~eGo adapter with O-Ring and a Black (steel) XL CE2, and it works. :D
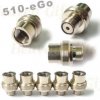
510~eGoAdapter.jpg
510~eGo adapter.
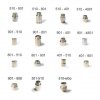
Adapters.jpg
Picture of other adapters for reference.

Next step is to get this modified 510~eGo adapter into the bottom delrin cap of the MAP tank.

PK
 
Last edited:
Status
Not open for further replies.

Users who are viewing this thread