Katana by POC ~ Show and Tell :) - Part 2

Status
Not open for further replies.

Ezkill

Ultra Member
ECF Veteran
Verified Member
Jun 26, 2012
2,306
2,642
Los Angeles
Good to know about the condensate. I don't think I'll be drilling anything quite yet as I'm not familiar enough with the device. It's one those...if I drill and don't like it, then what?

I'll compre the draw and hole size to my "DID's" when they show up. I can drill one of those if I want to try it out because I can just out and buy a new top cap. I have a feeling finding one for the Katana would involve...hunting down another Katana.
 

Phr0stByte

Ultra Member
ECF Veteran
Verified Member
Sep 30, 2011
1,062
2,242
Virginia is for vapers
Good to know about the condensate. I don't think I'll be drilling anything quite yet as I'm not familiar enough with the device. It's one those...if I drill and don't like it, then what?

I'll compre the draw and hole size to my "DID's" when they show up. I can drill one of those if I want to try it out because I can just out and buy a new top cap. I have a feeling finding one for the Katana would involve...hunting down another Katana.
Yeah, I agree - you definitely need to think it over before permanently altering anything. You had previously stated that it was good for you, so in your case, I am guessing that it is good the way it is. For me it was just too tight. In my case, it was the right thing to do.
 

Phr0stByte

Ultra Member
ECF Veteran
Verified Member
Sep 30, 2011
1,062
2,242
Virginia is for vapers
I got a newbie katana question too, can someone tell me how to replace the tank.
Before i take things completly appart i better ask ;D
It's like a puzzle but i didn't see one Part.
That is actually a great question, as I would like to know too. I was lucky enough to get four extra tanks with my purchase, but I have no idea how to change it.

PS - OMFG! This thing chokes you out in the morning! *Cough* *Cough*!
 

BluSwatch

Crazy Mod Collector
ECF Veteran
Verified Member
Nov 20, 2011
18,026
44,094
Washington
You have to pull your wick/coil, take the top screws off the posts, and pull your top plate off.
Easiest way to do it is to put the top cap back on after removing the stuff, and gently pulling, I VERY slightly rocked mine but you have to be careful not too much, and not to twist.
The whole top plate comes off, and you can pull the tank after that.
You can also rotate the white top plate in the metal ring at that time, once it's off, if you need to, to line up the air inlet with the wick.
 

Phr0stByte

Ultra Member
ECF Veteran
Verified Member
Sep 30, 2011
1,062
2,242
Virginia is for vapers
You have to pull your wick/coil, take the top screws off the posts, and pull your top plate off.
Easiest way to do it is to put the top cap back on after removing the stuff, and gently pulling, I VERY slightly rocked mine but you have to be careful not too much, and not to twist.
The whole top plate comes off, and you can pull the tank after that.
You can also rotate the white top plate in the metal ring at that time, once it's off, if you need to, to line up the air inlet with the wick.
Are there pictures around somewhere explaining this a little better?
 

Ezkill

Ultra Member
ECF Veteran
Verified Member
Jun 26, 2012
2,306
2,642
Los Angeles
Another newbie question....

Filling, there has to be an easier way.

So the only reliable way I've found to fill it right now is to run a tank through then dry burn the coil a bit so the wick dries out and then fill it really quickly with a needle filler. I say quickly because if I go slow the juice just seeps out of the top of the wick.

I was thinking maybe a longer needle that goes to the bottom of the tank? My needle does not and that might be part of the problem, not really sure.
 

rielevilnside

Senior Member
ECF Veteran
Verified Member
Feb 11, 2012
253
58
Renton Washington
I have tried pinching the wick and keeping it open and had successful wicking with both. However it seems having the wick just slightly pinched to an oval makes a difference. Also I have had my tank apart 3 times now for cleaning and it goes together rather smoothly but be careful about the orings.
If you don't lube/juice up the rings good enough and ease the stress from tearing the rings. As well my Katana's short electrode seems to want to rise all the time even after pushing back down into the tank so I cut a piece of rubber tubing and split the side to fit it between the black plate in the bottom part of the tank to help prevent it from being pushed up by frequent use. it seems to help but I am working on a better mod to help this.

I am also awaiting news from my Machinist on a quote for the work on the LE rings so those that are waiting if they sell out soon the material work can start.
 

Ezkill

Ultra Member
ECF Veteran
Verified Member
Jun 26, 2012
2,306
2,642
Los Angeles
Haha....so funny story about filling that lead to a whole bunch of stuff. Basically the guy I bought this from rolled a wick and supplied a coil that was working well. However he rolled his wicks so they weren't exactly hollow in the center thus making the wick filling method not viable. I tried to get the wick open with a variety of implements from both sides and it was fruitless.

Spur of the moment decision I'm going to build a new wick and coil, might as well learn right now. I had a hell of a time with my first rebuildable's, Penelope's, so I figured this wouldn't go too well. The problems I had with Penelope's were due lack of knowledge and trying to rush stuff. Anyway I ended up doing a lot of research in threads here and watching some videos. Kind of decided that dealing shorts wasn't something I wanted to do so I took a bunch of methods and combined them. While not efficient from a time perspective the first wick and coil attempt was spot on and an hour later it's still vaping like a dream.

For wick I used a 3 by 4 cm piece of 400x400. Approximately 1.2 inches to 1.6 inches. I used the big paper clip method to keep it hollow. I also gave it a torch before I started rolling. I kind of bodged the first one by rolling it too tight. I didn't know if it was would be OK for it to hit the bottom of the tanks so I decided to make a new one before I got too far along. Second one was a nice snug fit. Found it got a tiny bit more snug after quench and torching. Torched and quenched 4 more times after it was rolled. Then dripped e-juice on it 3 times and lit it on fire. For even more overkill I used the cigarette paper method. Wrapped a tiny piece of rolling paper around the top were the coils go before wrapping it with wire. This just creates an extra carbon layer right under the wire. Dry fired the coil and presto...no hot spots. Nice even ignition. Pulsed dry firing it until all cigarette paper turned to ash.

It's vaping great an hour later. Slightly off taste but I'm familiar with this taste and it happens in the Penelope's as well after a fresh coil. I think it's the Kanthal breaking in. I think pre-torching + extra torching + cigarette paper just ensured there would be no shorts. While it's fairly redundant and took a few minutes longer I'm sure it would have taken more time to deal with shorts after the fact. Being a beginner I just wanted my first coil to fire and not deal with hours of frustration.

Included some pictures of coil assembled with cig paper and then dry fired the first time.
 

Attachments

  • photo (4).jpg
    photo (4).jpg
    23.6 KB · Views: 48
  • photo (5).jpg
    photo (5).jpg
    20.4 KB · Views: 48
  • photo (6).jpg
    photo (6).jpg
    23.1 KB · Views: 48

Ezkill

Ultra Member
ECF Veteran
Verified Member
Jun 26, 2012
2,306
2,642
Los Angeles
The time to do this wasn't bad. I think it's roughly the same as a Penelope coil. Taking the penny apart, cleaning it, twisting wires together etc all takes some time. The wick was kind of fun to roll, I admit. I went way too far with the first one and it was much too small. Second one took no time at all.

That being said if you don't need a new wick this is 10 times faster then a Penelope since everything you need to get at is right under the top cap.
 

Ariel_MX

Vaping Master
ECF Veteran
Verified Member
Feb 15, 2010
3,511
5,048
51
Guadalajara, México
As some of us Katana owners I had been having some wicking problems with my Katana, tried a lot of different mesh setups and advices, sometimes the katana worked good for some days, but most of the time there were dry hits. I didn't want to modify my katana (opening the filling hole for example), last night I was playing with it and thinking why the dry hits, I came to the conclusion that dry hits is due the mesh is not in contact with the liquid, for example Katana with half tank filled, when you vape it at 90° the mesh is not in contact with liquid.

I would like to introduce you my ®patented© method to avoid dry hits (standard setup with screw in the filling hole) :laugh: :

You will need:

* Plastic tube approximately 1.7 cm long, 0.5 cm outside diameter. You can find that plastic tube on the spray cans (I took it from a empty deodorant can, be careful when opening compressed content cans).

* Scissors or cutter.

* Know how to disassemble the top cap.

Some pictures:

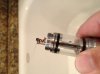
Standard setup (filling hole screw installed):
1z5spad.jpg


You can see how the liquid goes inside the wicking tube© when Katana standing up:
2i0ua6s.jpg


2ujh6kx.jpg


When you vape it the liquid enters inside the wicking tube©, allowing better wicking:
5oxan9.jpg


The plastic tube I took from a empty deodorant can (wash it very good and boil it):
2ia92eb.jpg


Cut a 1.7cm plastic tube piece and make some cuts on one end (this end will be at the tank bottom) to allow the liquid to enter inside the wicking tube©:

o72jcp.jpg


oh8mrd.jpg


1z2ho5l.jpg


Install the plastic tube inside the Katana tank, where the wick hole is placed, like in the third picture.

Install the Katana top cap, the +/- posts will help so the wicking tube stays in place.


So far it is working very good, no dry hits and I can vape the whole tank :)

Give it a try, it could work for you also.
 
Status
Not open for further replies.

Users who are viewing this thread