Once again, I like all of these mods and I salute those who have taken the time to work on them and share them with all of us.
As I mentioned before, I am currently using the vertical spring with the blue Scotch Brite pad. It has another advantage that I mentioned a long time ago, but would like to redress.
The Buff Puff and blue foam "plugs" rely on "horizontal compression" of the media to control the flow of the liquid. If you are flooding your atomizer you use more material.. squeeze it, and fit it onto the cartridge opening. If you are getting a burned taste and the atomizer is "starving", reduce the amount of material. That's all good.
The "pad" style relies on "axial" compression of the material. If the atomizer is flooding, you make the spring or straw a bit longer. If the atomizer is starved, reduce the length of the spring or straw. Different mechanism, same result.
BUT.... there is a trick that you can use with axial compression that you can't do with horizontal compression. You can control the amount of compression by changing the amount of engagement between the cart and the atomizer.
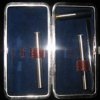
Example: I make a cartridge that works perfectly with the thinnest liquid I have... some PG 555. When the cart is installed it looks like this:
Note that the cartridge is completely "seated" on the atomizer.
Now, if I refill that cartridge with a thick fluid like an NHaler HV or some of my VG juice.... the atomizer will starve for fluid and I'll get a burnt taste. Solution... pull the cartridge out just a bit until I get the correct flow-rate. When I start to get a nice atomizer sizzle.. it will look like this:
The real beauty of this is that I only have to make one cart style and I can use it for all of my liquids by just setting the "throttle" position. The other beauty is that (despite our wishes and desires), not all atomizers "wick" and perform exactly the same. By using this "throttle" idea, you can dial-in almost any atomizer and get it to work properly.
This is perhaps one of my favorite features of the "axial spring and pad" style mod.
My $.02!

 Couldn't figure out why it was so bad, lol. I never thought to look into the cart for the straw!! 8-o