What about the seam in the back...does it overlap or just meet (abut)?
Yes it overlaps, but I ordered it that way...there is an overlap or no overlap option....it overlaps about an eighth of an inch and isn't noticeable at all....
What about the seam in the back...does it overlap or just meet (abut)?
The first one I made overlapped, and the corners lifted a little over time. The second just abuts, and so far it has worn better. I do think the wrap is a huge improvement for the Vamo, improves grip, gets rid of the rattle, and I'm not a chrome fan myself.Yes it overlaps, but I ordered it that way...there is an overlap or no overlap option....it overlaps about an eighth of an inch and isn't noticeable at all....

The first one I made overlapped, and the corners lifted a little over time. The second just abuts, and so far it has worn better. I do think the wrap is a huge improvement for the Vamo, improves grip, gets rid of the rattle, and I'm not a chrome fan myself.
I took apart the stainless and gave it more of a brushed finish...I like the more matte finishes instead of the shiny finishes that many other members like. The brushed finish feels better and is not a fingerprint magnetI'm not a chrome fan either (other than on a motorcycle...LOL) so I got the stainless Vamo so it wouldn't be a fingerprint magnet...still though, a relatively heavy APV can't be that smooth no matter what the surface....it's just waiting to slip through one's fingers and be dropped...The skin looks good and gives a bit more grip as it has a little bit of texture to it...it completely changes the look of the device in a positive way as well...I'm very happy with it...

I took apart the stainless and gave it more of a brushed finish...I like the more matte finishes instead of the shiny finishes that many other members like. The brushed finish feels better and is not a fingerprint magnet
I don't want to hijack Peraspera's thread too much, but here is the gist of it:I never thought of that...how did you go about giving it a brushed finish?
I never thought of that...how did you go about giving it a brushed finish?
I don't want to hijack Peraspera's thread too much, but here is the gist of it:
Take apart the Vamo (it was not easy for me, this required persistence while being careful):
Vamo first impression and disassembly how to - YouTube
I mounted the cap, bottom, and body on a drill and used 220 and 320 wet/dry sandpaper to make a new finish. I screwed an old carto onto the cap, put the carto in the chuck of the drill. For the body and bottom cap, I used a bolt with some nuts and a rubber furniture foot trimmed so that it fit tightly in the body (then put the bolt in the chuck of the drill). Soak the sandpaper in water and keep it wet while rotating the pieces on slow speed with the drill. It took about an hour once the Vamo was disassembled, but worked like a charm!!
EDIT: I almost kept the 220 finish, but the 320 was just a little more rich...
I don't want to hijack Peraspera's thread too much...
Thanks perasperaAnything that anyone does to change the appearance of their VAMO to suit one's own taste is on topic and most welcome as far as I'm concerned. Your post was helpful info. Thank you.
I found that the Scotch Brite treatment to lend more of a satin finish, which still had fingerprints, and the Vamo was still "slippy." I preferred the horizontal grain of the brushed look instead, and the sandpaper yields a more tactile finish that does not show fingerprints.For mine, I just tape off the LCD screen cover and use Scrotch brite over the body... buttons and all. It puts a nice even brush finish and gets rid of the uneven look of the stainless.
raulverna, I don't have an SVD but I'm wondering if the indentations would show up, even under a textured 3D vinyl wrap. If you want to try one J-Wraps has wraps for the SVD and Vapor Skinz has some SVD wraps as well.
If the SVD is close in diameter to the Vamo, you could print a paper template and fit it to the SVD from there. It might require a couple of revisions before you have it ready to cut from vinyl. Good luck!Thanks used your template to wrap my Vamo.
Any ideas for itaste SVD templates as well? I have one SVD which I would like to wrap as well.
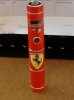
 Where'd you get the prancing horse? Is that a sticker?
Just finished dtessing my Vamo!
You certainly did the prancing horse proud!A hand drawn Ferrari emblem scanned to the computer. Used serif draw to add it to the vamo template. Used paint for the coloring of the background. Trimmed the jpg down so it could fit on 2 4X6 photo label postcards from Hammer Mill. Printed on my Lexmark printer. Cut out by hand with a box Knife and scissors and presto. Crazy Redhead!
Peraspera has done inlay work with some of her wraps, it looks like that will be your next challenge...to inlay the logo instead of laying it on top. Prancing Horse Club of America:Prancing Horse The classifieds can be fun to read through and create unattainable wish lists...Just finished dtessing my Vamo!
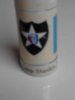
 Years ago, I was in the U.S. Army. In 1983 I was stationed at Camp Stanley, South Korea. This is my tribute to my service. their. Left side shows U.S. Flag next to the buttons and the led window as well as a 2nd ID logo on the lower battery extension. Top band shows unit affiliation of the 1/15 th FA. Section below the buttons shows the 1/15th FA crest. Right side shows South Korean Flag opposite the U.S. Flag along with another 2nd ID patch below on the battery extension. In the center of the battery extension is a map of South Korea detailing the U.S. Bases located in South Korea. The battery lid says "Camp Stanley South Korea 1983 - 84". I solved problems with the button fitment, used the suggested tip to use the DCT carto tank to punch out the fire button stated earlier in this thread. I used a tapered pick to punch out the smaller buttons and then shaved the tags that came out the back with a razor blade. but, I rushed cutting it out so it's not even on the backside.
  Left side
  Lower battery extension center
 Lower right battery extension.