For those that have a Bulli-Smoker A-2 type atomizer ... It is very easy to use the A-2 base and build an A-2TM and use it in genesis mode. Very inexpensive to do also. This is great for those that have an original A-2, some eGo cones (for pilfering the threading), some eGo Type B tanks, and a bunch of dead eGo/Riva batts or Smoktech DC cartomizers (for the tube), and the supplies to make a genesis wick laying around. The eGo cone threads onto the A-2 base, not perfectly, but well enough to be functional. So here goes:
1. You need an ego cone to acquire the threading as it also will fit the A-2 base.
2. You need Type B tanks (the soft/silicon cap variety work best IMO).
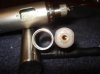
3. You need the A-2 base, with a Genesis coil setup leaving the wick a little long.
4. You need an old eGo batt tube, eGo mega atomizer, or type B atomizer.
5. Tools: Need something to cut tube with. I used a dremel to cut and finish the edges, and something to do a 1mm air hole in that batt tube. Scratch awl, 1mm drill bit, and dremel (Thanks Teach, cause this was my hardest problem - drilling that darn hole!).
To build:
1. Gut the eGo cone to get the threading out. I cut it slightly and used an old eGo batt to thread onto and pull the threading out.
2. Gut the eGo Type B atty, or an old eGo/Riva battery tube, or used DC cartomizer etc. I used a batt tube. Cut the tube section to be 25mm in length. Smooth edges, and clean it to get the grittys out.
3. Press the threads from eGo cone into your now 25mm long tube you just cut (don't glue it as you may want to adjust air hole location later).
4. Thread it onto the A-2 base.
5. Mark the cone for your air hole, it needs to be between the two posts for most vapor/flavor, or towards the tall post for more throat hit. (This is adjustable later if you need it to be, by pulling threading out and rotating to where you need it.) The whole also should be ~5-7mm above the bottom edge of tube on the threading side. Once you got it where you like it, I guess you could secure it with a dab of glue...
6. Drill your 1mm whole. Use scrawl awl to mark a start, then drill.
Build your genesis atomizer. See this:
http://www.e-cigarette-forum.com/forum/atomizer-mods/197617-bulli-a2-t-5.html#post3637188 (thanks!) I shoot for a ~2Ω coil as it works well on my eGo batts and my other mods.
Use:
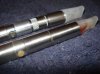
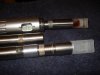
Now, first insert your juice filled (already pierced) type B tank into the 25mm tube non-threaded side (notice how nicely it seats). Carefully line your mesh up into the tank wicking hole, then seat and screw the tube & tank onto your A-2 atomizer base. Line up your tank for vaping preferences & vape!

Some things to note.
1. If the mesh is to wet, vapor production will fall off, I pull the cone/tank off and dry it a bit with some dry burns. This is a problem with a top fed genesis IMO - the wick gets to wet if left standing vertical - especially with PG, but it doesn't appear to be an issue with VG. I am not a VG fan, but like it on a genesis!
2. If throat hit is two harsh and vapor production is low, then air hole is not lined up most likely. Otherwise, check for a good coil resistance. Always check your coil resistance before using on an eGo batt or anything that doesn't have over-current protection! If flavor is strong, but vapor & throat hit is weak, then the wick is most likely to wet (See above).
I thought of using the eGo piercing needle to hold the wicking etc, but realized this was NOT necessary for a genesis SS mesh wick! What this means is the overall length is shorter then the regular A-2TM by about 5mm (pro) but it can't be used in type B tank mode with fiber wick either (con) like Cetin meant it to be. But it works great for genesis mode
")
Additional note: Use remaining batt tube and another eGo cone to acquire additional threads. Make a 21mm cover that attaches to outer eGo threads and covers the A-2 base for use on an eGo. Makes for a more aesthetic appearance if you are into that type of thing
Pics to follow as my camera is on the brink!